Teak furniture is one of those timeless investments that never really goes out of style. Whether it’s a classic outdoor dining set or a solid indoor coffee table, teak’s natural beauty and durability make it stand out. But here’s the thing: even teak, as tough as it is, eventually starts to show its age. Exposure to sun, rain, and daily use can leave it looking gray, stained, or just plain tired.
The good news? You don’t need to throw it away or spend a fortune on replacements. With the right approach, you can bring your teak back to life. In this guide, I’ll walk you through everything — from cleaning and restoring teak furniture to sanding, repairing, finishing, and maintaining it long-term. I’ll also share personal tips, expert insights, and even what to avoid so you don’t make common mistakes.
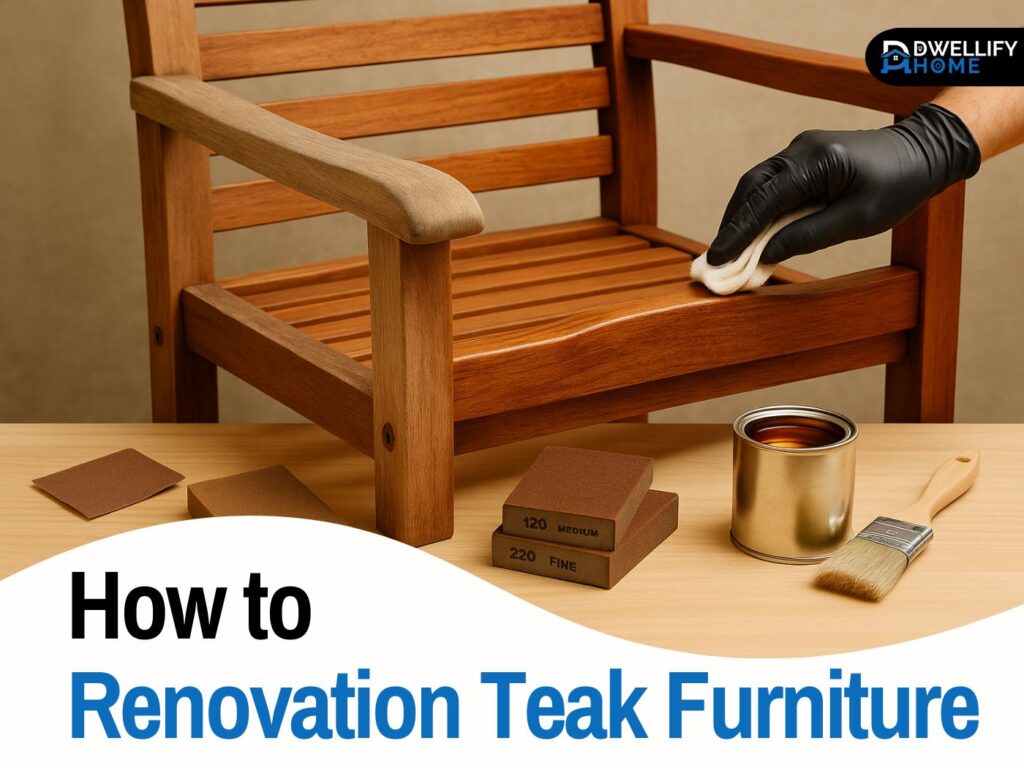
How to renovate teak furniture means restoring its natural beauty by cleaning, sanding, repairing, and applying oil or sealer. This process removes weathering, protects the wood, and extends the furniture’s lifespan indoors and outdoors.
Mission Statement
Our mission is to help homeowners and furniture lovers preserve the natural beauty of teak. By sharing expert-backed renovation tips and easy-to-follow methods, we aim to make restoration simple, affordable, and rewarding.
By the end, you’ll not only know how to renovate teak furniture, but you’ll also feel confident enough to do it yourself (and maybe even help a friend with theirs!).
Understanding Teak & Why Renovation Matters
Teak isn’t just any wood. It’s famous for its natural oils that resist moisture, bugs, and decay. That’s why shipbuilders used it for centuries and why high-end outdoor furniture brands still rely on it today. The natural golden-brown tone is gorgeous, but over time, exposure to sunlight and rain turns it into a silver-gray color. Some people love that weathered look, but others miss the warm, rich tones.
The thing is, even though teak is durable, it’s not maintenance-free. Without care, you’ll notice cracks, rough patches, or mildew spots. Indoor teak might not face harsh weather, but it still loses luster from dust, spills, or daily wear. That’s where renovation comes in — it restores both the beauty and strength of the wood.
Think of it like giving your furniture a spa day. With the right cleaning, sanding, and finishing, you’ll extend its lifespan for decades. And guess what? Renovating is usually cheaper than buying new — the cost to refinish teak furniture is often just a fraction of replacement.
Inspecting Your Furniture Before Renovation
Before you grab sandpaper or oil, take a moment to check what you’re working with. Every piece of teak is different.
- Check for structural issues: Look at joints, legs, and arms. Are they wobbly? Is there a crack that needs more than just surface care? If something looks loose, you might need structural repair teak furniture techniques like re-gluing joints or replacing hardware.
- Identify the current finish: Some teak is bare, while others may have oil, varnish, or sealer applied. If you see peeling or uneven patches, you’ll need to strip or sand more thoroughly.
- Indoor vs outdoor teak: Outdoor pieces usually look more weathered — gray, rough, maybe even greenish from algae. Indoor teak is often smoother but duller over time.
If you find severe damage (like deep cracks or rotting sections), that’s when calling a professional for teak furniture restoration near me might make sense. Otherwise, most surface issues can be handled DIY.
Tools, Materials & Safety Preparation
Here’s what you’ll need before starting:
- Cleaning tools: soft brush, mild soap, teak cleaner, sponge, water bucket
- Sanding gear: sandpaper (80, 120, 220 grit), sanding block, or orbital sander
- Finishing supplies: teak oil, sealer, or varnish (we’ll talk about which is best later), clean cloths, brushes
- Repair kit: teak-compatible wood filler, clamps, replacement screws, maybe a drill
- Optional: teak brightener (restores color after cleaning), wood glue
- Safety: gloves, eye protection, dust mask, drop cloths
Pro tip: Set up in a well-ventilated space, preferably outdoors or in a garage. You’ll make dust while sanding and need airflow when applying oils or sealers.
Cleaning & Restoring Teak Furniture
Cleaning is the first step, and honestly, it makes a bigger difference than most people expect. A good wash often brings out hidden color immediately.
- Remove surface dirt: Use a soft brush or cloth to wipe off dust and debris.
- Wash thoroughly: Mix mild soap or a teak-specific cleaner with water. Scrub gently along the grain. Avoid steel wool or harsh scrubbing pads — they can scratch.
- Rinse well: Use clean water to wash away any residue.
- Dry completely: Let the furniture air-dry before moving to the next step.
If you’re tackling mildew or stubborn stains, a diluted vinegar-water solution works wonders. For outdoor pieces, some people use a pressure washer, but be careful — too much pressure can rough up the grain.
Here’s a small trick: using a teak brightener after cleaning can instantly revive the golden tone. I’ve used it on a 10-year-old outdoor bench, and the difference was night and day.
Sanding Teak Furniture for a Smooth Finish
Here’s the part that takes a little muscle but pays off big. Sanding teak indoor furniture or outdoor pieces removes that gray, weathered surface and reveals fresh wood underneath.
- Start with coarse grit (80–120): This strips off the top gray layer.
- Move to medium (150): Smooths out rough spots.
- Finish with fine (220): Leaves a silky touch ready for oil or sealer.
Always sand with the grain, not against it, or you’ll leave scratches. For corners and carved details, a sanding sponge or detail sander works better than flat paper.
When I restored my own teak dining chairs, sanding was the step that made them look brand new. The gray faded away, and that rich honey color popped out again. Don’t skip cleaning the dust afterward — use a tack cloth or vacuum before applying any finish.
Renovating Teak Furniture Without Sanding
Now, what if you don’t want to sand? Maybe you don’t have the tools, or your furniture just needs a quick refresh. Here’s the good news: you can learn how to restore teak furniture without sanding by using special products.
- Teak restorers or oils: These penetrate and darken the wood, giving it back some of its golden glow.
- Teak brighteners: Apply after cleaning to instantly lift dull color.
- Sealants: Lock in the look and provide protection without heavy sanding.
The catch? Results won’t be as dramatic or long-lasting as a full sand-and-refinish. But for lightly weathered pieces or teak indoor furniture, it’s a time-saving alternative.
Repairing & Fixing Damaged Parts
Sometimes, renovation isn’t just about looks — it’s about keeping the furniture sturdy.
- Filling cracks: Use teak wood repair filler that blends with the grain.
- Replacing broken slats or arms: Always use teak if possible; mixing woods can look off.
- Tightening joints: A little wood glue or clamps can re-stabilize wobbly chairs.
- Hardware: Replace rusty screws with stainless steel to avoid stains.
Once, I restored an old teak coffee table with a crack running right down the middle. Instead of tossing it, I filled it with a high-quality wood filler, sanded it smooth, and finished it — today it looks like a rustic design element instead of damage.
Finishing Options: Oil, Sealer, or Natural Patina
This is where people often get stuck: teak sealer vs teak oil. Which is better?
- Teak oil: Enhances the rich golden look but needs regular reapplication. Great for indoor furniture.
- Teak sealer: Protects against UV and weather, lasting longer outdoors.
- Varnish: Provides a glossy, durable coat but can peel over time if not maintained.
Application tips:
- Work in thin coats, wiping excess with a cloth.
- Always follow the grain.
- Let it dry fully before using the furniture again.
On top of that, you don’t always have to apply anything. Some people prefer letting outdoor teak weather naturally into a silver-gray patina. Personally, I love the golden look, so I reapply oil every year to my teak chairs.
Cost & Time to Refinish Teak Furniture
Here’s the good part: the cost to refinish teak furniture is way less than buying new.
- DIY supplies usually cost $30–$80 depending on products.
- Hiring a professional for a chair might be $100–$150, while a full dining set can go up to $500–$1,000.
- Time-wise, expect 1–2 hours for a chair, 3–5 hours for a large table, not including drying.
So if you’re willing to put in the effort, DIY wins on cost. But if your teak is severely damaged or you just don’t have the time, professional restoration is a safe bet.
Maintaining Teak Furniture After Renovation
Renovation isn’t the end — maintenance keeps that fresh look.
- Clean gently every few weeks.
- Reapply oil or sealer every 6–12 months depending on weather exposure.
- Cover outdoor furniture during rain or winter.
- Wipe spills quickly on indoor pieces.
Here’s my tip: keep a small kit with teak restorer tools handy (brush, cloth, oil). Quick touch-ups prevent bigger jobs later.
Common Mistakes to Avoid
I’ve seen (and made) these mistakes myself:
- Over-sanding until the wood becomes uneven.
- Using regular oils (like linseed) instead of teak-specific products.
- Applying finishes on damp wood — it never sticks right.
- Forgetting to wipe off excess oil, which leaves sticky patches.
Avoiding these mistakes saves you frustration and extends the life of your work.
Expert & Advanced Tips for Better Results
- Use marine-grade sealers if your furniture sits in harsh outdoor conditions.
- Treat end-grain (cut edges) with extra oil since they absorb more moisture.
- Combine sanding with brighteners for faster results.
- Borrow ideas from boatbuilders: they’ve been keeping teak looking good for centuries.
Indoor vs Outdoor Teak Care
How to restore teak indoor furniture: Usually less work. A light clean and oiling is often enough. Indoor pieces don’t face UV, so oils last longer.
How to restore teak outdoor furniture: Needs stronger protection. Sealers or varnish may be better than oil alone. Also, always cover or store furniture in extreme weather.
One of my outdoor benches lives under direct sunlight — I learned the hard way that oil alone wasn’t enough. After switching to a sealer, it holds up beautifully year-round.
Finding Professional Help & Quality Products
If DIY isn’t for you, search for “teak furniture restoration near me.” A good professional can save time and deliver a flawless finish. Ask for:
- Before/after photos of past work
- A clear quote
- Type of products they use
For DIY, stick to trusted brands of teak oil, sealers, and cleaners. Don’t cheap out — quality products last longer.
Step-by-Step Quick Guide (Visual Snippet)
Step 1: Clean teak with mild soap or teak cleaner.
Step 2: Sand gently along the grain (80–220 grit).
Step 3: Repair cracks or loose joints.
Step 4: Apply teak oil or sealer for protection.
Step 5: Maintain with regular cleaning and re-finishing.
FAQs
Q1: Can I restore teak furniture without sanding?
Yes. You can use teak restorers, oils, and brighteners after cleaning. However, sanding gives longer-lasting results by removing the weathered surface.
Q2: What’s better for finishing teak – oil or sealer?
Use oil for indoor teak (enhances golden color) and sealer for outdoor teak (longer UV and weather protection).
Q3: How much does it cost to refinish teak furniture?
DIY costs about $30–$80 for supplies. Professional restoration ranges from $100 per chair to $1,000+ for large sets.
Q4: How often should I maintain teak furniture?
Clean every few weeks and reapply oil or sealer every 6–12 months, depending on indoor or outdoor use.
Q5: Is it okay to leave teak untreated?
Yes. If left untreated, teak naturally turns silver-gray. Some people prefer this look, though it offers less protection against cracks and weathering.
Conclusion
Renovating teak furniture isn’t rocket science — it’s about patience, the right tools, and a little know-how. Start with cleaning, decide if sanding is needed, repair cracks if you see them, and finish with oil or sealer. That’s the recipe.
Here’s the best part: once you’ve done it once, you’ll realize it’s actually pretty enjoyable. Watching that dull gray turn into warm honey-brown feels rewarding. Plus, you’ll extend the life of furniture that could easily last another 20 years.
So the next time you look at your old teak chair or table, don’t think “time to replace it.” Think, “time to give it a fresh start.” With this guide, you now know exactly how to renovate teak furniture like a pro.
Disclaimer
This article provides general information on how to renovate teak furniture for educational purposes. Results may vary depending on furniture condition, tools, and products used. Always follow product instructions and seek professional help for severe structural damage.

I’m Bilal, the founder of Dwellify Home. With 6 years of practical experience in home remodeling, interior design, and décor consulting, I help people transform their spaces with simple, effective, and affordable ideas. I specialize in offering real-world tips, step-by-step guides, and product recommendations that make home improvement easier and more enjoyable. My mission is to empower homeowners and renters to create functional, beautiful spaces—one thoughtful update at a time.