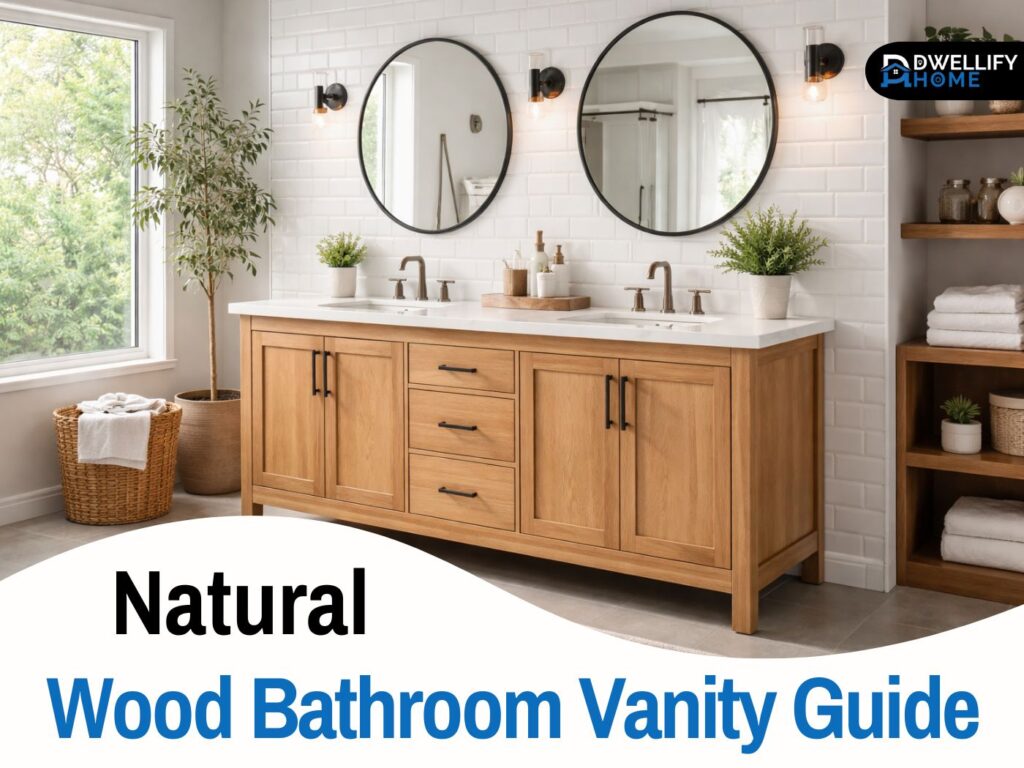
A natural wood bathroom vanity can make a bathroom feel warmer and more lived-in instantly. I’ve used wood vanities in tiny powder rooms, busy family bathrooms, and calm spa-style masters, and the difference is always noticeable. Wood brings softness to hard surfaces like tile, stone, and glass.
Here’s the thing, wood in a bathroom isn’t a set-it-and-forget-it choice. Humidity, splashes, and daily routines matter. In this guide, I’ll walk you through the same steps I use with clients so you end up with a vanity that looks beautiful and holds up for years.
Snippet-ready definition:
A natural wood bathroom vanity is a sink cabinet made with real wood or wood veneer that highlights the grain. With proper sealing and ventilation, it adds warmth, storage, and a timeless look to bathrooms.
Mission Statement:
At Dwellify Home, our mission is to help you create a home that feels calm and functional through practical design guidance, honest material advice, and real-world tips you can actually use.
What “natural wood” really means (so you don’t buy the wrong thing)
When people say “natural wood,” they usually mean one of three things. First is real wood with a clear protective finish that lets the grain show. Second is real wood that’s lightly stained to look “natural.” Third is a wood-look finish that mimics wood grain but isn’t actually wood.
The best part is, none of these are automatically bad. A wood-look option can be smart in a very humid bathroom. But if you want the real texture and depth of wood grain, you’ll want to confirm what you’re buying. Look for terms like solid wood frame, real wood veneer, and the type of topcoat used.
A quick tip from installs: open the spec sheet or product details and check materials for the cabinet box, doors, and drawer fronts. Some vanities are solid wood on the face but use engineered wood for the box, which is common and often fine if it’s well sealed.
Quick Guide Table (sizes, fit, and what to expect)
| Vanity size | Best for | Typical setup | What it feels like day to day |
| 24 inch (natural wood bathroom vanity 24 inch) | Powder rooms, very small baths | Single sink | Minimal counter space, small storage, clean look |
| 30 inch (wood vanity bathroom 30 inch) | Small full bathrooms | Single sink | Better usability than 24 inch, still compact |
| 36 inch (wood vanity bathroom 36 inch) | Most standard bathrooms | Single sink | Comfortable counter space, better drawer options |
| 48 inch (natural wood vanity 48) | Shared baths, larger layouts | Single sink or double depending on design | Big storage boost, more breathing room on the counter |
Single vs double quick note
- Single natural wood bathroom vanity: great when you want more counter space or you’re working with a smaller room.
- Double natural wood bathroom vanity: best when two people truly get ready at the same time and you have the width to spare.
Step-by-step: How to choose the right one (simple and practical)
- Measure width and depth (and tape the footprint on the floor if you can).
- Decide single vs double based on your morning routine, not just the look.
- Pick a wood look that matches your vibe: oak, walnut, maple, birch, teak.
- Confirm construction: solid frame, good drawer boxes, smooth slides.
- Choose the sink style: wood bathroom vanity with sink can be integrated, undermount, or vessel.
- Match a countertop you’ll actually enjoy living with (quartz is low-fuss, marble is higher-care).
- Check moisture protection: sealed edges, sink cutout protection, and a bathroom fan that works.
Quick buying checklist (the 60-second decision framework)
Before we go deep, this is the fast checklist I run through on site:
- Size: Does the width and depth fit without crowding the room?
- Single or double: Do you need one sink or two for your routine?
- Wood type: Is the species known to behave well in moisture?
- Finish: Is it sealed properly, especially around edges and sink areas?
- Sink and top: Is the countertop practical for your daily use?
- Storage: Are drawers laid out for what you actually store?
- Install reality: Does plumbing line up and does the wall support the vanity?
If you can answer those clearly, you’re already ahead of most buyers.
Choosing the right vanity size (with real-life fit tips)
Vanity size isn’t just about what looks balanced on a website. It’s about how you move in the bathroom and whether doors and drawers open without bumping into anything. In real projects, I’ve seen a “perfect” vanity become annoying because the depth blocked a walkway or the door hit the toilet.
Start with width and then check depth. Depth often gets overlooked, but it affects comfort and space more than people expect. Also leave breathing room for towel bars, cabinet doors, and cleaning access.
Most-searched sizes and where they work best
natural wood bathroom vanity 24 inch is ideal for powder rooms and very small bathrooms. You’ll get a sink and a little storage, but you’ll want to be thoughtful about what goes inside.
wood vanity bathroom 30 inch works well in small full bathrooms. It’s a sweet spot when a 24 inch feels tight, but you still need space for the toilet and shower swing.
wood vanity bathroom 36 inch is one of the most comfortable single-sink sizes. You get decent counter space, better drawer options, and it usually looks proportionate in most standard bathrooms.
natural wood vanity 48 is great when you want extra storage and counter space, or when two people share a bathroom but don’t need two sinks. I’ve designed a lot of 48-inch setups with one sink and generous counter space, and clients love it.
Practical measuring tip: mark the vanity footprint on the floor with painter’s tape. Then open the door and stand where you’d normally brush your teeth. If it feels cramped now, it will feel worse later.
Single vs double vanity (pick what matches your routine)
A single natural wood bathroom vanity makes sense when space is limited or when plumbing changes would be costly. It also works well when one person is the main user, or when you prefer more counter space instead of a second sink.
A double natural wood bathroom vanity is a lifestyle decision. If two people get ready at the same time most mornings, a double can reduce daily friction. But it isn’t always the best use of space. Two sinks usually mean less drawer storage and more plumbing, which can limit deep drawers.
Here’s what I tell clients: choose double only if you will truly use it. Otherwise, a larger single with smart storage often feels more luxurious day to day.
Best wood types for a bathroom vanity (looks + humidity performance)
Not all wood behaves the same in a humid room. Some species are more stable, some dent easier, and some naturally handle moisture better. This is where a little knowledge saves you from long-term headaches.
Oak is a workhorse. White oak is especially popular because it has a calm grain and tends to handle moisture better than many people expect when it’s properly finished. Walnut is richer and darker, and it gives an upscale look fast, but you’ll want to protect it well and wipe splashes quickly.
Maple and birch are often used for a cleaner, lighter look. They can be great choices when you want a bright bathroom, especially with warm metal hardware. Teak is the moisture superstar, but it often costs more. If your bathroom has poor ventilation, teak can be a smart investment.
Design tip: if you want a light wood look, choose a wood species that looks good in lighter tones rather than forcing a dark wood to be stained light. It tends to look more natural and age better.
Solid wood vs veneer vs engineered wood (how to judge quality fast)
People often assume “solid wood” equals best, but the truth is more nuanced. A well-built vanity with a solid wood frame and quality veneer panels can outperform a poorly built all-solid unit, especially in humid environments. Wood moves with moisture, so stable construction matters.
If you’re considering a set labeled solid wood bathroom vanity with sink, check what parts are actually solid. Look for solid wood in door frames and face frames, and quality plywood or engineered panels where stability is needed. Avoid vanities with thin particle board in wet zones unless the sealing is exceptional.
Quick quality checks I use in person:
- Open and close drawers. They should glide smoothly with no wobble.
- Look at the inside corners and edges. Sealed edges matter more than fancy marketing.
- Check hardware. Soft-close hinges and drawer slides are a good sign of thoughtful build quality.
- Peek under the sink area. Clean cutouts and sealed surfaces usually mean better manufacturing.
Moisture protection (the #1 factor for long-term durability)
Bathrooms are tough on wood because water isn’t the only issue. Steam from showers, temperature swings, and damp towels create constant moisture exposure. A vanity can look perfect at install and still develop swelling edges if it’s not protected properly.
The most vulnerable places are edges, seams, and the sink cutout area. I always recommend wiping standing water quickly and keeping ventilation consistent. Even a great fan needs enough runtime. Many of my clients see real improvement when they run the fan for 15 to 20 minutes after a shower.
Also check the plumbing. A slow drip under the sink can ruin wood over time. I’ve seen tiny leaks cause more damage than years of normal splashes.
Finish options that protect wood without hiding the “natural” look
A clear protective topcoat can keep the wood’s character while shielding it from moisture. Matte finishes look modern and hide fingerprints better, but they can show water spots if the coating isn’t strong. Satin is often a safe, forgiving middle ground.
If you love a raw-looking finish, make sure it’s still sealed. The look can be “natural,” but the protection needs to be real.
Choosing a vanity with the right sink setup
A wood bathroom vanity with sink can be convenient, especially for first-time bathroom updates. The key is checking whether the sink is integrated, undermount, or a vessel, because each changes cleaning and splash behavior.
Integrated sinks are easy to clean because there are fewer seams. Undermount sinks look clean and modern, but you want a properly sealed joint where the sink meets the counter. Vessel sinks can look stunning, but they can splash more and they often need more daily wiping.
One more practical detail: make sure the faucet setup matches your sink and countertop. If you’re switching from a widespread faucet to a single-hole faucet, you may need an extra plate or a different countertop drilling.
Countertop pairing (looks great + stays practical)
Countertops make a big difference in how “easy” a vanity feels day to day. Quartz is popular because it’s durable and low maintenance. It tends to handle makeup spills and water drops without constant worry.
Marble is beautiful and timeless, but it can stain or etch. I still use it in projects, but only when the client is comfortable with gentle maintenance. Solid-surface options can be a good middle ground, especially for busy bathrooms.
Backsplashes and sidesplashes are not just decorative. They protect walls from water marks. If your sink is near a wall, adding at least a small backsplash can save you repainting later.
Style guide: how natural wood vanities change the whole bathroom look
Natural wood pairs beautifully with clean tile and soft lighting. In modern bathrooms, a floating wood vanity can make the room feel larger and lighter. In classic spaces, shaker-style wood vanities feel calm and timeless.
If you like a spa feel, pair light wood with warm whites, stone textures, and soft brass or brushed nickel hardware. For a bolder look, walnut wood with matte black hardware can feel dramatic without looking harsh.
A trick I use often: match the undertone. If your wood leans warm, keep nearby whites warmer too. If the wood is more neutral, you have more flexibility. This small detail is what makes a bathroom look “designed,” not accidental.
Storage features you’ll appreciate every day
Storage is where you feel the difference between a pretty vanity and a great one. Drawers are usually more useful than shelves because you can access everything without digging.
Look for drawer layouts that fit your routine. Deep drawers work well for hair tools and bottles. Top drawers with a plumbing cutout can still be useful for small items if they’re well organized.
Small features that matter more than you think:
- Soft-close drawers reduce wear and keep things quiet
- Full-extension slides let you reach the back without struggling
- A toe-kick that’s comfortable can make daily use nicer, especially in smaller bathrooms
Installation and delivery prep (avoid expensive surprises)
A vanity can be the right size and still become a headache if plumbing and wall conditions aren’t considered. Before ordering, measure where the drain and water lines sit. If you’re changing vanity size, you may need minor plumbing adjustments.
Floating vanities look amazing, but the wall must support them properly. That usually means secure mounting into studs or a reinforced wall. I always recommend professional help for floating installs unless you’re very comfortable with wall anchoring and leveling.
Delivery tip: inspect the vanity before signing off. Check corners, edges, drawer alignment, and the countertop surface. If something is damaged, it’s much easier to address before installation begins.
Care and maintenance (keep it looking natural for years)
Daily care is simple. Wipe water spots and toothpaste splashes with a soft cloth. Avoid harsh cleaners, especially anything abrasive. Mild soap and water is usually enough.
Weekly, take a quick look under the sink for any moisture. It sounds basic, but it prevents most long-term damage. If you ever notice the finish dulling around the sink, that can be an early sign it’s time for a touch-up.
If you see water spots, don’t panic. Often a gentle cleaner and a dry cloth solve it. If you see swelling or peeling, check for leaks and improve ventilation first. Fixing the cause matters more than covering the symptom.
Price and value (what actually drives cost)
Cost usually comes down to size, wood species, construction quality, and countertop choice. A 24-inch vanity can be affordable, but a higher-quality finish and better drawers may raise the price. A larger vanity like a 48-inch model costs more simply because there’s more material and often more storage hardware.
Where I recommend spending:
- Quality sealing and finishing
- Good drawer slides and hinges
- Solid face frame and sturdy drawer boxes
Where you can save:
- Super trendy details that don’t improve durability
- Overly complex sink shapes that are harder to clean
Common mistakes to avoid (short but high-impact)
One mistake I see often is buying a vanity before measuring door swings and walkways. Another is choosing a wood finish that looks beautiful in photos but isn’t well sealed in real life.
Also, don’t underestimate ventilation. Even the best wood won’t love a bathroom that stays damp for hours. A good fan and simple habits protect your investment more than any product label.
Finally, think about how you live. A pristine white marble top can be amazing, but if your bathroom is a high-traffic zone, quartz might make you happier every day.
FAQs (keep this tight, high-intent)
Is a natural wood bathroom vanity okay for humid bathrooms?
Yes, when it’s properly sealed and the bathroom has decent ventilation. The finish and your habits matter a lot.
What vanity size is best for a small bathroom?
A 24-inch or 30-inch vanity often works well. The best choice depends on depth and walkway space too.
Is solid wood always better than veneer?
Not always. A well-built vanity with quality veneer and stable construction can perform very well in bathrooms.
What’s easiest to maintain: quartz or marble?
Quartz is generally easier. Marble is beautiful but needs more careful cleaning and can etch.
How do I prevent water staining on wood?
Wipe splashes quickly, run the fan after showers, and avoid harsh cleaners that weaken the finish.
Conclusion
Choosing the right vanity gets much easier when you follow a simple path: start with size, decide on single or double, pick a wood species that fits your style and moisture reality, then focus on sealing, sink setup, storage, and installation.
If you want a quick recap, here’s the formula I use on real projects: Size → Sink count → Wood type → Finish protection → Countertop practicality → Storage layout → Installation prep. Follow that, and you’ll end up with a bathroom vanity that feels good every single day, not just on installation day.
Disclaimer:
This article is for general informational purposes only. Bathroom measurements, plumbing, and installation requirements vary by home. Always follow the manufacturer’s instructions and consult a qualified contractor or plumber for structural or plumbing changes.

I’m Bilal, the founder of Dwellify Home. With 6 years of practical experience in home remodeling, interior design, and décor consulting, I help people transform their spaces with simple, effective, and affordable ideas. I specialize in offering real-world tips, step-by-step guides, and product recommendations that make home improvement easier and more enjoyable. My mission is to empower homeowners and renters to create functional, beautiful spaces—one thoughtful update at a time.