When I walk into a home office for the first time, I can usually tell within a minute whether it’s going to support focus or fight it. The difference isn’t expensive furniture. It’s planning. A functional workspace has a calm layout, good lighting, a chair that actually supports your back, and a setup that doesn’t make you reach, squint, or hunch for hours.
In this guide, I’ll walk you through how to set up a home office step by step, the same way I do with clients who work from home full-time, run small businesses, or just need a reliable spot to handle life admin. You’ll end up with a space that’s practical, tidy, and easy to maintain.
Snippet-ready definition:
Setting up a home office means creating a dedicated work zone at home with the right desk, chair, lighting, and tech. People do it to stay comfortable, reduce distractions, and work more productively every day.
Mission Statement:
At Dwellify Home, our mission is to help you create spaces that feel calm, functional, and personal, with practical design advice you can actually use, whether you’re upgrading one corner or redesigning a whole room.
Quick Guide Table: Home Office Setup at a Glance
| Setup area | What to do | Why it helps |
| Location | Pick the quietest spot you can claim | Fewer interruptions, better focus |
| Desk placement | Put natural light to the side, not behind you | Reduces glare and video-call shadows |
| Chair ergonomics | Adjust seat height, lumbar support, armrests | Less back and neck strain |
| Monitor height | Top third of screen near eye level | Prevents “looking down” posture |
| Lighting | Use layered light: room light + task lamp | Less eye strain, better comfort |
| Tech basics | Add a dock or hub if you use monitors | Cleaner setup, fewer cable hassles |
| Storage | Use one drawer or shelf system | Keeps the desk clear and workable |
| Cable management | Add clips or an under-desk tray | Reduces clutter and stress |
Simple step-by-step setup (clean and practical)
- Choose your work zone and set a boundary (even a small corner works).
- Place the desk where lighting is comfortable and glare is minimal.
- Set up your ergonomic chair first, then match desk and keyboard position.
- Add your monitor or laptop stand and fix screen height.
- Layer your lighting (daylight plus a task lamp for evenings).
- Organize storage and route cables so the desk stays easy to reset.
Step 1 — Choose the Right Spot (Location, Layout, and Boundaries)
Start with the quietest location you can realistically claim. A dedicated room is great, but it’s not required. I’ve set up productive workspaces in corners of living rooms, spare bedrooms, and even wide hallway nooks. What matters most is that your brain learns, “When I sit here, it’s work time.”
If you can, pick a spot with some natural light. A desk near a window tends to feel less draining over long days, as long as you manage glare. If the window is to the side of your monitor rather than directly behind it, you’ll usually get the best balance.
Placement matters more than people think. A simple rule I use often is: sit with your back to a wall if possible, and face toward the room or doorway. It feels more secure and reduces that low-level “someone’s behind me” tension that can distract you.
If you’re in a shared home, boundaries keep the peace. A folding screen, a bookshelf used as a divider, or even a small rug under your chair can visually mark your work zone. One of my favorite real-world fixes is a “start and stop ritual,” like turning on a desk lamp at the beginning of the day and switching it off when you’re done. It sounds small, but it helps work-life separation more than you’d expect.
Step 2 — Home Office Setup Checklist (Essentials You Actually Need)
Before you buy anything, make sure you have the basics covered. This home office setup checklist keeps you focused on what genuinely improves comfort and productivity.
- A supportive ergonomic chair with adjustable height and lumbar support
- A desk with enough surface area for your daily tasks
- Lighting: natural light plus a task lamp for evenings
- A stable internet connection and a sensible power setup
- A monitor or two, depending on your work
- Laptop or desktop, plus a dock or hub if you use multiple devices
- Keyboard and mouse that feel comfortable for long sessions
- Storage for papers and supplies (even minimal storage helps)
- Cable management tools (clips, a tray, or simple ties)
- Video call basics: clean background, decent camera angle, good lighting
If your setup is messy, you’ll feel it every day. The goal is a space that stays easy to use without constant resetting.
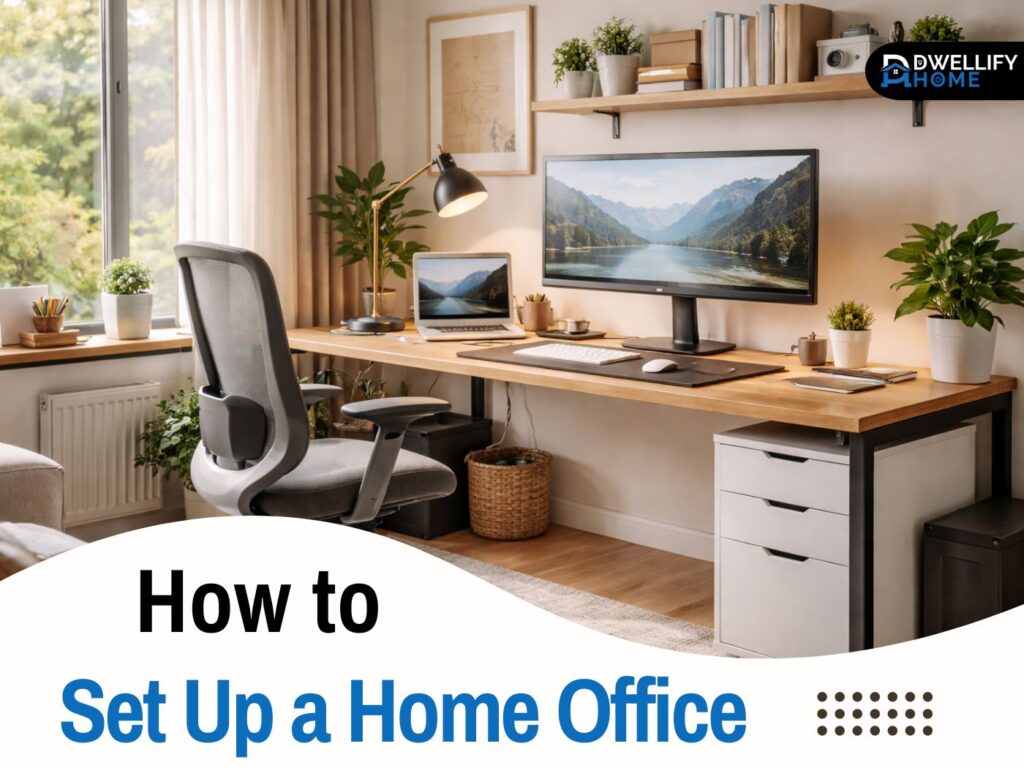
Step 3 — Desk Setup That Fits Your Space (Comfort + Workflow)
Your home office desk setup should match the way you work. If you mostly type, your keyboard and mouse should live in the center zone. If you sketch, read, or review documents, you’ll want more open surface area and fewer fixed items in front of you.
Desk size is often the hidden problem in small homes. A desk that’s too narrow forces clutter, and clutter turns into friction. If your space is tight, choose a slightly deeper desk over a longer one. Depth gives you room for a monitor at a comfortable distance, plus a small working area in front.
A clean layout matters more than decoration. I usually recommend keeping only three “always-on” items on the desktop: your screen, your input tools (keyboard and mouse), and one lighting source. Everything else should have a home, even if it’s a simple tray or drawer. That “less is more” approach is one reason the best home office setup for productivity often looks calm, not crowded.
Step 4 — Ergonomics First (Chair, Posture, and Healthy Sitting)
The chair is not the place to cut corners if you work from home regularly. I’ve helped clients troubleshoot headaches, neck tension, and lower back pain that were caused by nothing more than a chair that couldn’t adjust properly.
Ergonomic chair setup (how to adjust height, arms, and lumbar support)
Set chair height so your feet rest flat on the floor and your knees are close to a 90-degree angle. Your lower back should feel supported, not pushed forward aggressively. Armrests should support your elbows lightly, without forcing your shoulders up. If your shoulders rise, the armrests are too high.
If you’re shorter or your desk is tall, a simple footrest can make a big difference. I’ve even used a sturdy, flat box temporarily when testing heights, then upgraded clients later.
Desk height + posture basics (wrists, elbows, screen height, feet support)
When your hands are on the keyboard, your elbows should sit around 90 degrees, with your wrists neutral rather than bent up. If you’re typing on a laptop all day, you’ll almost always end up looking down, which strains the neck. That’s why adding a monitor or at least a laptop stand often improves comfort quickly.
A sit-stand desk can be a helpful upgrade, but only if you’ll use it. If you try one, keep it simple: stand for a few short blocks during the day rather than trying to stand for hours. Comfort comes from variety, not extremes.
Step 5 — Monitor Setup (Laptop-Only vs Laptop + Monitor vs Multiple Monitors)
A solid screen setup reduces fatigue, improves posture, and makes work feel smoother. In real client homes, this is often the single most noticeable upgrade.
Home office setup with laptop and monitor (ideal positioning + why a dock helps)
If you use a laptop, pairing it with a monitor is usually the sweet spot. A 25 to 27 inch monitor is a practical size range for most desks because it’s large enough to reduce squinting without overwhelming the space. Place the top third of the screen around eye level, and sit far enough back that you’re not leaning forward.
A USB-C or Thunderbolt dock can simplify everything. With one cable, you can charge your laptop and connect your monitor, keyboard, mouse, and even ethernet. It also makes it easier to pack up when you work from different rooms.
Home office setup with multiple monitors (simple layout rules for focus)
Two monitors can be great for spreadsheets, editing, research, and multitasking. Keep your primary screen directly in front of you, and place the second screen slightly to the side at a gentle angle. If both screens are used equally, center them together so your head stays aligned most of the day.
Monitor arms are a practical accessory because they free up desk space and make it easier to dial in the right height. They’re especially useful when your desk is shallow or you share the desk with other household needs.
Step 6 — Lighting That Prevents Eye Strain (and Looks Good on Calls)
Lighting is one of the most overlooked parts of a home office setup, and it affects energy more than people realize. I’ve seen clients feel noticeably better just by changing the direction of a lamp and reducing glare on the screen.
Use natural light whenever possible, but keep it controlled. If sunlight hits your screen directly, you’ll end up squinting or turning up brightness too high. Simple solutions include a sheer curtain, blinds, or shifting your monitor slightly so the window is to the side.
For evenings, think in layers. You want general room light plus a task lamp that brightens your work area. A desk lamp aimed at your workspace, not your screen, prevents reflections. For video calls, a soft light facing you can help, even if it’s just a small lamp placed behind your monitor. It makes your face look clearer and reduces harsh shadows.
Step 7 — Tech Setup for Reliability (Docking, Power, and Daily Flow)
Tech problems break focus quickly, so aim for a setup that feels predictable. If your work involves calls, uploads, or client communication, reliability matters just as much as style.
A docking station or multi-port hub reduces daily friction. It keeps your desk cleaner, and it prevents the constant unplugging and replugging that wears out cables. If you’re using a laptop, make sure you have enough ports for your monitor, charging, and any accessories you rely on.
Power deserves a little thought too. Use a surge-protected power strip and position it where you can reach it without crawling under the desk. In homes with unstable power, a UPS can protect your work and give you a few minutes to save files and shut down safely.
If you want a “2026-ready” setup, the best approach is still minimal. One reliable monitor, a comfortable input setup, tidy cable routing, and good lighting will do more for your day than piling on gadgets.
Step 8 — Storage, Organization, and Cable Management (Clean Desk, Clear Mind)
Organization isn’t about being perfect. It’s about making your desk easy to reset in two minutes. That’s one of the biggest differences I see between a workspace people love and one they avoid.
Start with storage that matches your habits. If you deal with paper, give it a clear system: an inbox tray, a file folder, and a spot for supplies. If you don’t use paper much, keep storage minimal and focus on drawer space for chargers, notebooks, and small items.
Cable management is a small effort with big payoff. My go-to fixes are:
- A cable tray under the desk for power strips and adapters
- Clips along the back edge to guide charging cables
- A label on each cable if you frequently unplug things
A tidy cable setup reduces visual clutter, makes cleaning easier, and helps your desk feel calmer.
Step 9 — Home Office Setup Accessories That Improve Productivity
Accessories are worth it when they solve a real problem. These are the home office setup accessories I recommend most often because they support comfort and workflow.
- A monitor arm or monitor riser if your screen sits too low
- A laptop stand if you use your laptop as a secondary screen
- Noise-canceling headphones if your home is lively
- A desk mat if your surface is reflective or uncomfortable
- A simple webcam light or lamp placement adjustment if you do frequent calls
You don’t need all of these. Pick the ones that remove the biggest daily annoyance first.
Step 10 — Personalize Without Clutter (Focus, Comfort, and Motivation)
Home office setup ideas work best when they’re practical. Personal touches should help you feel settled, not surrounded by distractions. A plant, one piece of art, and a tidy pinboard can make the space feel like yours without filling every surface.
For focus, try designing for fewer interruptions. If you’re in a shared space, face away from the busiest walkway if possible. Use a small signal that you’re working, like headphones on, a closed door, or a desk light turned on. These cues train both you and the people around you.
For video calls, your background is part of your workspace. Keep it simple and intentional. A plain wall, a bookshelf, or a tidy corner with a plant usually looks professional. Avoid a bright window directly behind you, because it turns you into a silhouette on camera.
Step 11 — Budget-Friendly Options (Including an IKEA-Style Approach)
You can build a strong setup without spending a lot, as long as you prioritize the right items. I often plan budgets in tiers so clients can improve comfort in steps.
Starter setup: a stable desk surface, a basic but supportive chair, a task lamp, and good cable routing. Add a laptop stand if you’re typing for hours.
Mid-range upgrades: a better ergonomic chair, a 25 to 27 inch monitor, and a dock or hub. This is also where a monitor arm can be worth it.
Premium comfort upgrades: a higher-quality chair, a sit-stand desk, and a refined lighting setup.
If you like the home office setup IKEA approach, think modular. Mix a simple desk with practical storage like drawer units or shelves that can move with you. This style works especially well in small apartments because it’s flexible and easy to adjust when life changes.
Common Home Office Setup Mistakes (Quick Fixes)
I see these issues all the time, even in beautifully decorated rooms.
One mistake is buying gear before planning the space. Fix it by mapping your daily tasks first, then choosing the desk size and layout that supports them.
Another is working laptop-only for months. If you can’t add a full monitor yet, at least raise the laptop and use an external keyboard and mouse. Your neck will thank you.
Lighting errors are common too. If your eyes feel tired, check for glare, harsh overhead lighting, or shadows on your desk. A simple lamp shift can solve it.
Finally, the biggest long-term problem is no boundary between work and home. Even in a shared space, a small “work zone” with a clear start and stop routine protects your focus and your downtime.
Quick FAQ
1) What is the best way to set up a home office?
Start with a quiet spot, then prioritize an ergonomic chair, proper monitor height, and good lighting. Finish with storage and cable management so the space stays tidy and easy to use.
2) How much money do you need to start a home office?
You can start small with a basic desk surface, a supportive chair, and a task lamp. Most people see the biggest comfort improvement by upgrading the chair and adding a monitor when possible.
3) What is needed for a home office setup?
At minimum: a desk, an ergonomic chair, reliable internet, good lighting, and your computer. For long work sessions, add a monitor or laptop stand, plus a keyboard and mouse.
4) What are the three types of offices?
Common types are: a dedicated private office room, a shared or open-plan workspace (like a corner of a living room), and a hybrid setup (flexible space used for multiple purposes).
5) Where should I place my desk in a home office?
Ideally near a window with light coming from the side, not directly behind or in front of your screen. If possible, sit with your back to a wall and face into the room for fewer distractions.
Conclusion
A good home office isn’t about copying a picture online. It’s about building a setup that fits your space, your body, and your daily work. Start with location, then lock in chair comfort, screen height, and lighting. After that, tidy your cables and add storage that keeps your desk easy to reset.
If you follow the steps in this guide on how to set up a home office, you’ll end up with a workspace that feels calmer, works better, and supports your focus day after day.
Disclaimer
This article is for general information and home setup guidance only. It isn’t medical or ergonomic treatment advice. If you have pain, injury, or specific health needs, consider consulting a qualified professional.

I’m Bilal Hassan, the founder of Dwellify Home. With 6 years of practical experience in home remodeling, interior design, and décor consulting, I help people transform their spaces with simple, effective, and affordable ideas. I specialize in offering real-world tips, step-by-step guides, and product recommendations that make home improvement easier and more enjoyable. My mission is to empower homeowners and renters to create functional, beautiful spaces—one thoughtful update at a time.