If you’ve ever tried to tame a sloped yard, you already know it can feel like the land has a mind of its own. Soil slides, water cuts paths you never asked for, and the space becomes hard to use. That’s why many homeowners decide to build a retaining wall on a slope, especially when they want more usable space for gardens, patios or walkways.
I’ve spent years building these walls for clients in different landscapes, and let me tell you, the trick isn’t strength alone. It’s all about controlling water, creating a stable foundation and letting the wall work with the slope rather than against it. So in this guide, I’ll walk you through everything step-by-step, just like I would if you were standing next to me on site. And since you’re reading this on Dwellify Home, you’re already in the right place to plan a beautiful and long-lasting outdoor upgrade.
Short Intro about How to Build a Retaining Wall on a Slope:
Learning how to build a retaining wall on a slope starts with a level base, proper drainage and the right materials. These steps keep the wall stable, safe and long lasting even in tricky yards.
Mission Statement
Our mission is to guide homeowners with clear, practical and trustworthy advice so they can build safe, durable and beautiful outdoor spaces. Every guide we share aims to simplify complex projects and empower you to upgrade your home with confidence.
When You Actually Need a Retaining Wall on a Slope
Before picking up a shovel, it’s important to understand whether you truly need a wall. Here’s the thing: not every slope requires one. Sometimes reshaping the soil or creating gentle terraces is enough. But if you’re dealing with erosion, soil that washes down after heavy rain or a yard that’s too steep to use comfortably, then a retaining wall can make a world of difference.
I’ve worked on yards where homeowners struggled for years with muddy patches and cracked edging because the slope kept shifting. Once we added a proper wall, everything settled and the space became easier to maintain. If your slope is very steep or the soil feels loose, it’s smart to consult a professional for safety reasons. Taller walls often need engineering approval, and it’s better to know that upfront.
Quick Guide Table: Building a Retaining Wall on a Slope
| Step | What to Do | Why It Matters |
| 1. Plan | Mark layout, measure height, check permits | Avoid future problems |
| 2. Dig Trench | Create a wide, level, stepped trench | Gives the wall stability |
| 3. Add Base | Fill with compacted gravel | Supports the first course |
| 4. Build Wall | Stack courses and stagger joints | Prevents shifting |
| 5. Add Drainage | Pipe, gravel and fabric | Stops water pressure damage |
| 6. Reinforce | Geogrid or tiebacks if needed | Strengthens taller walls |
| 7. Finish | Caps, grading, planting | Final look and durability |
Quick Step-by-Step Summary
- Mark the wall line and height
- Dig a trench and create level steps
- Add compacted gravel
- Lay the first course level
- Stack courses and backfill slowly
- Install drainage pipe and fabric
- Add reinforcement for taller walls
- Grade the top and finish with caps
Choose the Best Material for Your Slope Wall
Different materials suit different yard styles and budgets. Every homeowner has their own vision, so let’s break it down in simple terms.
Concrete blocks are strong, uniform and great for beginners because they lock together. Wooden timbers or sleepers can handle slopes well too, especially for a natural look, but they need tiebacks for strength. Rocks create a rustic, organic feel, though they take more skill to stack safely and evenly.
How each material works
- Blocks: Best for a clean modern look and simple stacking.
- Wood or sleepers: Ideal for warm and natural designs when reinforced correctly.
- Rocks: Great for homeowners who want a natural landscape with character.
Choosing the right material also depends on the height of the wall. For walls over three feet, materials like blocks with geogrid reinforcement usually perform better.
Plan, Measure and Mark the Wall Layout
Guess what, most wall problems start before construction even begins. Proper planning saves more time than any tool you’ll use later. Begin by marking where the wall will sit using stakes and a string line. This gives you a visual boundary so you can see how it complements the slope.
Measure the height you want, keeping in mind that taller walls might require permits. I’ve had homeowners excited to go big, only to learn the city required engineering approval. It’s always better to double check early. The planning stage also helps you understand how much material you’ll need, which makes budgeting smoother.
The Most Important Principle: Build a Stepped, Level Foundation
Let me share something from years on the job: a sloped yard does not mean your base should follow the slope. The base must be level, and you create steps when the ground rises. Think of it like building a staircase that supports the wall.
This approach is what keeps the wall strong for years. If you try to angle it with the slope, the soil pressure eventually pushes it out. A stepped foundation keeps each section stable and allows the wall to sit comfortably into the hill rather than fighting it.
What the step method means
A step simply means burying part of the first course deeper whenever the slope rises. You create small, flat levels instead of a single long angled trench. It looks neat, and more importantly, it distributes weight evenly.
Excavation and Trench Setup
Now it’s time to open the trench. Start digging along your marked layout, giving yourself enough width for both the wall and the gravel base. For most materials, the trench should be wide enough for the block or timber plus at least a few inches of clearance.
Make sure the base of your trench is firm and compact. Loose soil settles over time, which makes the wall shift. When I dig trenches on steep yards, I pay special attention to shaping the area behind the trench so water naturally drains away instead of pooling behind the wall.
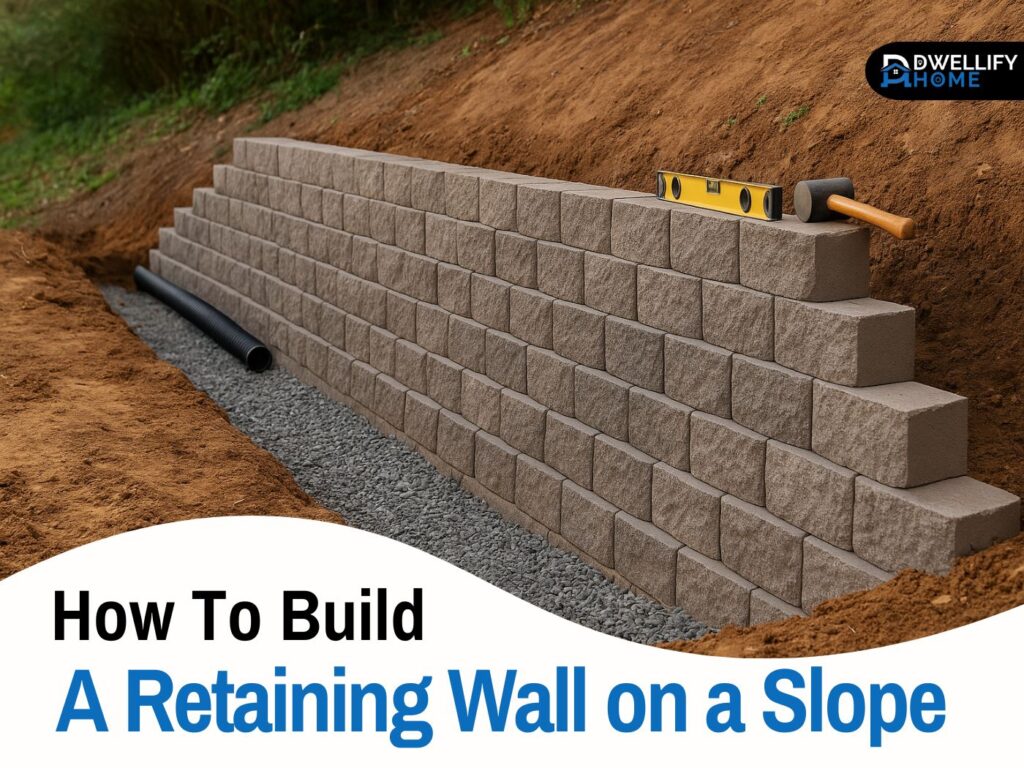
Build the Base Course Like a Pro
Once the trench is ready, add a layer of crushed gravel and compact it until it feels solid under your feet. This gravel acts like the foundation of a house. If it’s done right, the entire project becomes easier.
Place your first row of blocks or timbers on top of the gravel. Check every piece with a level. Here’s the thing: this first course decides everything. If it’s uneven, the whole wall will show it. I’ve seen people rush this step only to spend hours fixing crooked rows later. Take your time here and you’ll thank yourself later.
Build Up the Wall Course by Course
After the foundation is perfect, the rest feels more like assembling a puzzle. Stack your next course by staggering the joints. This gives the wall strength and reduces weak points. As you build up, add backfill behind the wall in layers.
Backfilling gradually helps the wall settle evenly and prevents sudden soil pressure. When I’m working with homeowners, I always remind them not to place too much soil at once. Slow and steady gives the best results and keeps the wall from leaning.
Drainage Setup
Water is the biggest enemy of any retaining wall. Without proper drainage, even the strongest wall starts to bow over time. That’s why every professional builds a drainage system right behind the wall.
Add a gravel zone behind each course as you build. Lay a perforated pipe at the base, making sure it directs water away. Then use landscape fabric to keep soil from clogging the gravel. On top of that, proper grading helps water run away from the wall instead of pouring into it.
A homeowner once told me their old wall failed repeatedly until they added a drainage pipe. After that, everything stayed perfectly aligned. It’s a small detail that makes a huge difference.
Reinforcement for Taller or Heavier Load Walls
For walls above three or four feet, reinforcement becomes essential. Geogrid is the most common solution for block walls. It stretches back into the soil like invisible anchors that stop the wall from tipping forward.
Wood walls often use deadmen or tiebacks. These are long timber anchors buried deep into the slope. Whenever I install timber walls on steep grades, tiebacks are non negotiable. Without them, the wall won’t resist long term pressure.
Reinforcement might feel overwhelming at first, but once you understand why it works, it becomes pretty straightforward.
Special Case: Retaining Wall on a Sloped Driveway
Driveways bring added pressure from vehicles and faster water flow during rain. That means your base, drainage and compaction need to be extra solid. In many cases, I recommend building two shorter tiered walls instead of one tall one. It reduces pressure and creates a safer structure.
A tiered design also looks cleaner and blends nicely with landscaping. If your driveway already has erosion signs, fix that first before installing the wall.
Finishing Touches That Improve Looks and Durability
Once the structure is up, it’s time to make it look good. Add capstones or timber caps to create a clean finish. Caps also help lock the top row in place for added strength.
Shape the soil above the wall so water flows away. A gentle slope works wonders for long term durability. Many homeowners also plant shrubs or ground cover near the top for a polished look. It softens the wall and makes the yard feel more inviting. At Dwellify Home, we often recommend low root plants that won’t disturb the wall over time.
Common Mistakes That Make Slope Walls Fail
There are a few mistakes I see over and over again. The first is skipping the stepped base. Without that, the wall never sits right on a slope. Another common issue is poor compaction. Loose soil behind the wall settles later and pushes everything forward.
Some DIY builders also forget drainage or choose materials not suited for taller walls. Remember, soil pressure increases with height, so you have to match the design with the load.
Avoiding these mistakes saves money, time and frustration.
Building a Retaining Wall on a Slope Cost
Costs vary depending on size, material and terrain. Block walls usually cost more than wood, but they last longer with less maintenance. Rocks can be affordable if you source them locally, though installation takes more labor.
If you hire a professional, the cost rises based on height and reinforcement needs. For DIY builders, the biggest expenses are materials and tools. Make sure to budget for gravel, fabric, caps and drainage pipes too. These often cost more than homeowners expect, but they’re essential for a durable wall.
Retaining Wall on a Slope Pictures and Design Ideas
A sloped yard offers awesome design opportunities. You can create a terraced garden with multiple smaller walls. You can blend the wall with plants for a natural look. Modern blocks give a sharp, clean finish, while timbers keep things warm and rustic.
Adding landscape lighting along the wall or embedding steps between tiers creates a stunning nighttime effect. A well built wall can completely transform the space and make your slope the highlight of your yard.
Conclusion
If you want a yard that’s safer, more usable and more beautiful, a retaining wall on a slope is one of the smartest upgrades you can make. Just remember the three golden rules I teach every homeowner: build a level stepped base, install proper drainage and reinforce the wall if it’s tall. When you follow these steps, your wall won’t just stand strong, it’ll make your whole landscape feel more organized and enjoyable.
Take your time with each stage, trust the process and don’t be afraid to ask for help on bigger projects. Your slope has potential and now you know exactly how to unlock it.
FAQs
1. Can you build a retaining wall on a slope?
Yes, you can. You just need to create a stepped and level base, add drainage and choose materials that can handle soil pressure. Most DIY walls under four feet are manageable with proper planning.
2. What are the 7 common mistakes made when installing retaining wall blocks?
The most common mistakes are:
- Not leveling the first course
- Skipping the gravel base
- No drainage pipe
- Poor backfill compaction
- No geogrid on taller walls
- Following the slope instead of stepping
- Using blocks not meant for retaining walls
3. What is the cheapest way to build a retaining wall?
The most affordable method is using treated wood, sleepers or locally sourced rocks. They cost less than engineered blocks, but you still need gravel, drainage and proper reinforcement for long term strength.
4. What is the maximum slope before a retaining wall is needed?
A wall is usually needed when the slope is too steep to hold soil in place or when erosion becomes noticeable. Many yards with slopes over 30 to 35 degrees benefit from a wall or terracing.
Disclaimer
This article provides general guidance for building retaining walls on slopes. Always follow local building codes and consult a professional for tall walls, unstable soil or structural concerns. Your site conditions may require additional steps or inspections.

I’m Bilal, the founder of Dwellify Home. With 6 years of practical experience in home remodeling, interior design, and décor consulting, I help people transform their spaces with simple, effective, and affordable ideas. I specialize in offering real-world tips, step-by-step guides, and product recommendations that make home improvement easier and more enjoyable. My mission is to empower homeowners and renters to create functional, beautiful spaces—one thoughtful update at a time.