Nandina domestica, also called heavenly bamboo or sacred bamboo, is one of those shrubs that looks harmless until it starts acting like it owns the yard. I’ve removed it from tight foundation beds, sloped backyards, and overgrown fence lines. And here’s the thing: it’s not hard because it’s “strong,” it’s hard because people remove the top and accidentally leave the part that matters most.
If you’ve tried cutting it back and it popped right back up, you’re not alone. Nandina has a tough root crown, plus it can spread by seeds through berries. The best part is, once you understand how it grows, you can choose a method that actually works and stop the cycle of regrowth.
This guide walks you through the options I use on real residential jobs: manual removal, repeated cutting, and herbicide methods when they’re appropriate. I’ll also cover cleanup, disposal, and how to keep it from coming back.
Snippet-ready definition:
Removing nandina domestica means eliminating the root crown that fuels regrowth. You can dig it out, weaken it with repeated cutting, or use a targeted cut-stump treatment. Bag berries and monitor for resprouts.
Mission Statement:
At Dwellify Home, our mission is to help homeowners solve real yard problems with clear, safe, practical guidance that works in everyday landscapes, without confusing jargon or unrealistic promises.
What is Nandina domestica (heavenly bamboo) and why it’s hard to kill
Nandina is a woody shrub with multiple upright canes, fine leafy growth, and often bright red berries. It’s sold in nurseries in both tall forms and compact varieties like ‘Obsession.’ A lot of homeowners plant it for color and low maintenance, then later discover it spreads or becomes a constant cleanup job.
What makes it stubborn is the root structure. Nandina grows from a dense root crown, which is basically the plant’s restart button. Cut the canes and the crown pushes new shoots. Dig a little but leave chunks of root behind and it can resprout again. So the job is less about “killing leaves” and more about dealing with the crown and the roots.
Is nandina domestica invasive where you live?
In many regions, nandina spreads beyond planting beds. Birds eat the berries and drop seeds elsewhere, then you get volunteer seedlings in mulch beds, along fences, or in natural areas near the property. Even when you’re only removing it from your yard, it helps to treat it like a plant that can travel.
If you’re seeing nandina seedlings popping up away from the original plant, that’s a strong sign you’re dealing with a plant that’s behaving invasively in your area. That’s also why berry cleanup matters a lot more than people think.
Quick Guide Table: Best Removal Method by Situation
| Method | Best for | What you do | Pros | Watch-outs |
| Digging and root crown removal | Small plants, loose soil | Excavate the crown and major roots | Immediate, no chemicals | Backbreaking on big clumps |
| Repeated cutting | Chemical-free approach | Cut to ground, repeat every few weeks | Safe around ornamentals | Slow, needs persistence |
| Cut-stump treatment | Large established clumps | Cut low, treat fresh stump promptly | High success, targeted | Must follow label and timing |
| Foliar spray | Seedlings, fresh regrowth | Spray leaves during active growth | Good for many small plants | Drift risk near prized plants |
Step-by-step quick plan (simple and clean)
- Confirm it’s nandina (multi-cane shrub, fine leaflets, often red berries).
- Bag berries first so they don’t scatter.
- Pick your method: dig for small clumps, cut-stump for big ones, repeated cutting if you want no chemicals.
- If digging: water soil, dig wide, pull the root crown, remove big root chunks.
- If cutting: cut at ground level and repeat whenever new shoots appear.
- If cut-stump treating: cut low and treat the fresh stump promptly, focusing on the living ring. Follow the product label.
- Follow-up checks at 2 weeks, 30 days, and 60–90 days. Remove any resprouts immediately.
Quick identification (so you remove the right plant)
Most homeowners call it heavenly bamboo because the canes look bamboo-like. But it’s not bamboo. It’s a woody shrub with thin, jointed stems and compound leaves that can turn red or bronze in cooler weather.
Here are the signs I look for on site:
- Multiple upright canes growing from one root area
- Lacy, layered leaves with many small leaflets
- New growth can be bright green, older growth may be reddish
- Clusters of berries, often red, hanging in winter
The “nandina problems pictures” searches usually show the same thing: a thick clump that’s spreading outward and sending up new shoots from the base. If your plant looks like a fountain of skinny canes, it’s probably nandina.
Dwarf nandina vs tall nandina (including ‘Obsession’ types)
Compact cultivars like ‘Obsession’ tend to stay shorter and denser, but removal is similar. The main difference is the root mass is often tighter and more concentrated, which can make digging easier if the plant is small.
Taller nandina forms can develop bigger crowns and wider root systems. Those are the ones where people cut it down, feel like they “handled it,” then call me three months later when the bed is full of shoots again. If yours is chest-high or taller, plan on either full excavation or a cut-stump approach.
Why removal matters (practical plus responsible reasons)
From a landscaping perspective, nandina can crowd out other plants and turn a tidy bed into a tangled clump. It also drops leaves and canes, then you’re constantly pruning to keep it off walkways or windows.
On top of that, berries can spread the plant. Even if you don’t care about the “invasive” label, you’ll care when you’re pulling seedlings out of your mulch every spring. I’ve seen yards where the original shrub was removed, but berries had already done their job and seedlings kept returning for a couple seasons.
If you’re removing nandina because it’s taking over or causing ongoing maintenance headaches, you’re making a smart move. The goal is to remove it in a way that stops regrowth and prevents spread.
Before you remove it: choose the right method for your situation
Before you grab the shovel, take one minute to assess what you’re dealing with. Size and location decide the best method. A small plant in loose soil is a good candidate for digging. A big clump wedged between shrubs and a foundation often needs a different plan.
Also think about what matters most to you: avoiding chemicals, finishing quickly, or minimizing disturbance to nearby plants. There’s no one “perfect” method, but there is a method that fits your yard.
Best method based on plant size (small vs large clump)
Here’s the quick way I decide on jobs:
- Seedlings and small plants: hand pull or dig out
- Medium clumps you can access: dig out the root crown and as much root as possible
- Large, established clumps: cut-stump treatment or repeated cutting if you want a no-chemical approach
- Beds packed with other plants: targeted cut-stump can be less disruptive than excavating everything
Best time of year to remove nandina
Digging is easiest when the soil is moist but not soggy. After a rain or after a deep watering the day before is perfect. Dry soil turns the job into a wrestling match.
For herbicide methods, active growth seasons typically give better uptake. The exact timing depends on climate, but generally you want the plant functioning well enough to move the treatment through its system. Avoid windy days, and avoid days when rain is expected soon after application.
Manual removal (best for small plants and manageable clumps)
Manual removal is my favorite method when it’s realistic. It’s clean, immediate, and you can see exactly what came out of the ground. The catch is you have to remove the crown and enough roots to prevent restart growth.
If you’re doing this yourself, don’t rush the digging. Most regrowth comes from leaving a chunk of crown behind because the shovel went in too close to the stems.
How to dig up nandina domestica (step-by-step)
Start by cutting the canes down to about knee height. That gives you a handle to wiggle the plant and it opens up the base so you can see the crown. Then dig a ring around the plant, usually wider than homeowners expect. For medium plants, I often start 8 to 12 inches out from the base. For larger clumps, go wider.
Work the shovel under the crown and lift. If it won’t budge, don’t just yank harder. Use a digging bar, or dig deeper on one side to find the main mass, then rock it loose. Once you lift the crown, keep digging until you’ve removed the central root mass. Expect some roots to snap, but aim to remove the biggest sections.
After you pull it, check the hole. I always do a quick “root sweep” with my hand or the shovel edge to pull out leftover crown chunks. Those are the pieces that come back.
Tools that make removal easier (real-world homeowner tips)
You don’t need fancy gear, but the right tools save your back:
- A sharp spade shovel for cutting roots
- Loppers or a pruning saw for thick canes
- A digging bar for leverage on big crowns
- A mattock for hard soil or tangled roots
- A tarp to drag the plant out without dumping berries everywhere
One tip from experience: if you can move the crown even half an inch, you’re close. Keep widening the hole rather than prying against the foundation or nearby plants.
Mechanical control (no chemicals, but requires persistence)
If digging isn’t realistic, mechanical control can work. This means you’re starving the plant by repeatedly removing new growth until the crown runs out of stored energy. It’s slower, but it’s a good choice if you want a chemical-free approach and can stick with the follow-through.
The biggest mistake I see is cutting once or twice and then forgetting about it. Nandina will treat that like a haircut.
Repeated cutting or mowing at ground level
Cut the stems as close to the soil as you can. You want to remove as much above-ground structure as possible. Then, every time new shoots appear, cut them back again. Early regrowth is your chance to weaken the plant fastest.
A practical schedule I use on properties is every 3 to 4 weeks during active growth. The plant doesn’t have time to rebuild reserves if you keep it trimmed down. Expect this to take months, and sometimes a full season, depending on the size of the original clump.
If berries are present, remove them first and bag them. That prevents seed spread while you’re doing the long game.
Smothering with black plastic or landscape fabric
Smothering can help as an add-on, but I don’t treat it as the only strategy for big nandina clumps. The crown can hold energy for a long time, and gaps in the covering let light in and restart growth.
If you want to try it, cut the plant down first, then cover the area with heavy black plastic. Extend the plastic well beyond the crown zone and weigh it down tightly. Check edges so light doesn’t sneak in. This works best on small plants or in areas where you can keep the cover sealed for a long stretch.
Herbicide methods (use with caution, best results when done correctly)
Herbicides can be appropriate when the clump is large, the roots are hard to excavate, or repeated cutting isn’t practical. Used correctly, they can save a lot of labor and reduce soil disturbance.
I’ll be straight with you: most failures happen because the application was mistimed, too diluted, or applied to the wrong part of the plant. If you decide to use an herbicide, follow the label instructions and avoid overspray.
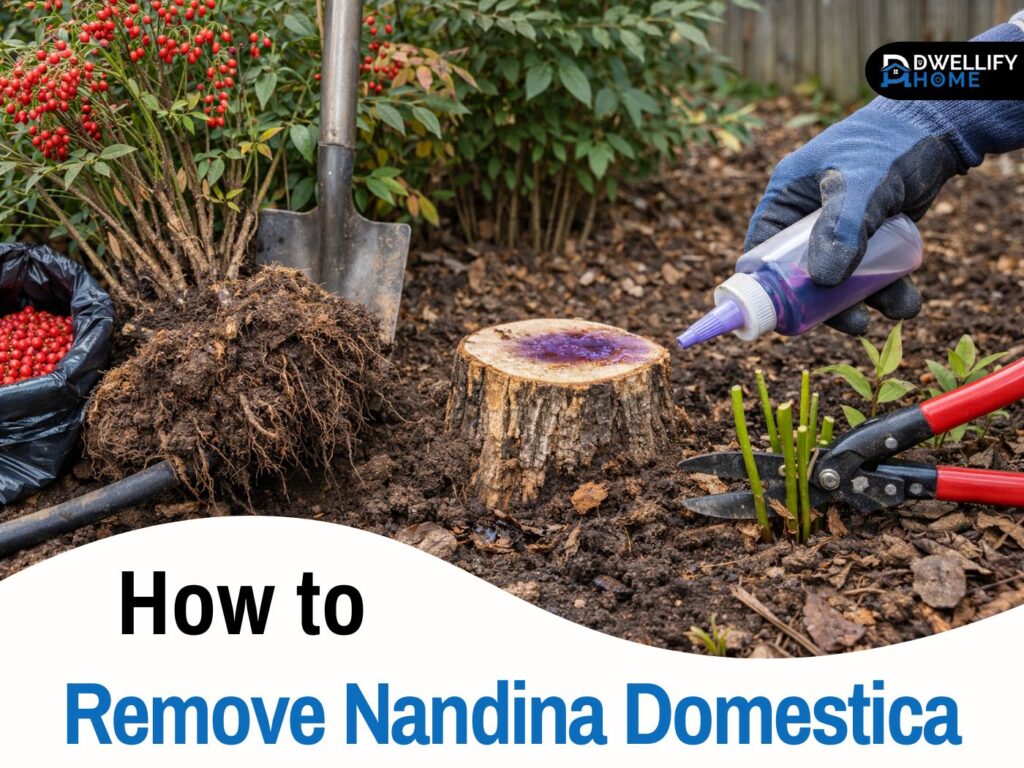
Cut stump method (most effective for established plants)
This is the method I use most often on big, stubborn shrubs. Cut the plant close to the ground and treat the fresh cut surface right away. Timing matters. The cut surface starts sealing quickly, so quick treatment improves results.
You’ll often see people ask, will Roundup kill nandina. Products that contain glyphosate can work well for cut-stump treatments when applied correctly. Triclopyr is another common option for woody plants, depending on what’s labeled and appropriate for your site.
The key detail many folks miss is where to apply it. Focus on the outer ring of the stump where the living tissue is, not just the middle. Then monitor and retreat any sprouts that appear.
Foliar spray method (best for sprouts and leaf-heavy regrowth)
Foliar spraying means treating the leaves. It’s best used when the plant is small, when you’re dealing with fresh regrowth after cutting, or when you have lots of seedlings.
Spray carefully, cover leaves evenly, and avoid drift. If the nandina is mixed in with plants you want to keep, foliar spraying is risky because it’s easy to hit the wrong foliage. On jobs like that, I prefer cut-stump because it’s more targeted.
Basal bark treatment (advanced option)
Basal bark treatment involves applying a suitable herbicide mixture to the lower portion of the stems. It can be effective on woody plants in some situations, but it’s more technical and product-specific.
If you’re not comfortable with that, don’t force it. Cut-stump is usually simpler and more homeowner-friendly while still being effective.
Vinegar and “home remedies”: what actually works vs what wastes time
I get this question all the time, and I get why. Vinegar feels safer and easier. But here’s the thing: woody shrubs don’t play fair. They can lose leaves and still survive because the crown is doing the heavy lifting underground.
Will vinegar kill nandina?
In most real yard situations, vinegar won’t kill an established nandina clump. It may burn leaves, especially in warm weather, but the crown often survives and sends up new shoots.
Where vinegar can help is on very young seedlings with tiny root systems. Even then, pulling is more reliable. If you want results without repeat frustration, focus on root removal, repeated cutting, or a targeted cut-stump method.
How to remove nandina domestica from cuttings (and avoid accidental spreading)
If you cut nandina and toss the stems into a shady corner or damp compost pile, you can create a new problem. While nandina is more notorious for spreading by seed, it’s still smart to handle cut material like it could survive.
If you’ve taken cuttings intentionally or accidentally, don’t plant them or leave them where they can root into moist soil. Let cut stems dry fully on a tarp, then dispose of them properly. If you’re trying to remove nandina domestica from cuttings in a garden bed, pull them early, roots and all, before they establish a crown.
One job-site habit I use is keeping all cut material contained from the start. It keeps the work area clean and prevents berries or fragments from ending up in mulch.
Disposal and cleanup (stop it from spreading)
Removal isn’t finished when the plant is out. Cleanup is part of control. I’ve seen properties where the shrub was removed but berries were left behind in the bed, and seedlings appeared later.
What to do with berries
Bag berries and put them in the trash. Don’t compost them. Don’t toss them into a brush pile. If you’re dealing with heavy berry clusters, lay a tarp under the plant before you cut, so berries don’t scatter into the soil and mulch.
What to do with roots, canes, and debris
Roots and canes can go out with yard waste in many areas, but rules vary. If you’re unsure, trash bagging is the safest option for preventing spread.
A practical approach I use is:
- Shake soil off roots back into the hole
- Let pulled roots and canes dry out on a tarp
- Bag smaller pieces so they don’t scatter
- Keep the area raked clean after removal
Follow-up plan (the secret to permanent removal)
If you want this job to stick, the follow-up matters as much as the removal. Nandina is a resprouter, so your goal is to catch any comeback early while it’s weak and easy to handle.
How to spot resprouts early
Resprouts usually pop up right around the old crown area. You may also see seedlings nearby, especially if berries were present before removal.
Walk the area and look for bright green shoots emerging from the soil. They’re often thinner and softer than the old canes at first. This is the easiest stage to remove them.
Simple 30 to 90 day check routine
Here’s a routine I recommend to homeowners because it’s realistic:
- Check at 2 weeks and remove any sprouts immediately
- Check again at 30 days and repeat
- Do a final check around 60 to 90 days
- Keep an eye on the area for one growing season
If you see sprouts, don’t panic. Cut them low, pull them if they’re loose, or retreat the stump if you used cut-stump herbicide and the label supports a follow-up.
Replace nandina with better options (same vibe, less trouble)
After removal, you’ll often have a bare spot. If you leave it open, weeds move in fast. Replanting is part of the long-term fix, especially if you removed a large clump that was shading the soil.
I like replacements that give you structure and seasonal interest without turning into a maintenance project. The goal is a shrub that fits the space and doesn’t spread.
Easy replacements with color and structure
If you liked nandina for winter color, you can get a similar effect with other shrubs depending on your region. Options often used for red stems, berries, or fall color include plants like red twig dogwood, Virginia sweetspire, and other locally appropriate shrubs.
If wildlife support matters to you, check native shrub options for your area. Local nurseries and extension resources can guide choices that do well in your climate and soil.
Choose replacements based on sun or shade and moisture
This is a simple way to choose:
- Full sun beds do best with sun-tolerant shrubs that can handle heat
- Shady beds need shrubs that won’t thin out and look bare
- Wet spots need moisture-tolerant roots
- Dry foundations need drought-tolerant choices
A quick check of sunlight and irrigation saves you from replanting twice.
FAQs
Are nandinas hard to dig up?
Mature clumps can be tough because the root crown is dense and grips the soil. It gets much easier after deep watering, digging wider than you think, and using leverage tools like a digging bar.
How do you get rid of Nandina domestica?
For small plants, dig out the root crown and main roots. For large clumps, cut-stump treatment is usually the most reliable, or use repeated cutting for a chemical-free approach.
Does Nandina domestica have invasive roots?
It’s not an aggressive “sideways runner” like true bamboo, but it can resprout from the crown and spread widely through berries and seedlings. That’s why berry disposal and follow-up checks matter.
Will nandina grow back if cut down?
Yes, very often. Cutting removes the top growth but leaves the root crown alive, which can push new shoots. Repeated cutting or a cut-stump method helps stop that cycle.
Will vinegar kill nandina?
Vinegar usually burns leaves but rarely kills an established plant because it doesn’t reliably destroy the root crown. It may help on tiny seedlings, but pulling them is more dependable.
Conclusion
Removing heavenly bamboo is completely doable, but it works best when you treat it like a root problem, not a leaf problem. If the plant is small, digging out the crown and root mass is usually the cleanest win. If it’s large, you can either commit to repeated cutting or use a targeted cut-stump approach to reduce regrowth.
Once the plant is out, don’t skip cleanup. Bag the berries, clear the debris, and keep an eye out for resprouts and seedlings. That little follow-up routine is what separates a one-time removal from a yearly headache.
And if you replant the space with a better-behaved shrub, you’ll be surprised how quickly the whole bed looks improved. You’re not just removing a problem plant, you’re resetting the landscape so it stays easier to manage for the long haul.
Disclaimer
This guide is for general information and home landscaping education. Always follow herbicide label directions, wear appropriate safety gear, and check local disposal rules. When in doubt, consult a licensed professional for your site and conditions.

I’m Bilal, the founder of Dwellify Home. With 6 years of practical experience in home remodeling, interior design, and décor consulting, I help people transform their spaces with simple, effective, and affordable ideas. I specialize in offering real-world tips, step-by-step guides, and product recommendations that make home improvement easier and more enjoyable. My mission is to empower homeowners and renters to create functional, beautiful spaces—one thoughtful update at a time.