Every home improvement enthusiast eventually hits a breaking point. It usually happens when fine sawdust coats the family car, or the dining table gets hijacked for a weekend project that stretches into a prolonged ordeal. Moving your hobbies out of the main house and into a dedicated backyard workshop is the ultimate upgrade for your productivity, safety, and domestic harmony. Planning this space requires more than just moving a few hand tools into a dark corner of the yard. It demands thoughtful structural choices, smart interior layouts, and a firm focus on long-term comfort and usability. By starting with a clear strategy, you can create a highly functional retreat that caters to all your creative needs.
Choosing the Right Structural Shell
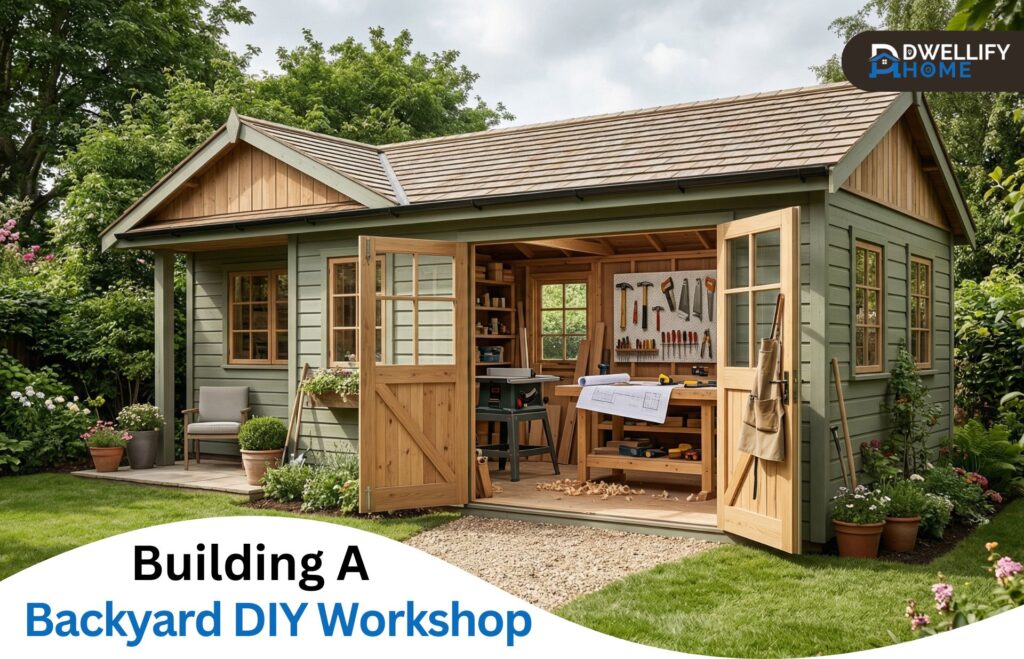
The first critical step in creating your dream workshop is securing a weather-tight shell that can handle year-round projects and withstand unpredictable outdoor conditions. While converting an existing garage is a common starting point, many homeowners prefer building a standalone structure to keep the noise and mess entirely separate from their living quarters.
When you invest in large garden sheds, you gain a heavy-duty, purpose-built footprint that provides the ideal blank canvas for a workspace. A high-quality steel structure protects expensive tools from harsh elements while giving you the necessary square metreage to tackle bigger builds without feeling cramped. Starting with a dedicated outbuilding allows you to lay a robust concrete slab, install proper thermal insulation, and run dedicated power lines for heavy machinery without compromising your home’s existing electrical load. You also gain the freedom to position windows strategically, ensuring you capture the best natural light for daytime work.
Prioritising Ergonomics and Comfort
Once your building is erected and weatherproofed, the interior fit-out begins. It is easy to get distracted by buying new tools or planning elaborate storage walls, but your primary focus should always be on the workbench. Since you will spend countless hours standing at this station, a poor setup can quickly lead to severe back strain, neck pain, and physical fatigue.
According to occupational health guidelines, working tables and benches should be adjustable to suit different physical statures and tasks. Customising the height to match your specific body size and the exact project at hand is crucial for reducing muscle strain over long periods. Take time to measure your optimal standing reach before bolting any heavy benches to the wall. For detailed woodworking or electronics repair, you might want a slightly higher bench to prevent hunching, whereas heavy assembly tasks often require a lower surface for better leverage. Additionally, consider installing thick, high-quality anti-fatigue mats on the concrete floor to cushion joints during marathon weekend projects.
Managing Power and Ventilation Needs
A proper workshop requires robust utilities to function safely. Running a dedicated sub-panel to your new building ensures you can operate air compressors, table saws, and dust collection systems simultaneously without tripping breakers in the main house. Good lighting is equally essential. Install bright LED batten lights across the ceiling to eliminate shadows, and add focused task lighting directly above primary workstations.
Ventilation is another critical factor often overlooked during planning. Heavy DIY work generates fumes, dust, and heat, which must be managed effectively to maintain a safe environment. Install a high-capacity exhaust fan to draw out stale air, and ensure doors and windows can be opened to create a cross-breeze. Proper airflow protects your lungs and helps regulate internal temperature during hot summer afternoons.
Essential Workshop Zones for Efficiency
A highly successful workspace relies on a smooth workflow and smart organisation. Instead of scattering tools randomly across the room, divide your floor plan into specific, functional areas. This layout strategy prevents cross-contamination, such as getting fine wood dust stuck on a freshly varnished table.
Consider implementing these primary zones in your new workspace layout:
- The Prep and Cutting Station: Position your table saws, thicknessers, and mitre saws near the main double doors. This allows long lengths of timber to feed through easily while also maximising natural ventilation when generating a lot of sawdust.
- The Finishing and Detail Area: Having a dedicated outbuilding gives you room to set up specialised project zones. Whether you are assembling furniture or exploring other garden and outdoor DIY projects, dedicating a corner for a safe, temporary paint booth allows you to refinish items without worrying about toxic fumes or overspray drifting into your home.
- The Tool Organisation Wall: Dedicate the most accessible, highly visible wall to a French cleat system or a large pegboard setup. This ensures your most frequently used hand tools are always within arm’s reach and visually accounted for at the end of the day.
- The Safety and Cleanup Corner: Keep fire extinguishers, comprehensive first aid kits, a powerful shop vacuum, and eye wash stations grouped together near the primary exit. Quick access to these items is essential during an unexpected emergency.
Building a backyard workshop is a fantastic investment in your creativity, personal skills, and overall home value. By starting with a robust outer structure, focusing heavily on ergonomic bench setups, and planning internal zones methodically, you will create a space that inspires you to tackle bigger, more ambitious projects. Best of all, you will finally reclaim your garage and dining table for their intended purposes.
And before you go, be sure to check out some of our other helpful articles! Please note that some of the links in this article may be affiliate or sponsored links. These links may generate a small commission if you make a purchase, which helps support and grow our website. The opinions and views expressed in this post are solely those of the author and do not necessarily reflect the views or policies of Dwellifyhome.com.

I’m Bilal Hassan, the founder of Dwellify Home. With 6 years of practical experience in home remodeling, interior design, and décor consulting, I help people transform their spaces with simple, effective, and affordable ideas. I specialize in offering real-world tips, step-by-step guides, and product recommendations that make home improvement easier and more enjoyable. My mission is to empower homeowners and renters to create functional, beautiful spaces—one thoughtful update at a time.