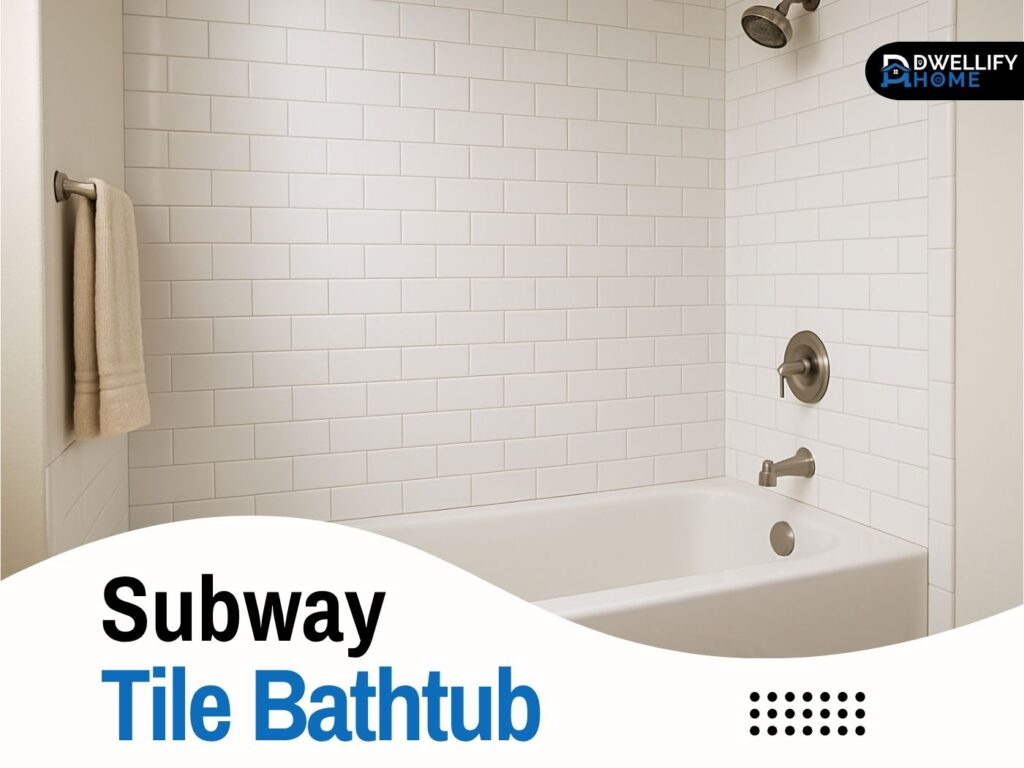
If there’s one design trend that never seems to fade, it’s the subway tile bathtub surround. Whether you’re renovating your bathroom or simply giving it a refresh, subway tiles bring that perfect mix of modern simplicity and timeless charm. They’re clean, durable, and surprisingly versatile. Over the years, I’ve worked on dozens of bathroom remodels, and every time I recommend subway tiles, homeowners fall in love with how effortlessly stylish their space turns out.
Here’s the thing — subway tile isn’t just a trend. It’s a statement. A design detail that balances tradition with modern elegance. And when used around a bathtub, it completely transforms the atmosphere from basic to beautiful.
Snippet-Ready Definition:
A subway tile bathtub is a bathroom design where rectangular tiles surround the tub area, creating a clean, classic look that’s durable, water-resistant, and easy to maintain — perfect for modern homes.
Mission Statement:
At Dwellify Home, our mission is to simplify home design for everyday people. We believe everyone deserves a space that feels beautiful, functional, and truly personal. From timeless bathroom ideas to smart renovation tips, we help homeowners turn inspiration into reality — one stylish upgrade at a time.
Why Choose Subway Tile for Your Bathtub Surround
When clients ask me why subway tile is so popular, I always tell them the same thing — it’s like the white T-shirt of bathroom design. It goes with everything, looks clean, and never goes out of style.
One of the biggest reasons people love subway tile is its durability. Bathrooms see a lot of humidity and water exposure, and subway tiles handle it all with ease. Their glazed surface makes them resistant to stains, mold, and soap buildup. A simple wipe-down keeps them looking new for years.
On top of that, subway tiles are incredibly budget-friendly compared to marble or natural stone. You can create a luxurious spa look without overspending. And because these tiles come in so many finishes, colors, and patterns, they fit into almost any home — from a sleek urban condo to a cozy farmhouse.
Another bonus? They reflect light beautifully, making small bathrooms appear bigger and brighter. A white subway tile bathtub surround, for instance, instantly adds freshness and openness to the space.
Types and Styles of Subway Tile Bathtub Surrounds
Subway tiles may have started as simple white rectangles, but today, they come in a range of styles that can match any mood or decor.
White subway tile bathtub surrounds are the go-to choice for most homeowners. They deliver a clean, timeless aesthetic and pair perfectly with any wall color or vanity finish. If you want to keep things simple but elegant, white tiles with a soft gray grout line can make your tub area pop.
For a more modern vibe, grey subway tile bathtub surrounds work wonders. They add depth and warmth, especially in bathrooms with white fixtures or natural wood accents. And if you want to break away from the traditional layout, try vertical subway tile around the bathtub. This layout draws the eye upward, making ceilings feel taller and the space airier.
Then there’s the faux subway tile shower panel option — a great choice if you want the same look with less maintenance. These panels mimic real tile but without the grout cleaning hassle.
If you like experimenting, mix 4×12 subway tile showers or even textured matte tiles with glossy ones. The contrast adds interest and makes your bathtub area stand out.
Subway Tile Bathtub Ideas and Inspiration
Designing with subway tile opens up endless creative possibilities. Some people love the simplicity of subway tile around the bathtub, while others go for full wall coverage to make the room feel cohesive.
One of my favorite projects involved a subway tile bathtub shower combo where we used white tiles up to the ceiling and added a single row of navy-blue accent tiles. It gave the space a coastal, airy look without feeling overdone.
Want something bold? Try subway tile above the bathtub paired with dark grout — it adds drama and highlights the tile’s shape. Or, go with a subway tile tub surround idea that blends different materials, like marble flooring or wood shelves, for that designer touch.
You can even add built-in niches for soaps and candles. Combine this with warm lighting, and your bathtub area will feel like a personal spa.
Planning and Preparation Before Installation
Before you start tiling, there’s some prep work to get right — and trust me, it makes a world of difference in the final result.
First, measure the walls around your bathtub carefully. You’ll want to map out where each tile will go so you don’t end up with awkward cuts near the edges. Planning the layout ahead ensures symmetry and saves a lot of frustration later.
Next, check your wall surface. It must be smooth, clean, and moisture-resistant. Always use a cement backer board or waterproof membrane before applying tiles. Skipping this step could lead to water damage down the line.
As for materials, go for high-quality adhesive and grout. I usually recommend thin-set mortar and epoxy grout because they hold up better in wet environments. And don’t forget to seal the grout once it’s dry — that’s your shield against moisture and mildew.
Lastly, consider lighting. Glossy tiles reflect more light, while matte finishes absorb it. If your bathroom doesn’t get much natural light, glossy white subway tiles can brighten it right up.
How to Install Subway Tile Around a Bathtub
Installing subway tile might seem tricky, but with the right tools and a bit of patience, it’s doable even for DIY lovers.
- Prep the surface – Make sure the wall is clean, level, and waterproof.
- Plan your layout – Use a chalk line to mark the center point and ensure even spacing.
- Apply mortar – Spread thin-set mortar in small sections to prevent it from drying too fast.
- Set the tiles – Press each tile firmly, using spacers for consistent grout lines.
- Cut around fixtures – Use a tile cutter for neat edges near faucets or soap holders.
- Grout and seal – Once the mortar sets, fill the joints with grout, then seal them after 24 hours.
Here’s a quick tip from experience: always start your first row on a perfectly straight line above the tub edge. Even the slightest tilt can throw off your pattern.
If you’re not comfortable with tiling tools or have a complex layout, it’s worth hiring a pro. A small installation mistake can lead to leaks or uneven lines that are tough to fix later.
Design Patterns and Layout Options
Subway tile may seem simple, but layout choices can completely change the vibe of your bathroom.
- Classic brick pattern – The timeless favorite that works in almost every style.
- Stacked layout – Perfect for modern, minimalist bathrooms.
- Herringbone pattern – Adds movement and a touch of sophistication.
- Vertical layout – Ideal for small bathrooms to create height and openness.
In one client’s home, we used a vertical herringbone pattern behind a freestanding bathtub, and it became the room’s focal point. So don’t be afraid to experiment — even small changes in tile direction can create big visual impact.
Cost, Budget, and ROI Considerations
Let’s talk about cost because it’s one of the first things homeowners ask. On average, a subway tile bathtub surround installation costs between $700 and $2,000, depending on the tile type, labor, and waterproofing needs.
If you’re doing it yourself, you can save a good chunk, but factor in tool rentals and extra tiles for mistakes. Professionals charge more, but you’ll get flawless alignment and waterproofing — which pays off long-term.
The best part is that subway tile offers great ROI. It’s one of the few upgrades that can boost your home’s value while keeping maintenance low. Buyers love clean, well-tiled bathrooms, especially ones with classic white subway tile designs.
Maintenance, Cleaning, and Upkeep
One of the biggest advantages of subway tile is how easy it is to maintain. You don’t need fancy cleaners or hours of scrubbing. A mix of warm water and mild soap works just fine.
To prevent mildew, make sure your bathroom is well-ventilated and dry the tiles after showers. Once a year, reseal the grout lines to keep moisture out and preserve that fresh look.
If you ever spot cracks or loose tiles, fix them early. It’s usually a simple re-grouting job. Over the years, I’ve seen people ignore small issues, and they end up with water leaks behind walls — so stay ahead of it.
Pros and Cons of a Subway Tile Bathtub
Like everything, subway tile has its strengths and a few drawbacks.
Pros:
- Timeless and versatile design
- Easy to clean and maintain
- Increases property value
- Affordable compared to marble or stone
Cons:
- More grout lines mean slightly more cleaning
- Labor-intensive to install
- Needs proper sealing to prevent water seepage
But overall, the pros easily outweigh the cons. If you love clean, elegant spaces that last for years, subway tile is a smart investment.
Alternative and Complementary Design Options
If you want to mix things up, consider combining subway tiles with other materials. For example, a subway tile bathtub surround looks great with wood accents or marble countertops. It balances modern and natural elements beautifully.
You can also add wainscoting or a painted wall above the tile line for a vintage vibe. For a luxury look, install LED lighting or backlit niches — it highlights the tile’s glossy surface and creates a calming atmosphere during evening baths.
Sustainability is another growing trend. Many manufacturers now offer eco-friendly ceramic or recycled porcelain tiles, so you can design responsibly without sacrificing style.
Real-Life Projects and Expert Tips
A few years ago, I worked on a small city apartment with almost no natural light. The bathroom felt dull and cramped. We installed glossy white subway tile around the bathtub, added a vertical mirror wall, and swapped out the lighting for warm LEDs. The result? The space instantly looked twice as big.
Another homeowner wanted something bolder, so we used grey subway tiles with matte black fixtures and warm lighting. It gave the bathroom a cozy yet modern feel that matched their personality perfectly.
Here’s my best advice: always choose grout color wisely. Light grout looks clean but shows stains faster, while dark grout hides dirt but can make small spaces feel busier. Find that balance based on your lifestyle and cleaning habits.
Troubleshooting Common Issues
Even the best installations can face issues over time. Here’s what to watch out for:
- Water leaks behind tiles – Usually due to poor sealing. Reapply waterproof caulk and seal grout annually.
- Cracked or loose tiles – Caused by movement or poor adhesion. Replace damaged pieces immediately.
- Discolored grout – Clean with a gentle tile cleaner or baking soda paste. Avoid harsh chemicals that erode sealant.
Regular maintenance and occasional re-sealing can prevent most of these problems from happening at all.
Quick Comparison Table — Subway Tile vs. Other Bathtub Surrounds
| Feature | Subway Tile Bathtub | Acrylic Surround | Marble / Stone Surround |
| Style | Timeless, versatile | Simple, modern | Luxurious, natural |
| Durability | High (with sealing) | Moderate | Very high |
| Maintenance | Easy, regular grout cleaning | Very easy | Medium, needs sealing |
| Cost | Affordable | Budget-friendly | Expensive |
| Customization | Many patterns & colors | Limited | Unique per slab |
| Installation | Moderate skill required | Easy | Complex, heavy |
| Best For | Classic & modern bathrooms | Quick remodels | High-end designs |
Step-by-Step: How to Install Subway Tile Around a Bathtub
- Prep the surface – Clean, level, and waterproof the wall.
- Mark your layout – Use a chalk line for straight alignment.
- Apply thin-set mortar – Spread evenly in small areas.
- Set the tiles – Place and press tiles using spacers.
- Cut around edges – Trim neatly near faucets or fixtures.
- Grout the joints – Fill gaps evenly and smooth the surface.
- Seal and finish – Let grout dry, then apply sealant to protect from water.
FAQs
Can I install subway tile only halfway up the wall above the bathtub?
Yes, and it looks beautiful. Half-wall subway tile can create contrast when paired with paint or wallpaper above.
Is vertical subway tile better than horizontal?
For small bathrooms, vertical tiles make ceilings feel taller. Horizontal tiles, however, feel more traditional and wide.
What grout color works best with white subway tile?
Light gray is the perfect balance — it hides dirt better than white and gives a soft contrast.
Can I tile over existing tiles?
Yes, but only if the original tiles are stable and clean. Always consult a professional for waterproofing advice.
Are faux subway tile panels a good alternative?
They are if you want less maintenance and faster installation, especially for rental units or budget remodels.
Conclusion
If you’re dreaming of a bathroom that feels clean, bright, and effortlessly stylish, a subway tile bathtub surround is the way to go. It’s practical, budget-friendly, and endlessly customizable. Whether you go with classic white tiles, modern gray ones, or a bold herringbone layout, the charm is undeniable.
My final tip? Don’t rush the design process. Choose the right tile size, grout color, and lighting that reflects your personality. A little attention to detail can turn your bathtub area into a serene retreat you’ll love coming back to every day.
Disclaimer
This article is for informational and design inspiration purposes only. Always consult a licensed contractor or interior designer before starting any remodeling or tile installation project. Product availability, prices, and materials may vary by region and supplier.

I’m Bilal, the founder of Dwellify Home. With 6 years of practical experience in home remodeling, interior design, and décor consulting, I help people transform their spaces with simple, effective, and affordable ideas. I specialize in offering real-world tips, step-by-step guides, and product recommendations that make home improvement easier and more enjoyable. My mission is to empower homeowners and renters to create functional, beautiful spaces—one thoughtful update at a time.