The bathroom is where most slips happen because everything is hard, smooth, and often wet. One small upgrade can change how steady and confident you feel in there, especially if you’re helping a parent age at home or you’re recovering from an injury.
I’ve installed bathroom safety bars in all kinds of real homes, from tiny apartments with tile walls to older houses with plaster and mystery framing. The best part is, when they’re chosen and mounted correctly, they don’t just feel safer, they actually make daily routines easier and less stressful.
Snippet-ready definition:
Bathroom safety bars are sturdy, wall-mounted grab bars that help you balance when stepping into a shower, standing from a toilet, or moving on wet floors. Their safety depends on correct placement and solid mounting.
Mission Statement:
At Dwellify Home, our mission is to make everyday living safer and more comfortable through practical, experience-based home guidance that helps families create spaces that support independence and confidence.
What Bathroom Safety Bars Are (And Why They Work)
A grab bar is a load-bearing handhold designed to support a person’s weight during movement, like stepping into a shower or standing up from a toilet. It’s not the same as a towel bar, soap dish, or decorative handle. Those look sturdy, but most of them are not built or anchored to take a sudden pull.
Guess what, I’ve been called to bathrooms where someone yanked a towel bar during a slip and it came right off the wall. Not because the person was heavy, but because the bar was never meant to be a safety device.
The real reason grab bars work is simple: they give your body a stable point to push or pull against. When your feet lose traction for a split second, your hand can keep you upright. That only happens when the bar is mounted into solid backing and placed where your hand naturally reaches.
Quick Guide Table (Simple Comparison)
| Area or Need | Best Choice | Why it helps | Pro tip from installs |
| Shower entry | Short vertical bar | Natural “grab and step” support | Place where your hand lands before stepping in |
| Inside shower | 18–24 inch straight bar | Steadying while turning and washing | Mount into studs or solid backing whenever possible |
| Bathtub | Two bars (entry + exit support) | Controls the step-over and the stand-up | One bar rarely covers both motions well |
| Toilet area | Side wall bar or flip-up rail | Helps sit-to-stand safely | Side support is usually more useful than rear only |
| Small bathroom safety bars | Compact bar near high-risk moves | Adds support without crowding | Favor vertical bars where wall space is tight |
| Temporary travel support | Suction bar, light use only | Can help with balance, not weight | Treat it as a reminder handle, not a body-weight bar |
Step-by-step mini guide: “Safer placement in 10 minutes”
- Watch the movement: step in, turn, sit, stand, and note where the hand reaches first.
- Mark natural hand spots with painter’s tape.
- Check structure: find studs or confirm the right load-rated anchors.
- Set height to the person: ADA guidance is a helpful reference, but comfort and reach matter.
- Install and test: firm pull test, no wobble, then recheck after a week.
Who Benefits Most (Not Only Elderly)
A lot of folks assume grab bars are only for seniors. In practice, I see the biggest benefit anywhere balance, strength, or stability is even slightly reduced. That includes knee pain, back issues, vertigo, post-surgery recovery, pregnancy, and even kids who slip getting out of the tub.
For bathroom grab bars for elderly family members, the value is often emotional as well as physical. People feel more independent when they can move without calling for help. And caregivers get peace of mind because transfers become more controlled.
On top of that, grab bars are a smart “just in case” upgrade for guest bathrooms. One visitor with a sore ankle or a new hip can struggle in a slick shower. A simple bar can prevent a scary moment.
How to Pick the Best Bathroom Safety Bars (Quick Buyer Checklist)
When clients ask me what matters most, I tell them to focus on three things: strength, grip, and corrosion resistance. Looks come later.
A practical checklist that works in real homes:
- Solid metal construction, often stainless steel or quality coated steel
- A comfortable grip diameter that feels secure in wet hands
- Enough clearance between bar and wall so knuckles don’t scrape
- A finish that won’t pit or rust in humidity
- A mounting system with a sturdy flange and reliable screws
If you’re choosing the best bathroom grab bars for elderly users, don’t underestimate grip feel. Some people love a slightly textured or knurled surface because it reduces slipping. Others with sensitive hands prefer a smoother finish. If possible, hold a sample in your hand and imagine it wet.
One more honest tip from the field: avoid anything that feels flimsy at the store. If the bar is light, thin, or the mounting plates flex, it’s not a great sign. The best bathroom safety bars feel boringly solid.
Types of Grab Bars (Choose by Need + Bathroom Layout)
Most homes do well with straight bars. They’re versatile and easy to place, and they work for push, pull, and steadying.
That said, different shapes solve different problems:
- Straight bars: best all-around option for showers, tubs, and toilets
- Angled bars: helpful for sit-to-stand because your hand naturally changes height during the movement
- Flip-up bars and toilet safety rails: useful when side-wall mounting is limited or when transfers need extra support
- Modern grab bars for shower setups: sleeker profiles with concealed mounts that blend into updated bathrooms
- Designer grab bars: style-forward finishes and shapes that look intentional instead of clinical
Here’s the thing, design options are not just vanity. When a bar looks like it belongs, people are more likely to keep it installed and actually use it. I’ve had clients tell me they refused bars for years because they hated the “hospital look,” then happily used designer grab bars once they matched the fixtures.
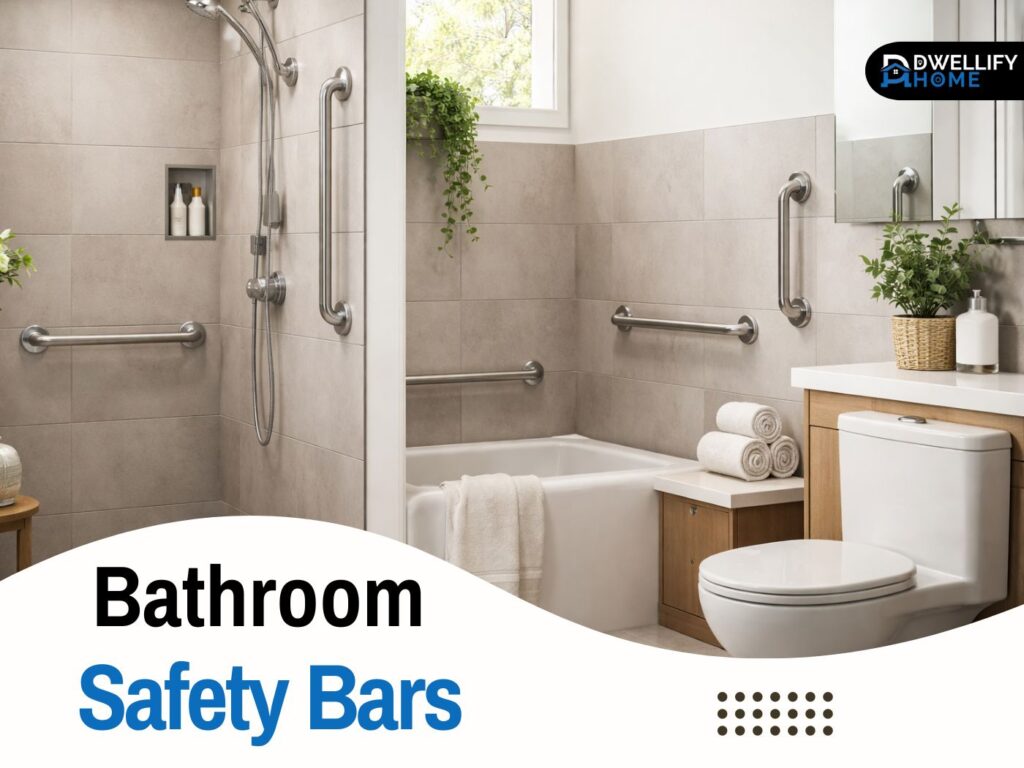
Where to Install Bathroom Safety Bars (High-Impact Zones)
If you only do one area, do the shower. That’s where wet feet, soap, and turning movements combine in the worst way.
Shower (the top priority area)
For shower grab bars, I typically plan for two moments: stepping in and standing while washing. A vertical bar near the entry can be great because it gives your hand a natural pull point as you step over a curb or threshold.
Inside the shower, a horizontal bar at a comfortable reach height helps with balance while you turn, rinse, or lift a foot to wash. In my experience, many people place bars too far forward, then they have to lean to reach them. That defeats the purpose.
Bathtub (safe entry and exit needs multiple support points)
Tubs often need more than one bar because entry and exit involve stepping over a high edge. A common setup is a bar near the faucet end for controlled entry, plus another positioned to help you stand and pivot safely.
One real-world example: I installed bathtub grab bars for a client who had a knee replacement. The first bar helped her get in, but she still struggled to get out because her leverage point was wrong. Adding a second bar closer to her natural standing position made the exit smooth and far less painful.
Toilet area (sitting and standing support)
The toilet is a repeat-motion zone. Even a small wobble can become a fall when you’re standing up and your center of gravity shifts forward.
A solid wall-mounted bar on the side wall is ideal. If there’s no side wall, a rear-wall bar can help with steadying, but it usually won’t replace side support. In tight layouts, a flip-up bar can act like a supportive armrest without blocking the space.
Vanity and sink area (often ignored but helpful)
This one surprises people. The sink area can be risky because you’re often leaning, turning, or stepping back while wiping water off your face.
A short vertical bar near the vanity edge can provide a subtle steady point, especially in homes where someone has dizziness or needs a moment to regain balance after bending down.
Placement Rules That Keep You Google-Safe and People-Safe (Simple, Not Over-Technical)
Let’s keep this practical. There are accessibility guidelines like ADA recommendations that give helpful ranges for height, spacing, and bar dimensions. In homes, I treat those as a smart starting point, then I adjust to the real person using the bathroom.
The most useful approach is what I call the “movement test.” Stand where the user stands, then simulate the motion slowly:
- Step into the shower as if you’re tired
- Turn as if you’re rinsing shampoo
- Sit and stand at the toilet without using momentum
- Reach for a towel and step back
Where does your hand naturally go when you want support? That’s where a bar should be, not where it looks centered on the wall.
Common placement mistakes I see:
- Too high, so the user can’t get leverage
- Too far away, so the person leans to grab it
- Too short, so it doesn’t support different positions
- Installed on drywall with weak anchors when studs were available
If you take one lesson from this section, make it this: placement should follow the body, not the tile pattern.
Bathroom Grab Bars for Elderly Installation (DIY vs Pro)
Bathroom grab bars for elderly installation can be a DIY job if you’re comfortable drilling, finding studs, and working around tile. But it’s also one of those projects where a small mistake has a big cost. A loose bar is worse than no bar because it can fail when someone truly needs it.
A safe install usually depends on what’s behind the wall:
- Wall studs or solid blocking are best
- Quality anchors can work when studs are not in the right spot, but they must be rated for load and installed correctly
- Tile needs careful drilling to avoid cracks and water damage
If the bathroom has older walls, thin tile, or unknown framing, hiring a pro can be the smarter choice. I’ve opened walls before and found odd spacing, rotten backing, or previous water damage. In those cases, you want someone who can fix the structure, not just add hardware.
Grab bars for shower installation (tile-specific tips)
Tile is strong on the surface but brittle when drilled wrong. The best tip I can share is to go slow and use the right bit for the tile type. Rushing is how you end up with spider cracks, and those cracks can let water into the wall.
A few practical do and don’t reminders:
- Do mark holes carefully and double-check level before drilling
- Do use the correct bit and start with light pressure
- Don’t drill right on a grout line edge if you can avoid it
- Don’t over-tighten screws, that can crack tile or deform mounts
- Do seal penetrations properly so water does not migrate behind the wall
This is also where bar placement and mounting quality meet. Even the best-looking bar won’t help if the backing is weak.
Wall-Mounted vs Suction Bathroom Safety Bars (What’s Actually Safe?)
Wall-mounted bars are the gold standard for real support. They’re designed to take force, including a sudden grab during a slip. When properly installed into studs or solid anchors, they can handle the kind of load that matters in real life.
Suction bars are tricky. I’m not saying they never help, but I don’t treat them as primary safety devices. They can lose suction over time due to humidity, surface texture, or small changes in position. And the scary part is they often feel secure right up until they don’t.
If someone wants a temporary aid for travel, a suction bar might be a limited option for light balance support on smooth tile. But for steadying your body weight, especially for seniors, I always recommend a properly mounted solution.
If you’re unsure, a helpful step is to ask a physical therapist or occupational therapist what kind of support the user needs. Some people need a steadying point. Others need a true weight-bearing bar during transfers.
Small Bathroom Safety Bars (Support Without Crowding the Space)
Small bathroom safety bars can work beautifully when you keep the layout in mind. In tight spaces, the goal is to add support without creating obstacles or sharp corners to bump into.
In compact bathrooms, I often use a minimal setup that still feels strong:
- A short vertical bar near the shower entry for controlled stepping
- A compact bar near the toilet where the hand naturally reaches during standing
- A discreet bar near the vanity edge if there’s a history of dizziness
There are also multi-functional options like a shelf-grab combo or a towel-bar style grab bar. These can look great, but I treat them with extra caution. They must be rated and mounted like real grab bars, not like typical accessories.
Making Grab Bars Look Good (Modern + Designer Options)
Good news, you don’t have to choose between safety and style anymore. Modern grab bars for shower spaces come in finishes that match today’s fixtures, like matte black, brushed nickel, and warm metallic tones. With concealed mounting, they can look like part of the design plan.
Designer grab bars can also be placed in a way that feels intentional. For example, aligning the bar with the shower valve line or matching it to towel hook heights can make it visually cleaner.
A simple style trick I use: match the bar finish to the faucet, then keep the mounting plates symmetrical where possible. When it looks planned, people stop noticing it as a “special needs” item and start seeing it as a smart feature.
Maintenance and Safety Checks (Keep Them Safe for Years)
Once installed, maintenance is easy, but it’s important. Moisture, cleaning chemicals, and daily use can loosen hardware over time.
A quick monthly check takes less than a minute:
- Put one hand on the bar and give it a firm wiggle
- Check the mounting plates for gaps or movement
- Look for rust spots, especially near screws
- Make sure the surface is not slick with soap residue
For cleaning, mild soap and water is usually enough. Avoid harsh abrasives that can scratch finishes and create spots where corrosion starts. If the bar has a textured grip, use a soft brush occasionally to remove buildup.
FAQs
Will Medicare pay for grab bars in the bathroom?
Usually no for Original Medicare. Grab bars are generally treated as home modifications or convenience items, not covered durable medical equipment. Some Medicare Advantage plans may offer allowances or supplemental benefits, but it varies by plan and location.
Do suction cup grab bars really work?
They can work for light balance support on smooth, non-porous surfaces, but they are not reliable for full body-weight support. Humidity, surface texture, and imperfect suction can cause sudden release.
Where should grab bars be placed in a bathroom?
Focus on the highest-risk moves: shower entry, inside the shower for turning and washing, and next to the toilet for sit-to-stand support. ADA guidance commonly places horizontal bars around 33–36 inches above the finished floor, then adjust to the user’s reach.
Do plumbers install shower grab bars?
Yes, many plumbers do, especially when installation involves tile drilling, waterproofing concerns, or mounting into solid structure. Accessibility contractors and handymen also do it, but whoever installs should understand load-bearing mounting.
How high should bathroom safety bars be?
For many accessible layouts, a common reference is 33–36 inches above the finished floor measured to the top of the gripping surface. In homes, fine-tune based on the person’s height, strength, and how they move.
Conclusion
If you want a safer bathroom without turning your home into something that feels medical, start with smart placement and solid mounting. That’s the difference between a bar that looks helpful and one that truly is.
My practical advice is to prioritize the shower and the toilet first, then fine-tune based on how the person moves. Use wall-mounted bars where weight support is needed, and choose finishes and styles that make you happy to keep them installed.
Done right, bathroom safety bars become one of those upgrades you stop thinking about, because everyday routines feel normal again. And honestly, that’s the goal.
Disclaimer:
This article is for general home-safety information and does not replace medical advice or an in-person accessibility assessment. Installation requirements vary by wall structure, materials, and local codes, so consult a qualified professional if you are unsure. Coverage and benefits for grab bars depend on your specific insurance plan and region.

I’m Bilal, the founder of Dwellify Home. With 6 years of practical experience in home remodeling, interior design, and décor consulting, I help people transform their spaces with simple, effective, and affordable ideas. I specialize in offering real-world tips, step-by-step guides, and product recommendations that make home improvement easier and more enjoyable. My mission is to empower homeowners and renters to create functional, beautiful spaces—one thoughtful update at a time.