A paint job can go sideways fast when dust starts floating, overspray lands everywhere, and the air in the workspace turns heavy. That’s usually the point where a simple booth starts making sense. A good homemade setup doesn’t need to look fancy. It just needs to contain the mess, move air in the right direction, and give you enough room to work without fighting the space.
I’ve seen people spend more time fixing contamination, dry spray, and uneven coverage than they would’ve spent building a basic booth in the first place. The booth itself isn’t the goal. The goal is a cleaner finish, fewer headaches, and a safer place to spray.
Snippet-Ready Definition
A diy paint booth is a homemade enclosed space that helps control overspray, dust, and airflow while painting. People use it to get cleaner finishes and keep the work area safer and easier to manage.Mission Statement
Dwellify Home helps homeowners make practical, stylish, and informed home improvement decisions with clear, trustworthy guidance.
What Is a DIY Paint Booth?
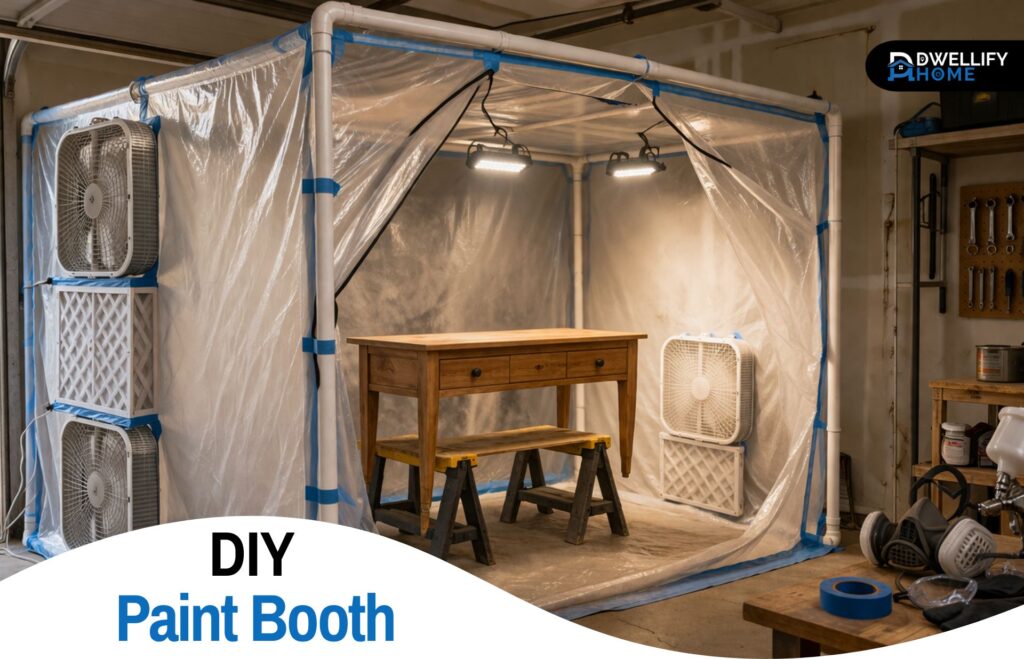
A DIY paint booth is a temporary or semi-permanent enclosed space built to control overspray, dust, and airflow while painting. Most home setups use a frame made from PVC, wood, or support poles, then wrap it with plastic sheeting and add filtered airflow.
That controlled space makes a real difference. Paint settles better, dust has less chance to land in the finish, and cleanup is much easier. It also helps separate the painting area from the rest of the garage or workshop, which matters more than most beginners expect.
A homemade booth isn’t the same as a professional spray booth. It won’t match a commercial setup for airflow design, fire safety, or production-level use. Still, for furniture, cabinets, hobby parts, small metal pieces, and occasional home projects, it can work very well when built carefully.
Key Benefits
- Helps reduce dust landing in wet paint
- Keeps overspray more contained
- Makes lighting and spray angles easier to manage
- Creates a more repeatable painting setup
- Can be built to fit garages, workshops, or small hobby spaces
Who Should Build a DIY Paint Booth?
This kind of setup fits homeowners, hobbyists, and weekend DIYers who spray often enough to need a cleaner process but not often enough to justify a full commercial booth.
It makes sense when:
- you paint furniture, trim, doors, or cabinets at home
- you need better overspray control in a garage
- you work on models, crafts, or small parts
- you want a temporary booth that can come down after the job
It’s less practical for large-scale automotive work, frequent solvent-heavy spraying, or situations where proper ventilation can’t be managed safely. In those cases, renting a paint booth or using a professional facility is usually the smarter call.
Choosing the Right DIY Paint Booth Setup
The best booth style depends on what you paint, how often you spray, and how much room you can dedicate.
A garage paint booth is the most common choice. It gives you enough depth for furniture, doors, and medium-size projects. It’s also easier to vent than a room inside the house.
A portable or collapsible paint booth works better for occasional jobs. These are useful in shared garages where the space needs to go back to normal after the project is done.
A DIY paint booth indoor setup is where people often get overconfident. Indoor booths can be done for limited craft or hobby use, but airflow and safety become harder to manage. That’s especially true with stronger coatings.
For models and small parts, a tabletop booth is usually the better answer. It takes less material, costs less, and is easier to ventilate properly for the scale of the work.
DIY Paint Booth Plans: Size, Layout, and Space Requirements
The easiest mistake to make is building the booth too small. On paper, the project fits. In real life, you still need room to move around it, hold the spray gun at the right distance, and avoid brushing against plastic walls.
A booth should give you enough clearance on all sides of the piece, plus enough room for the fan and filter setup. For furniture and cabinet work, extra walking room matters more than people think. Tight booths trap you in awkward positions, and that usually shows up in the finish.
Think through the layout before cutting anything:
- where clean air will enter
- where air will leave
- where you’ll stand and move
- where the painted item will sit or hang
- how you’ll get in and out without stirring up dust
Simple diy paint booth plans are usually better than overbuilt ones. Straight walls, enough headroom, and a clear airflow path will serve you better than a complicated shape.
Materials You Need to Build a DIY Paint Booth
Most homemade paint booth setups use the same basic parts: a frame, plastic walls, floor protection, ventilation pieces, lighting, and safety gear.
PVC works well for lightweight temporary booths because it’s easy to cut and reconfigure. Wood is sturdier and better for semi-permanent builds. Temporary support poles can also work in a garage when you want a booth that goes up and comes down quickly.
For the enclosure, heavy plastic sheeting holds up much better than thin drop film. Thin material tears too easily, especially around the entry and corners. Floor covering matters too. A dirty concrete floor can kick up a surprising amount of dust.
For ventilation, most DIY setups use fans, furnace-style filters, and sometimes ducting to direct exhaust. This is where people tend to oversimplify. A fan alone is not a complete plan. Air has to come in, pass through the booth evenly, and leave without creating dead zones.
Lighting should be bright enough to show dry spots, missed edges, and surface texture. Poor lighting causes more bad passes than people realize. Even a decent spray technique looks rough under weak lighting.
Don’t treat safety gear as optional. A proper respirator, gloves, and eye protection are basic, not advanced.
Homemade Paint Booth Ventilation Explained Simply
Good ventilation is what makes a paint booth work. Without it, you’ve just built a plastic room that traps overspray and stale air.
The goal is controlled airflow. Clean air should enter from one side, move across the project, and exit from the other side. That steady movement helps carry overspray away from the surface instead of letting it hang in the air and settle back into the finish.
Negative pressure means the booth pulls air inward slightly instead of pushing contaminated air out into the room. That’s generally what most home users are trying to achieve. Positive pressure setups are a different category and are harder to do well in a simple home build.
Another detail beginners miss: catching overspray and handling fumes are not exactly the same thing. Filters can help trap paint particles, but ventilation planning still matters for the air you’re breathing and the materials you’re spraying. That’s one reason paint type matters so much.
How to Build a DIY Paint Booth Step by Step
Start by choosing the cleanest, driest location you have. Garages usually make the most sense because you get space and easier exhaust options.
Build the frame first. Keep it square, simple, and sturdy enough that the plastic won’t sag into your working space. Then wrap the walls and ceiling, and tape seams well enough to control leaks and flapping.
Protect the floor next. This part gets skipped a lot, but it helps with dust and cleanup. After that, install your intake and exhaust setup. Air should move through the booth, not just churn around inside it.
Add a simple entry flap or zippered opening that you can use without dragging dust in every time you step through. Then set up the lights where they show the surface clearly without being in your way.
Before spraying anything, test the airflow. Use a light strip of plastic or similar visual cue and check whether the air is actually moving where you expect. This quick test saves a lot of frustration.
A Simple DIY Paint Booth Setup for Beginners
For someone painting occasionally, a simple booth is usually the right starting point. PVC frame, plastic sheeting, filtered airflow, decent lighting, and enough room to move is more than enough for many home projects.
The mistake is trying to copy a professional paint booth too early. A first build should focus on three things: containment, visibility, and workable airflow. Once those are sorted, upgrades are easier to judge.
That kind of beginner-friendly setup also teaches you what your projects actually need. After a few sessions, you’ll know whether you need more width, better lighting, easier access, or a stronger ventilation layout.
How to Build a More Professional Paint Booth at Home
A more refined booth usually improves sealing, lighting, access, and airflow control. The difference isn’t always in expensive materials. It’s often in better planning.
For example, a booth with proper work height, cleaner intake air, stronger wall support, and better light placement feels completely different to use. You spend less time adjusting the project and more time spraying evenly.
Still, there’s a line between a serious home booth and a true professional booth. That line matters. Home builds are useful, but they shouldn’t be mistaken for commercial systems designed for heavy, repeated use.
DIY Paint Booth Ideas for Small Garages and Tight Spaces
Small spaces need smarter layouts, not just smaller versions of big booths.
A fold-away booth can work well when the garage also stores cars, tools, or household items. A temporary plastic enclosure with a simple frame is often enough for occasional projects. Some people even build panels that store flat against a wall between jobs.
The key is not to crowd the project. Small-space paint booth ideas work best when the project size matches the booth size. Trying to spray a large dresser in a booth meant for chairs usually leads to overspray bounce-back and awkward spray angles.
DIY Paint Booth for Models, Miniatures, and Small Parts
Small-scale work benefits from a different approach. A tabletop booth with compact ventilation is easier to manage, cheaper to build, and more practical for model parts, miniatures, and craft pieces.
For these jobs, control matters more than size. You want steady airflow, clear lighting, and a work surface that lets you rotate parts without touching the finish. This is one area where a dedicated small booth often performs better than trying to use a full garage booth for tiny pieces.
DIY Paint Booth Indoor: What to Know Before You Spray Inside
Indoor setups need extra caution. Space is tighter, ventilation paths are harder to control, and paint fumes can linger longer than people expect.
Water-based coatings may seem more forgiving, but they still create overspray and still require good airflow. Stronger coatings raise the stakes further. A room that feels ventilated might still be a poor place to spray.
That’s why indoor spraying should be treated carefully. For some small hobby uses, it can be manageable with the right setup. For larger projects or stronger finishes, it’s often better to move the work to a garage, workshop, or another more suitable area.
How to Use a DIY Paint Booth for Better Results
A booth helps most when it’s prepared before each session. Sweep and settle dust first. Check filters. Look at the floor covering. Make sure the airflow is working before you mix paint or load a gun.
Project positioning matters too. Place the item so you can reach edges and corners without twisting around inside the booth. That reduces missed spots and helps keep your spray distance consistent.
After spraying, let the piece sit in stable air. Rushing in and out of the booth or moving the item too early can ruin a clean finish just as quickly as poor prep.
Common DIY Paint Booth Mistakes to Avoid
The most common problems are predictable:
- building the booth too small
- placing fans without a real airflow path
- using weak lighting
- ignoring dust on the floor and walls
- delaying filter changes
- spraying without proper protective gear
Another frequent mistake is assuming more fan power automatically means better ventilation. Sometimes it just creates turbulence, which can pull dust around and make spraying less consistent.
DIY Paint Booth Safety Tips That Matter
Safety isn’t a side note here. It’s part of the build.
Use a respirator suited to the materials you’re spraying. Keep ignition risks in mind. Be careful about electrical equipment and light placement. Replace filters before they become a restriction instead of after performance drops badly.
Also, clean up after each session. Overspray buildup, dirty floor covering, and neglected filters make the next job harder and less predictable.
How Much Does a DIY Paint Booth Cost?
A basic booth can be built on a modest budget if you keep the design simple. PVC, plastic sheeting, tape, filters, and a straightforward fan setup usually cover the essentials.
Costs rise when you add stronger framing, better lighting, zippered entry systems, ducting, or a more refined layout. The hidden expenses are usually replacement filters, extra plastic, protective gear, and the little pieces people forget during planning.
For most home users, the sweet spot is a booth that’s sturdy enough to reuse but simple enough to maintain without constant upgrades.
DIY Paint Booth Rental vs Buying vs Building
Building makes sense when you paint often enough to use the booth more than once and your projects fit a home setup.
Renting makes more sense for one-time work, larger jobs, or cases where you need a higher-grade setup than a garage booth can realistically provide.
Buying a ready-made paint booth can be useful for hobby work or frequent small-part spraying. For bigger projects, though, many people still end up adapting the booth to their own space and workflow.
Maintenance Checklist for a DIY Paint Booth
A booth stays useful only if you maintain it.
Before each use, check the plastic, floor covering, filters, and airflow. After spraying, deal with overspray residue, remove trash, and replace anything that’s become dirty enough to affect the next finish.
This doesn’t need to be complicated. A short routine after each session keeps the space predictable, and predictability is a big part of getting repeatable paint results.
DIY Paint Booth FAQ
What do you need to make a paint booth?
You’ll need a frame, plastic sheeting, floor protection, tape, lighting, airflow with fans and filters, and basic safety gear. Most home builds use PVC or wood for the frame.
How to make a homemade photobooth?
A homemade photobooth is different from a paint booth. For a photobooth, you usually need a backdrop, lighting, a camera or phone stand, and enough space for people to stand comfortably.
Are DIY paint booths safe?
They can be safer than spraying in an open garage, but only when airflow, protective gear, and fire risk are taken seriously. A plastic enclosure without proper ventilation is not a safe setup.
Is it cheaper to DIY paint a truck?
It can be cheaper on materials and labor, but mistakes, rework, prep time, and setup costs add up quickly. Large vehicle projects also push a home booth beyond what many simple setups handle well.
What kind of ventilation works best in a homemade paint booth?
The best setup moves air steadily through the booth instead of letting it swirl around. Clean air should enter from one side and exit from the other, with filters placed where they actually support airflow.
Conclusion
A good DIY paint booth doesn’t need to be complicated, but it does need to be thought through. Size, airflow, lighting, and safety all work together. Get those right, and the booth becomes more than a plastic enclosure in the garage. It becomes a workspace that helps you paint cleaner, work more comfortably, and make fewer costly mistakes.
Start with a setup that fits your projects and your space. Keep it simple where you can, improve it where it counts, and don’t ignore the small details. Those small details are usually what separate a frustrating paint day from a smooth one.
Disclaimer
This content is for general informational purposes only. Always follow product labels, local codes, and safety requirements for your specific materials and workspace.

I’m Bilal Hassan, the founder of Dwellify Home. With 6 years of practical experience in home remodeling, interior design, and décor consulting, I help people transform their spaces with simple, effective, and affordable ideas. I specialize in offering real-world tips, step-by-step guides, and product recommendations that make home improvement easier and more enjoyable. My mission is to empower homeowners and renters to create functional, beautiful spaces—one thoughtful update at a time.