I’ve lost count of how many summer kitchens I’ve helped plan over the years. Some were simple grill stations for couples who just wanted to stop running in and out of the house. Others turned into full outdoor living rooms with pizza ovens, refrigerators, and enough seating for the whole neighborhood.
The ones that worked best had one thing in common: someone thought through the details before breaking ground.
If you’re considering a summer kitchen for your backyard, you probably have a mix of excitement and questions. You can picture yourself out there cooking, hanging out with friends, maybe even staying outside when it’s hot instead of hiding in the AC. But you also wonder about cost, layout, materials, and whether you’ll actually use it enough to make it worth the investment.
I’ve been through this with dozens of homeowners. Here’s what I’ve learned.
Snippet-Ready Definition
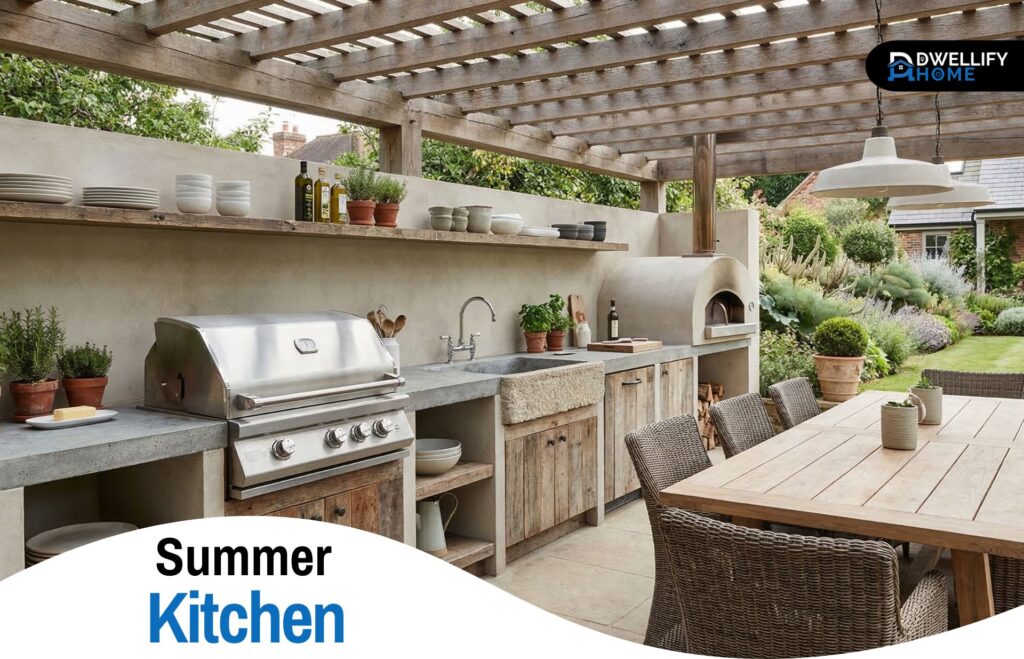
A summer kitchen is an outdoor cooking space separate from the main house, designed to keep heat, smoke, and cooking odors outside during warm months. Modern versions range from simple grill stations to fully equipped outdoor rooms with appliances, counter space, and seating for entertaining.
Mission Statement
Dwellify Home helps homeowners make practical, stylish, and informed decisions about their living spaces.
Is a Summer Kitchen Right for You?
Not everyone needs a summer kitchen. I’ve walked into backyards where a simple charcoal grill and a folding table would have been plenty. I’ve also seen people spend fifteen thousand dollars on an outdoor kitchen they used twice before deciding it was too much trouble to keep clean.
The people who get the most use out of their summer kitchens share a few traits. They cook outdoors often anyway, even if it’s just burgers on a basic grill. They have friends over regularly during warm months. They live somewhere with at least three or four months of decent weather. And they genuinely enjoy being outside, not just the idea of it.
If that sounds like you, a summer kitchen could be a great fit. If you’re more of an occasional griller who prefers air conditioning, you might be better off with something simple.
Space matters too. You don’t need a huge yard, but you do need enough room to cook safely and move around comfortably. The National Fire Protection Association recommends keeping grills at least ten feet from your house or any other structure. That’s a hard rule, not a suggestion. I’ve seen deck fires from people ignoring it.
Climate plays a role as well. If you live where winters are harsh, you’ll need to think about winterizing. If you’re in a rainy area, you’ll want cover. And if you’re somewhere hot and sunny, you’ll need materials that won’t fade or crack after a few summers.
As for home value, here’s the honest truth: a well-built summer kitchen can help your home sell faster, but you probably won’t get every dollar back. Build it because you’ll use it, not because you think it’s an investment.
Planning Fundamentals – Getting It Right From the Start
Before you look at pictures online or visit a showroom, sit down and think about how you actually live. Do you host big parties where you’re cooking for a crowd? Or is it mostly family dinners where you want to be part of the conversation while you work?
That answer drives everything else.
I worked with a guy once who insisted on a massive six-burner grill because he liked the way it looked. After we built it, he admitted he mostly cooked for himself and his wife. A smaller grill with more counter space would have served him better.
Once you know your style, grab a tape measure and map out your space. Mark where your house is, where doors and windows are, and where you might run gas and electrical lines. This doesn’t have to be fancy. Graph paper and a pencil work fine.
The work triangle concept applies outdoors just like indoors. Your main cooking surface, your sink if you’re having one, and your prep area should form a triangle that lets you move efficiently without bumping into things. Fifteen feet total is a good target, with no single leg shorter than four feet or longer than nine.
Budget is where dreams meet reality. I’ve built summer kitchens for under three thousand dollars using modular pieces. I’ve also built them for over fifty thousand with custom stonework and commercial appliances. Most people end up somewhere in the middle, around ten to twenty thousand for a nice built-in setup.
Get clear on your number before you fall in love with anything. And add fifteen percent for surprises. There are always surprises.
Permits are boring but important. Some towns require them for any structure with gas or electrical work. Others don’t care until you sell the house and an inspector flags the unpermitted work. Call your local building department and ask. It takes ten minutes and saves headaches later.
Summer Kitchen Layouts – Finding Your Perfect Flow
The linear layout is the simplest. Think of a straight counter with appliances set into it. It works well along a fence line or house wall where space is tight. You walk back and forth instead of turning around, which is fine for smaller setups.
L-shaped layouts give you more room to work. One leg might hold your grill, the other your prep sink and counter space. The corner becomes a natural gathering spot where people can stand without being in your way. I’ve done these on patios and under pergolas, and they almost always feel right.
U-shaped layouts are for serious cooks. You have three sides of workspace, which means everything is within arm’s reach. You turn instead of walking, which saves steps when you’re moving between grill, sink, and prep. The downside is it takes more space and can feel closed off from guests. If you go this route, leave one side open or add bar seating so people can still talk to you.
Island layouts put cooking in the middle of everything. People can sit around three sides while you work on the fourth. It’s great for parties and social cooking. Just make sure your ventilation can handle smoke drifting toward seating. And plan for storage underneath, because island bases are wasted space otherwise.
Modular setups are worth considering even if you plan to build permanent later. Start with a grill cart and a prep table. Use it for a season. Pay attention to what works and what doesn’t. Then design your permanent kitchen based on real experience instead of guesses.
Quick Layout Comparison
| Layout Type | Best For | Space Needed |
| Linear | Narrow spaces, smaller budgets | 8-10 ft length |
| L-shaped | Defining zones, corner spaces | 10-12 ft each leg |
| U-shaped | Serious cooks, maximum efficiency | 12-14 ft each side |
| Island | Entertaining, social cooking | 4×6 ft minimum |
| Modular | Renters, phased builds | Flexible |
Key Benefits of a Summer Kitchen
Keeps cooking heat out of your main living space
Expands usable outdoor living area
Creates a natural gathering spot for entertaining
Adds convenience with outdoor-rated appliances
Can be built in phases to match your budget
Appliances – Building Your Outdoor Cooking Powerhouse
The grill is the star. Gas is most common because it’s convenient. You turn a knob and cook. Charcoal takes more time but gives more flavor. Pellet grills offer smoke and convenience together. Hybrid models let you switch.
I recommend buying the best grill you can afford, but don’t overspend on features you won’t use. A basic three-burner gas grill from a reputable brand will outlast a fancy one with wifi and LED lights if you take care of it.
Pizza ovens have become incredibly popular. Wood-fired models get hotter and give that authentic taste. Gas models heat faster and are easier to control. If you’re serious about pizza, go wood. If you want to make pizza sometimes without the hassle, go gas.
Outdoor refrigeration seems like a luxury until you have it. Suddenly you’re not running inside for drinks or to grab another pack of burgers. Undercounter fridges fit neatly into cabinetry. Beverage centers are narrower if space is tight. Ice makers are nice but need regular cleaning.
Sinks are worth the plumbing cost if you can manage it. Washing hands without going inside, rinsing vegetables, cleaning grill grates while they’re hot. Even a small bar sink changes how you use the space.
Specialty appliances like side burners, smokers, and griddles depend on what you cook. I’ve seen smokers gather dust. I’ve also seen people use their side burner every single time they grill for sauces or sides. Think about your actual cooking habits.
Appliance quality matters outdoors more than indoors because everything fights weather. Commercial-grade looks impressive but requires more maintenance. Residential-grade from reputable brands usually holds up fine for home use.
Materials That Last – Built for Sun, Rain, and Snow
Cabinets take the most abuse outdoors. Stainless steel is the gold standard. It resists rust, cleans easily, and holds up to weather. Marine-grade polymer is another good option. It won’t rust or rot, and it costs less than stainless. Powder-coated aluminum is lightweight and durable. Wood cabinets can work if they’re properly sealed and maintained, but they require more work.
Countertops are where people make expensive mistakes. Granite is popular because it looks good and handles heat. But it needs sealing and can crack if water gets underneath. Concrete gives an industrial look but stains easily and can crack over time. Porcelain and sintered stone like Dekton are nearly indestructible, resist heat and UV, and never need sealing. They cost more upfront but save over time.
Tile looks great but grout fails outdoors. I’ve replaced too many tile countertops to recommend them for heavy use. Stainless steel counters are durable and heatproof but show every fingerprint and scratch.
Flooring needs to be non-slip when wet. Wet grass is slippery enough. Wet stone or tile is dangerous. Textured concrete, rubber pavers, and certain types of tile made for outdoor use work well. Avoid smooth finishes anywhere near cooking areas.
In real terms, here’s what I’ve seen hold up best over ten years: stainless steel cabinets with porcelain countertops, under a covered structure. That combination handles sun, rain, snow, and daily use with minimal maintenance.
Design and Inspiration – Creating a Space You’ll Love
Shelter changes everything. A pergola with adjustable louvers lets you control sun and shade. A solid roof means you can cook in the rain. Shade sails are cheaper but need replacing every few years. Retractable awnings offer flexibility but require maintenance.
Lighting makes the space usable after dark. Task lighting over the grill and prep areas is essential for safety. String lights add ambiance without being harsh. Undercabinet lighting highlights countertops and creates depth. Put everything on dimmers so you can adjust the mood.
Seating should match how you entertain. Bar seating along one side of an island lets people sit while you cook. Lounge areas away from cooking give guests a place to relax. Dining tables work if you have room. Just make sure there’s enough space to walk behind seated people without bumping them.
Greenery softens everything. Built-in planters with herbs give you fresh flavors while cooking. Potted plants can move with seasons. Vertical gardens save space and look interesting. Just remember plants need water and may attract bugs near food prep.
Weatherproof decor has come a long way. Outdoor cushions made from solution-dyed acrylic hold color for years. Outdoor rugs define spaces and add warmth. Just bring them inside during winter or heavy rain.
Entertainment extras depend on your crowd. Outdoor speakers are easy to add. Weatherproof televisions exist but cost more than bringing a portable one outside when you want it.
The outdoor shower trend has grown. If you have a pool or spend summers at the beach, a simple shower near your kitchen keeps people from tracking through the house. It’s not for everyone, but the people who add one love it.
Utility Systems – The Behind-the-Scenes Essentials
Gas line installation is not a DIY job. Leaks kill. Period. Hire a licensed professional who will pull permits and test everything. The cost is worth your safety.
Electrical work similarly needs a pro. Outdoor outlets need GFCI protection. Lighting circuits need proper weatherproofing. Appliances need dedicated circuits with correct amperage. An electrician who knows outdoor kitchens is worth finding.
Plumbing involves running water lines, installing a backflow preventer, and planning for drainage. Some areas require freeze-proof hydrants if you get cold winters. Others let you drain and blow out lines for the season. Know your local requirements before trenching.
Ventilation matters more than people think. If your kitchen is under a solid roof, smoke and grease need somewhere to go. Range hoods designed for outdoor use handle this. Without one, your beautiful covered structure will gradually collect grease and smell like old barbecue.
Winterization is simple if planned for. Install shutoff valves inside the house for outdoor water lines. Slope drain lines so water doesn’t pool. Plan to store cushions and removable items. Build cabinets that allow airflow so moisture doesn’t get trapped.
Smart home integration works outdoors too. Controls let you monitor temperatures, turn on lights from inside, and get notifications if something’s wrong. It’s not necessary, but it’s nice.
Summer Kitchen Costs – Real Numbers for Real Planning
Basic setups with modular pieces start around two to three thousand. You’re looking at a good grill cart, some counter space, maybe a small prep table. No built-ins, no utilities, just functional cooking.
Mid-range built-ins run eight to fifteen thousand. This includes decent appliances, basic cabinetry, standard countertops, and simple utilities. You’re getting a real outdoor kitchen that will last with proper care.
High-end projects go twenty to thirty thousand. Better appliances, better materials, more features like pizza ovens or refrigeration. Custom touches start appearing.
Luxury builds exceed thirty thousand and can go much higher. Commercial-grade appliances, stonework, custom cabinetry, full utilities, entertainment systems. At this level, you’re limited only by your yard and your imagination.
Breaking it down, appliances typically run thirty to forty percent of total cost. Cabinetry twenty to twenty-five percent. Countertops ten to fifteen percent. Labor twenty to twenty-five percent. Permits and site prep five to ten percent.
Where to splurge? The grill if you cook often. Countertops if you prep a lot. Cabinetry if you’re in harsh weather. Where to save? Fancy extras you won’t use. Name brands that don’t perform better. Features that complicate maintenance.
Hidden costs catch everyone. Trenching for gas and electrical runs adds up fast. Upgrading electrical panels if you need more capacity. Surprises when you dig and find rock or old utilities. Add that fifteen percent buffer. You’ll probably need it.
ROI varies by market. In warm climates where outdoor living matters, you might recoup sixty to eighty percent. In colder areas, less. But again, build it for yourself, not for resale.
Financing options exist if you need them. Home equity loans, personal loans, even financing through some contractors. Phased building is smart if budget is tight. Do the structure and grill now. Add sink and refrigeration next year. Finish with extras later.
Professional Help vs. DIY – Making Smart Choices
You can handle modular setups yourself. Unbox, assemble, place. No permits, no utilities, no stress.
You can also do non-structural elements. Painting, decorating, planting, accessorizing. All fine.
Everything involving gas, electrical, plumbing, or structural changes needs a pro. Not might need. Needs. I’ve seen too many close calls from DIY gas work and too many fires from DIY electrical.
Choosing a contractor means asking the right questions. How many outdoor kitchens have you built? Can I see photos? Who pulls permits? What’s your timeline? What’s not included in your quote? Good contractors answer clearly. Vague answers mean keep looking.
Quotes should itemize major categories. Appliances, cabinets, countertops, labor, permits, site work. If someone gives you one number and says trust me, don’t.
Timelines vary. Modular setups happen in a day. Simple built-ins take a week or two. Complex projects with custom work can stretch months. Ask upfront and plan accordingly.
Common Planning Mistakes – And How to Avoid Them
Skipping permits is the most expensive mistake. I know someone who had to tear out a fifteen thousand dollar kitchen because it was too close to the property line and never permitted. Check first.
Indoor materials outdoors fail eventually. I’ve replaced cabinets that delaminated, countertops that cracked, flooring that crumbled. Outdoor-rated materials cost more but last.
Ventilation and drainage seem minor until they’re not. Grease buildup on ceilings. Standing water under cabinets. Fixing these after the fact is expensive.
Lighting, storage, and seating get forgotten until the first party. Then you’re cooking in the dark, running inside for tools, and watching guests stand awkwardly. Plan these from the start.
Winterization matters if you have cold winters. One hard freeze can crack pipes and destroy appliances if you didn’t prepare. Know your climate and plan accordingly.
Prep space gets underestimated constantly. You need room to put down a platter, set aside cooked food, chop vegetables, rest a drink. Count your burners and plan twice that much counter space nearby.
Maintenance access seems obvious until cabinets are built tight against walls with no way to reach behind. Leave room to clean and service everything.
Maintenance and Year-Round Care
Daily care is simple. Wipe surfaces after cooking. Clean grills while warm. Empty grease traps. Cover appliances if not using for a while.
Weekly, check for issues. Loose screws, signs of rust, debris in drains. Catching problems early means fixing them cheap.
Seasonally, do more. Spring start-up means checking gas connections, testing electrical, cleaning thoroughly. Fall winterization means draining water lines, storing cushions, covering or storing removable items.
Appliance care varies by type. Grills need regular cleaning and occasional part replacement. Refrigerators need coil cleaning. Pizza ovens need ash removal if wood-fired.
Countertops need appropriate cleaners. Granite needs stone cleaner. Stainless needs stainless cleaner. Porcelain just needs soap and water. Use what’s right for your materials.
Call a professional when you smell gas, when electrical trips repeatedly, when water leaks appear, or when you’re unsure. Better safe than sorry.
FAQs
What does a summer kitchen mean?
Historically, it meant a separate building where cooking happened to keep the main house cooler and reduce fire risk. Today, it refers to any outdoor cooking space designed for warm-weather use, from simple grill areas to full kitchens with appliances and seating.
What is the best layout for a summer kitchen?
The layout that fits your space and cooking style. Linear works for tight areas, L-shaped balances cooking and gathering, U-shaped maximizes efficiency for serious cooks, and island layouts put you in the middle of the action. Match the layout to how you actually use the space.
What is a summer kitchen in the basement?
This usually refers to historical homes where basement kitchens were used in summer to keep the main floor cooler. Modern usage of this term is rare, as today’s summer kitchens are almost always outdoors.
Conclusion
Every summer kitchen I’ve built taught me something. The ones that worked best started with honest thinking about how people actually live. Not how they imagined living, not how they thought they should live, but how they really spent their time.
Your summer kitchen doesn’t need to be complicated. It needs to fit your space, your budget, and your habits. It needs to be safe and built to last. And it needs to make you want to be outside more than you already are.
Start with the fundamentals. Measure your space. Know your budget. Think about how you cook and who you cook for. Then start looking at layouts and materials and appliances.
The best time to plan is now, before you’re standing in a showroom falling in love with something that won’t work in your yard. The second best time is before you hire someone to build something you haven’t thought through.
Go ahead and sketch out your space. Think about that first meal you’ll cook out there. Imagine who you’ll share it with. Then build something that makes those moments happen more often.
Disclaimer
This article provides general guidance only. Always consult licensed professionals for permits, installations, and project-specific advice.

I’m Bilal, the founder of Dwellify Home. With 6 years of practical experience in home remodeling, interior design, and décor consulting, I help people transform their spaces with simple, effective, and affordable ideas. I specialize in offering real-world tips, step-by-step guides, and product recommendations that make home improvement easier and more enjoyable. My mission is to empower homeowners and renters to create functional, beautiful spaces—one thoughtful update at a time.