If you’ve ever painted a room and still felt like something looked a little unfinished, it’s usually the baseboards. Tiny gaps along the top edge can cast shadows, collect dust, and make even a fresh paint job look sloppy.
Here’s the thing: you don’t need fancy tools or a perfect house to get a clean line. With the right caulk and a calm, steady approach, you can make baseboard trim look like it was installed yesterday.
I’ve caulked miles of baseboards in real homes, from brand-new builds to old plaster walls that wave like the ocean. This guide walks you through it like I would in your hallway, step-by-step, with the little finishing tips that save you from messy beads and cracked seams.
Snippet-Ready Definition:
Calk baseboard means sealing small gaps between baseboards and walls using paintable caulk to create smooth lines, improve appearance, block dust, and prepare trim for a clean, professional paint finish.
Our Mission:
At Dwellify Home, we simplify home improvement by sharing real-world, expert-backed guidance that helps homeowners make confident, practical decisions and achieve clean, lasting results.
Quick Guide Table: Calking Baseboards at a Glance
| Situation | Should You Caulk? | Pro Recommendation |
| Baseboard to wall (top edge) | Yes | Use paintable acrylic latex caulk |
| Baseboard to tile floor | Sometimes | Small flexible bead only |
| Baseboard to laminate/LVP | No | Use shoe molding instead |
| Gaps under 1/8 inch | Yes | Thin, controlled bead |
| Gaps over 1/4 inch | No (alone) | Use backer rod or molding |
| Before painting | Yes | Caulk before final paint |
Step-by-Step Quick Guide (Simple & Clean)
How to Calk Baseboard Properly
- Clean dust and debris from the baseboard edge
- Cut caulk nozzle small (45° angle)
- Apply a thin, steady bead along the seam
- Smooth gently with a damp finger or tool
- Remove tape while wet (if used)
- Let caulk dry fully before painting
What Caulking Baseboards Actually Does (And What It Doesn’t)
Caulking baseboards to wall is mainly about closing small gaps where trim meets drywall. Drywall isn’t perfectly straight, baseboards aren’t always perfectly flat, and houses settle. Those tiny gaps are normal.
A thin bead of paintable caulk does three great things:
- It hides shadow lines so the trim looks tight and intentional
- It blocks dust and makes baseboards easier to wipe clean
- It helps your paint edge look crisp instead of jagged
What it doesn’t do is fix bad carpentry. If the baseboard is loose, bowed, or pulled off the wall, caulk won’t hold it there long-term. In those cases, you’ll get cracking because the trim is moving.
Quick Decision Guide: Where Should You Caulk, Wall, Floor, or Both?
Most of the time, the top seam is the “yes” seam. That’s the line everyone notices, and it’s the one that makes paint look sharp.
The bottom seam is more of a “depends” situation. I decide based on what kind of flooring you have and whether it moves.
A simple rule I use on job sites:
- Baseboard to wall: usually yes
- Baseboard to tile: sometimes yes, only with a flexible, clean bead
- Baseboard to floating floors like laminate or many LVP installs: usually no, because movement can crack the caulk or trap dirt
If you’re not sure, look for shoe molding or quarter round. When there’s a big floor gap, molding often looks better than trying to caulk a canyon.
Best Caulk for Baseboards (Choose Like a Pro)
This is where a lot of DIY projects go sideways. The “best caulk for baseboards” isn’t the toughest or the stickiest. It’s the one that matches the job and stays paint-friendly.
Paintable caulk for most interior trim: acrylic latex or siliconized acrylic
For interior baseboards, I reach for a paintable acrylic latex caulk, often labeled painter’s caulk. If you want a little more flexibility, siliconized acrylic latex is a solid upgrade and still paints well.
These work great for:
- Calk baseboard trim along drywall
- Calk baseboard installation touch-ups after nail filling
- Tight seams that need a clean paint-ready finish
When silicone makes sense (and why it’s often avoided on paintable trim)
Pure silicone is waterproof, but it’s usually not paintable. That’s why I avoid it on trim that’s getting painted.
I’ll consider silicone in very wet areas or where paint isn’t involved, but for most baseboards in living spaces, stick with a paintable option. If the label doesn’t clearly say paintable, don’t gamble.
Tools and Materials You’ll Want Before You Start
You don’t need a workshop. You just need the basics, and one or two small upgrades make it easier.
Here’s my practical list:
- Paintable caulk (acrylic latex or siliconized acrylic)
- Caulk gun, dripless is worth it
- Utility knife for cutting the nozzle
- Damp rag or sponge
- Painter’s tape (optional, but helpful)
- Vacuum, brush, or microfiber cloth
- A caulk smoothing tool or a disposable glove
A dripless caulk gun is a quiet hero. It reduces the surprise blobs that happen when you stop and start.
Prep Work That Makes Your Caulk Line Look Professional
Prep is the difference between a tight, clean seam and a gummy mess that pulls away later.
First, clean the area. I’m not talking deep cleaning. Just get the dust off. A quick vacuum along the baseboard edge and a wipe with a damp cloth goes a long way. Caulk sticks best to clean, dry surfaces.
Next, remove failing caulk if you see it. If old caulk is cracked, peeling, or rubbery, don’t coat over it. Slice it out gently with a utility knife and pull it free.
One more real-world tip: if a baseboard is loose, fix that first. Add a finish nail into a stud, or reset it where it’s pulling away. Caulk is a finishing material, not a fastener.
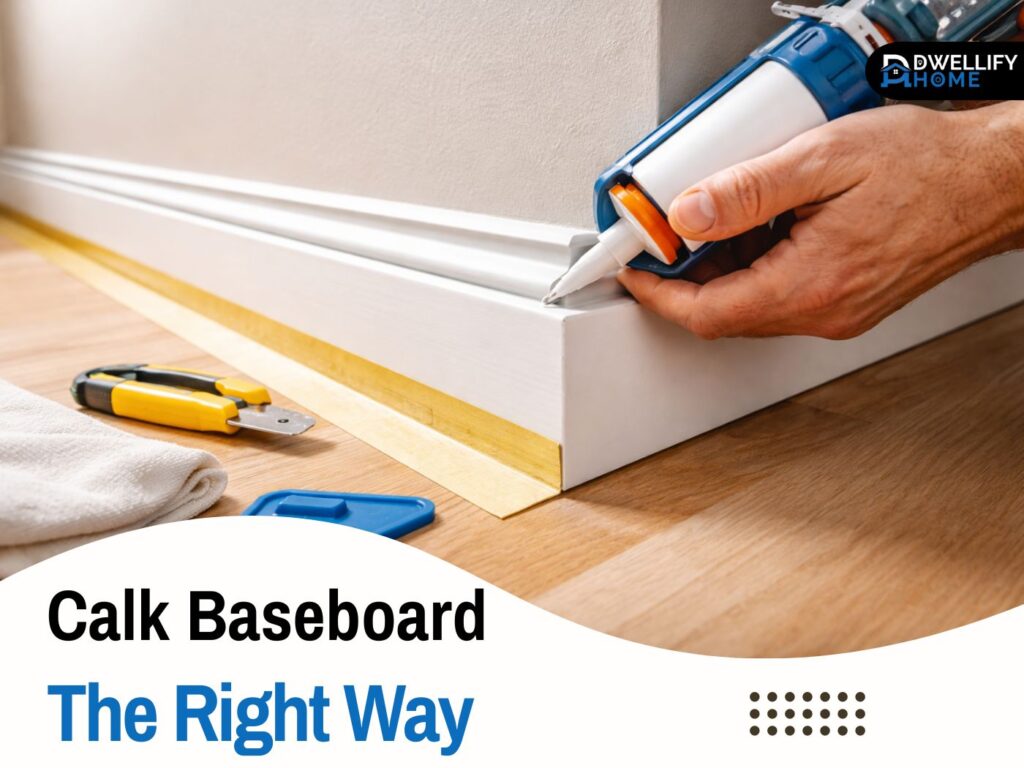
How to Tape and Caulk Baseboards (Step-by-Step)
This is the main event. Take your time here and you’ll be happy every time you walk past that wall.
Step 1: Tape (optional, but great for beginners and crisp lines)
If you want super clean edges, tape the wall just above the baseboard. Press the tape down firmly so caulk can’t sneak underneath.
I don’t tape every job, but for high-contrast paint colors or first-time caulkers, it’s a stress reducer. It also helps you avoid smearing caulk up the wall while you learn.
Step 2: Cut the tip small (control is everything)
Cut the nozzle at a 45-degree angle, but keep the hole small. People cut it too big because they think it’ll fill faster. What actually happens is a fat bead that’s hard to smooth.
Aim for a hole about the size of a pencil lead to a small matchstick. You can always cut a little more. You can’t uncut it.
Step 3: Run a thin, steady bead (don’t overfill)
Hold the gun at a consistent angle and move at a slow walking pace. Apply steady pressure and try to keep the bead the same size the whole run.
If you get a little gap in the bead, don’t panic. You can touch up after tooling. What you want to avoid is pumping extra caulk into one spot and creating a lump.
Step 4: Smooth the bead correctly (clean, slightly concave finish)
This is where the magic happens. Light pressure, one smooth pass.
I usually use a damp finger or a smoothing tool. The goal is to press caulk into the gap and leave a neat, slightly concave line. Wipe your finger or tool often. A dirty finger drags caulk and leaves ridges.
If the caulk starts to skin over, stop and move on. Trying to resmooth half-dry caulk creates a torn, fuzzy edge.
Step 5: Pull tape while wet and wipe tiny misses immediately
If you taped, remove it right away while the caulk is still wet. Pull it back on itself at a low angle. That keeps the edge sharp.
Keep a damp rag handy and do quick cleanup as you go. Five seconds of wiping now saves you ten minutes of scraping later.
Caulking Baseboards to Wall (Top Edge) the Right Way
This top seam is the one I’d prioritize even on a tight budget or a rushed weekend. It’s the seam that turns “nice paint job” into “finished room.”
Start in a corner and work your way out. I like doing 6 to 10 feet at a time, tool it, then keep going. That rhythm keeps the caulk workable and your bead consistent.
If you’ve got textured walls, don’t fight them. You’re aiming for a clean line that blends. A thin bead and light tooling usually looks better than trying to fill every tiny texture dip.
How to Caulk Baseboards to Floor Without Future Cracking
This is where homeowners often ask, “Should I seal this too?” The answer depends on the floor.
If you have tile, a small neat bead can help block water from mopping and give a finished edge. In that case, keep the bead tiny and flexible.
If you have a floating floor, like many laminates and some LVP installs, that floor expands and contracts. Caulk can crack, or worse, it can glue the baseboard edge to the floor and interfere with movement.
If you want a cleaner look at the bottom on a floating floor, shoe molding is usually the better option. It hides the gap without creating a rigid seal.
Handling Corners, Miters, and Tricky Transitions
Corners are where “good enough” turns into “why does this look messy?” The trick is using less caulk than you think.
For inside corners, don’t jam caulk into the corner like you’re icing a cake. Run your bead into the corner, then tool away from the corner on each side. That keeps you from building a blob.
Outside corners and miters need a gentle touch too. If there’s a hairline gap, a tiny bead is fine. If the joint is open because the miter wasn’t tight, that’s a carpentry fix, not a caulk fix.
Around door casings, keep your line consistent and stop cleanly. I often do those transitions last so I can focus and avoid smearing caulk onto a finished surface.
Big Gaps, Uneven Walls, and “This Won’t Caulk” Situations
Every house has at least one wall that laughs at your level. When the gap gets big, your approach changes.
The big-gap fix: backer rod plus caulk
If the gap is around 1/4 inch or more, don’t try to fill it with one thick bead. Thick caulk shrinks, skins over, and cracks.
Backer rod is a foam rope you press into the gap first. Then you caulk over it. This supports the bead, reduces waste, and helps the caulk cure properly.
When to choose shoe molding or quarter round instead of caulk
If the floor gap is large or the baseboard was installed a little high, shoe molding is often the cleanest solution. It looks intentional and saves you from a thick, wavy caulk line.
I’ve walked into many homes where someone tried to caulk a big floor gap. It usually ends with a chunky line that catches dirt and looks worse over time.
Caulk Baseboards Before Painting (Best Timing and Simple Order)
If you’re painting trim or walls, it’s usually best to caulk baseboards before painting the final coats. That way the caulk gets sealed under paint and the whole edge looks unified.
A simple sequence that works well:
- Fix loose trim and fill nail holes
- Light sand if needed
- Clean dust
- Caulk the seams
- Let it dry
- Paint
One real job-site habit: I always keep a small light or flashlight low to the floor while caulking. Side lighting shows every gap. It’s an easy way to catch misses before paint makes them obvious.
Dry Time, Cure Time, and When It’s Safe to Paint
Most paintable caulks are ready to paint in a short window, but “dry” and “cured” aren’t the same thing.
Dry-to-touch means the surface isn’t wet. Cure means the caulk has stabilized and won’t shrink much more.
My practical advice:
- Follow the tube label, always
- Give it extra time if the bead is thicker or the room is humid
- If you paint too soon, the paint can crack as the caulk continues to shrink
If you press lightly and the caulk feels firm, not tacky, you’re usually in good shape to paint.
Cleanup and Maintenance (So It Stays Looking New)
Wet caulk cleans up easily with water if it’s acrylic latex. Keep a damp rag nearby and wipe mistakes immediately.
Once it dries, cleanup becomes a scraping job. That’s why I’m big on “clean as you go.” It’s not about being neat, it’s about saving your time.
For maintenance, expect hairline cracks over years in high-movement spots like stairways or older homes. That’s normal. A quick touch-up bead, done neatly, keeps things looking sharp.
Common Mistakes (And Quick Fixes)
I’ve seen these mistakes in expensive homes and DIY projects alike. The good news is most are fixable.
Common issues:
- Cutting the nozzle too big and laying a fat bead
- Skipping cleaning, so caulk pulls away later
- Tooling too late after the caulk skins over
- Trying to fill large gaps with caulk alone
- Caulking the bottom edge on a moving floor and getting cracks
Quick fixes that work:
- If the bead is ugly but still wet, wipe it out and redo it
- If it’s dry and bad, slice it out cleanly and reapply
- If you see shrinkage, add a second thin pass, not a heavy one
When in doubt, go thinner. A neat thin line looks professional. A thick line looks like patchwork.
Baseboard Caulking Hack Section (Small Tricks That Make a Big Difference)
I’ll share a few baseboard caulking hack tips that I actually use, not gimmicks.
First, keep a small cup of clean water nearby. Lightly dampening your finger or tool reduces drag and helps the bead smooth without pulling.
Second, focus on consistency over speed. I’ve trained new helpers on trim work, and the ones who slow down for the first room always end up faster by the third room because they aren’t fixing mistakes.
Third, if you tape, press the tape edge down firmly and remove it while wet. That one habit alone makes your line look like a sprayed finish.
FAQ
1. Are you supposed to calk baseboards?
Yes. Caulking baseboards to the wall helps hide gaps, improve paint lines, and give trim a finished look. It’s standard practice for clean interior finishing.
2. What caulk should be used on baseboards?
Use paintable acrylic latex or siliconized acrylic caulk. These are easy to smooth, flexible, and accept paint well. Avoid pure silicone for painted trim.
3. What is the 7 rule for baseboards?
The “7 rule” refers to leaving roughly 7 mm (or about 1/4 inch) as the maximum gap before using backer rod or trim instead of caulk alone.
4. What are common mistakes when opening caulk?
Common mistakes include cutting the nozzle too large, skipping the inner seal puncture, squeezing too hard, or not using a dripless caulk gun.
5. Should you calk baseboards before or after painting?
Caulk baseboards before final paint coats. This seals the seam and allows paint to create one smooth, continuous finish.
Conclusion: A Cleaner Baseboard Line Starts With the Right Caulk and Light, Controlled Beads
A clean baseboard finish isn’t about fancy products. It’s about prep, a small controlled bead, and smoothing it at the right time. That’s the same approach I use on high-end trim jobs and quick refresh projects.
If you take one thing from this guide, let it be this: use less caulk than you think, and make it consistent. Fix loose trim first, handle big gaps the smart way, and give the caulk time before paint.
Do that, and your baseboards won’t just look better for a day. They’ll look clean and intentional for years, which is exactly what you want when you’re trying to make a room feel truly finished.
Disclaimer
This content is for general informational purposes only. Home conditions vary, so always follow product instructions and consult a qualified professional when structural or safety concerns exist.

I’m Bilal Hassan, the founder of Dwellify Home. With 6 years of practical experience in home remodeling, interior design, and décor consulting, I help people transform their spaces with simple, effective, and affordable ideas. I specialize in offering real-world tips, step-by-step guides, and product recommendations that make home improvement easier and more enjoyable. My mission is to empower homeowners and renters to create functional, beautiful spaces—one thoughtful update at a time.