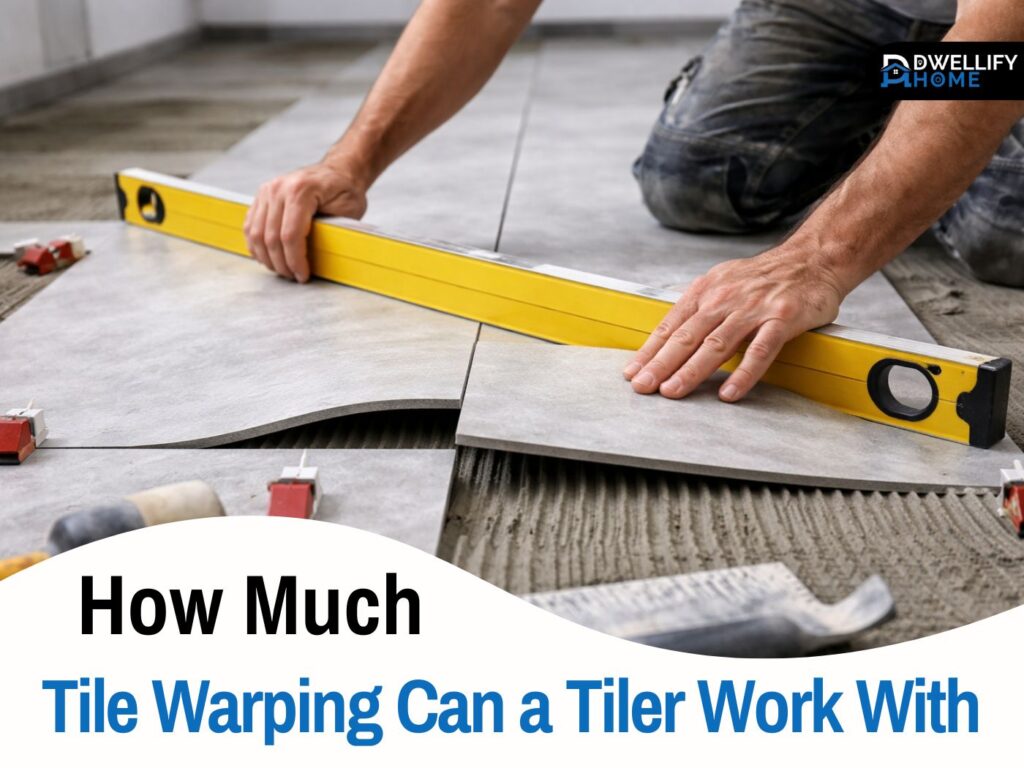
If you’ve ever laid a tile on the floor and noticed the center rocking up or the edges lifting, you’ve already seen tile warping in real life. It’s more common than most people realize, especially with large tiles like 12x24s or wood-look planks. And here’s the thing: not all warped tiles are defective, and not all warped tiles are workable either.
After more than 15 years installing ceramic, porcelain, and large-format tile on real job sites, I can tell you this with confidence: the question isn’t “Is the tile warped?” It’s “How much tile warping can a tiler realistically work with and still deliver an acceptable result?” That’s exactly what we’re going to break down, without theory, hype, or manufacturer fluff.
Snippet-Ready Definition:
How much tile warping a tiler can work with depends on industry tolerances, tile size, layout, and floor flatness. A tiler can manage minor warping only if lippage stays within acceptable limits and looks right after installation.
Mission Statement:
At Dwellify Home, our mission is to provide clear, honest, experience-based guidance that helps homeowners and professionals make smarter decisions about materials, installation, and long-term durability—without confusion or hype.
Tile Warpage vs Tile Lippage (Don’t Confuse the Two)
This is where most misunderstandings start, even between homeowners and contractors.
Tile warpage refers to the tile itself. It happens during manufacturing when the tile cools unevenly in the kiln. The tile might be slightly bowed, cupped, or twisted before it ever touches mortar.
Tile lippage is what you see after installation. It’s the difference in height between the edges of two neighboring tiles. Lippage can come from warped tiles, but it can also come from poor prep, bad layout choices, or rushed installation.
Here’s why this matters. A tile can meet manufacturing standards for warpage and still create visible lippage once installed. When that happens, people often blame the installer, even though the tile itself played a big role.
Quick Guide Table: Tile Warping & What a Tiler Can Handle
| Factor | What’s Usually Workable | When It Becomes a Problem |
| Tile warpage | Minor bowing within industry standards | Visible edge height even with proper layout |
| Tile size | Small to medium tiles hide warping better | 12×24 and planks exaggerate warping |
| Layout pattern | 1/3 offset or straight lay | 50% offset on warped tiles |
| Subfloor flatness | Very flat substrate | Dips or humps amplify lippage |
| Mortar & coverage | LHT mortar + back-buttering | Thin coverage or hollow spots |
| Final result | Lippage feels and looks acceptable | Sharp edges, trip hazards, glare |
Simple Step-by-Step: How Pros Deal With Tile Warping
- Check tiles before installation
Dry-lay and compare tiles face to face to spot bowing early. - Choose the right layout
Avoid 50% offset on large rectangular or wood-look tiles. - Prepare the substrate properly
Flatten the floor first—mortar won’t fix uneven surfaces. - Use correct mortar and coverage
LHT mortar and back-buttering help support warped tiles. - Set realistic expectations
Even tiles within standards can still show slight lippage.
The Real Standards: How Much Warpage Is Actually Allowed?
Warpage Is Measured as a Percentage, Not a Guess
Industry standards don’t say tiles must be perfectly flat. They allow a small amount of warpage, measured as a percentage of the tile’s length. This is defined in standards like ANSI A137.1 and measured using ASTM C485 methods.
In simple terms, most porcelain and ceramic tiles are allowed around 0.75 percent warpage. That doesn’t sound like much, but on larger tiles, it adds up quickly.
For example, a 24-inch tile can legally have several millimeters of bow and still pass inspection. On the floor, though, that bow becomes very real when one tile’s high point meets another tile’s low point.
Rectified vs Non-Rectified Tiles
Rectified tiles have their edges ground square after firing. They look sharp and modern, but they don’t magically fix warpage. In fact, they can make lippage more noticeable because they’re often installed with tighter grout joints.
Non-rectified tiles usually have slightly wider joints, which can help visually hide small imperfections. This is why grout joint size and tile type always go hand in hand when discussing lippage tolerance.
Tile Lippage Tolerance: What’s Acceptable After Installation?
Tile lippage tolerance is not just one fixed number. It depends on several factors, including grout joint width and the inherent warpage of the tile.
In practice, most installers aim for lippage no greater than about the thickness of a credit card. That’s not a legal promise, but it’s a practical benchmark many pros use on site.
Here’s the key point most people miss. Standards allow the installer to add the tile’s warpage into the allowable lippage. So a warped tile legally increases what’s considered acceptable. That’s why a floor can technically meet standards and still look bad under certain lighting.
So, How Much Tile Warping Can a Tiler Work With, Realistically?
Here’s the honest answer from the field.
A tiler can work with warping only up to the point where the finished surface still meets lippage tolerance and looks acceptable under real-world lighting. Once warpage forces visible or feelable edges, no amount of skill can fully hide it.
Several things affect how much warping is manageable:
- Tile size and shape
- Grout joint width
- Substrate flatness
- Offset pattern choice
- Mortar type and coverage
Change any one of those, and the workable limit changes too. This is why two installers can install the same tile and get very different results.
Why 12×24 and Plank Tiles Show Warping More Than Others
Long rectangular tiles are the toughest to work with, period. The longer the tile, the more likely it is to have a crowned center or bowed length.
With 12×24 tiles and wood-look planks, the high point is usually right in the middle. When you stagger them incorrectly, that high point lines up with the low end of the next tile. That’s how lippage explodes even when everything else is done right.
Wood-look tile makes this even worse because people want tight grout joints and long staggered layouts. That combination leaves very little room to hide warpage.
Layout Choices That Reduce Lippage (12×24 Staggered or Straight?)
12×24 Tile: Staggered or Straight?
If you remember one thing from this article, let it be this. A 50 percent offset is the most common cause of lippage complaints with large rectangular tile.
Most professionals recommend a one-third offset instead. By shifting the tile less, you avoid stacking the high points directly over low points. It doesn’t eliminate warpage, but it spreads it out enough to keep lippage within tolerance.
Which Direction to Lay 12×24 Tile
Tile direction matters more than people think. Light hitting across the tile, especially from windows or low-angle fixtures, exaggerates every edge.
Whenever possible, I look at the main light source first, then decide orientation. Sometimes rotating the tile 90 degrees makes imperfections far less noticeable, even with the same tile and layout.
How to Lay Tile That Looks Like Wood
For wood-look tile, the safest approach is:
- One-third offset
- Realistic grout joint width
- Flat substrate before setting a single tile
Trying to force tight joints and aggressive offsets usually leads to callbacks and unhappy homeowners.
Subfloor and Substrate Flatness: The Make-or-Break Factor
Here’s something I say on almost every job site. Mortar bonds tile. It does not level floors.
Large-format tile requires a much flatter surface than small tile. Even a slight dip or hump in the subfloor can amplify lippage when warped tiles are installed over it.
Before I set large tile, I always check flatness and address issues with proper leveling compounds or patching. Skipping this step limits how much warping you can realistically manage later.
Installation Techniques That Help Manage Warpage
Choosing the Right Mortar
Large-format tile mortar, often called LHT or medium-bed mortar, is designed to support heavier tiles and fill voids under crowned centers. Using standard thinset with large tiles is asking for trouble.
Coverage and Back-Buttering
Back-buttering is non-negotiable on warped tile. Applying mortar to the back of the tile helps fill low spots and ensures full support.
I also use straight-line troweling and collapse the ridges properly. These small habits make a big difference when you’re pushing the limits of tile warpage.
Tile Leveling Systems: Helpful but Not Magic
Leveling clips help hold tile edges in plane while the mortar cures. They’re great tools, but they don’t fix bad tile or poor prep.
If the substrate isn’t flat or the tile is excessively warped, clips can actually lock in tension and cause other issues. They’re a support system, not a solution.
How to Check for Warped Tiles Before Installation
This is one of the best ways to avoid disputes.
Before installing, I always dry-lay and check tiles face to face. A straightedge across the surface quickly shows bowing or twisting. Sorting tiles early lets you avoid stacking the worst ones together.
If warpage looks excessive, stop and contact the supplier. Once tile is installed, that conversation becomes much harder.
When Warpage Becomes a Real Problem
Warpage crosses the line when it forces visible lippage even with proper layout, prep, and technique.
Red flags include:
- Tiles rocking during dry layout
- Hollow sounds after installation
- Sharp edges that catch feet or light
- High-gloss surfaces showing every edge
At that point, the issue is no longer workmanship. It’s a tile quality problem or a design mismatch.
How to Fix Warped Tiles or Lippage After Installation
Here’s the tough truth. You usually can’t fix warped tiles once they’re installed.
Minor lippage can sometimes be reduced by replacing individual tiles or addressing localized prep issues. Grinding is rarely an option for porcelain and often creates more problems than it solves.
In serious cases, replacement is the only real fix. That’s why early inspection and layout approval matter so much.
FAQs
What is the allowable inherent warpage of the tile?
Most ceramic and porcelain tiles are allowed a small amount of warpage based on tile length. Industry standards permit minor bowing, especially on large-format tiles, as long as it stays within specified limits.
What is the warpage tolerance for tile?
Tile warpage tolerance is typically defined as a percentage of the tile’s length. Larger tiles can legally have more warpage than smaller ones, which is why layout and preparation matter so much.
What is the 1/3 rule for tiles?
The 1/3 rule means offsetting rectangular tiles by no more than one-third of their length. This helps avoid lining up high and low points, which reduces visible lippage on warped tiles.
Why is 50% tile pattern not recommended?
A 50% offset lines up the highest point of one tile with the lowest point of the next. On warped tiles, this almost guarantees noticeable lippage, especially with 12×24 or plank tiles.
Can leveling systems fix warped tiles?
Leveling systems help align tile edges while mortar cures, but they cannot fix excessive warpage or an uneven subfloor. They assist installation, not tile quality.
Conclusion: What You Should Take Away
So, how much tile warping can a tiler work with? Enough to stay within lippage tolerance, meet standards, and still look acceptable in real lighting. No more than that.
Tile size, layout, grout joints, substrate flatness, and installation technique all decide where that line is drawn. When those factors work together, even imperfect tile can look great. When they don’t, even a skilled installer is limited.
If you’re planning a tile project, the smartest move is to understand these limits before the first tile is set. That’s how you avoid disappointment and get results you’ll be happy living with for years.
Disclaimer:
This article is for informational purposes only and reflects real-world installation experience and industry standards. Tile tolerances and installation results may vary based on materials, site conditions, and local codes. Always consult a qualified professional for project-specific advice.

I’m Bilal Hassan, the founder of Dwellify Home. With 6 years of practical experience in home remodeling, interior design, and décor consulting, I help people transform their spaces with simple, effective, and affordable ideas. I specialize in offering real-world tips, step-by-step guides, and product recommendations that make home improvement easier and more enjoyable. My mission is to empower homeowners and renters to create functional, beautiful spaces—one thoughtful update at a time.