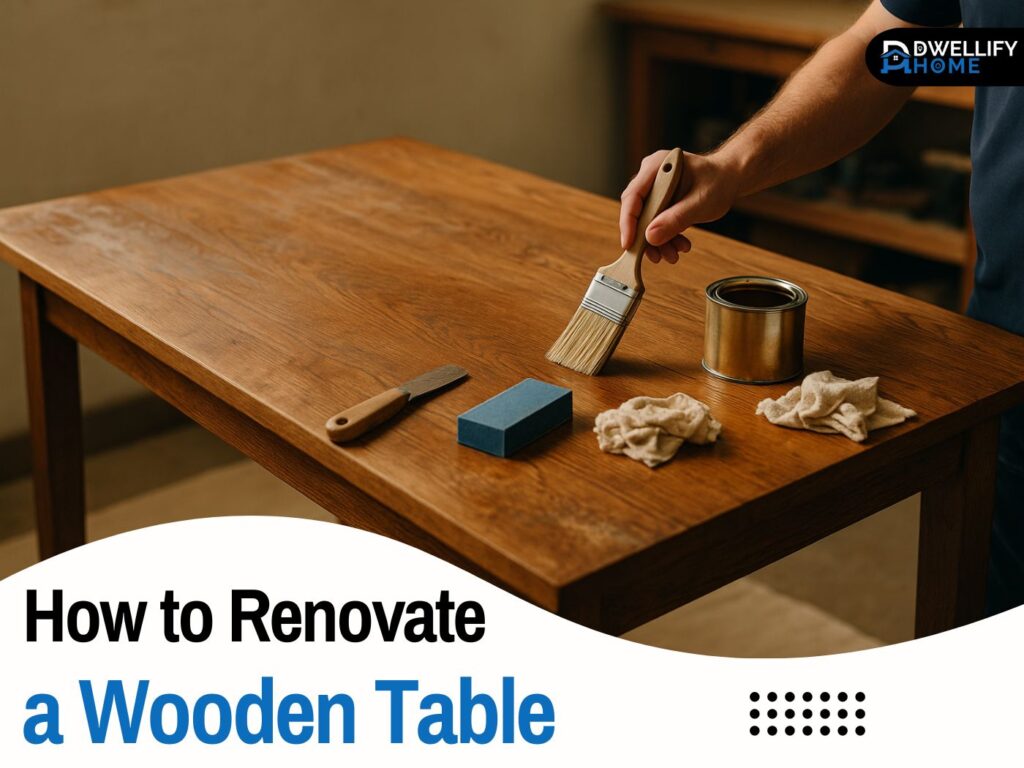
If you’ve got an old wooden table sitting in the corner — scratched, faded, or maybe covered with years of family dinners and coffee rings — don’t rush to toss it out. Renovating it can give it a whole new life. Here’s the thing: learning how to renovate a wooden table isn’t as complicated as it sounds. You don’t need to be a professional carpenter; just a bit of patience, the right tools, and a clear plan can make a huge difference.
Short Snippet-Ready Definition:
How to renovate a wooden table means restoring its beauty by cleaning, sanding, repairing, and refinishing the surface with stain, paint, or protective coatings — giving old furniture a brand-new life.
In this guide, I’ll walk you through everything — from assessing the condition of your table to sanding, staining, and sealing it like a pro. I’ve done this dozens of times, and trust me, the satisfaction of turning an old, dull piece into something fresh and glowing is unbeatable.
Mission Statement:
At Dwellify Home, our mission is to empower every homeowner and DIY enthusiast to restore and renew furniture with confidence.
We believe that renovating a wooden table isn’t just about looks — it’s about preserving stories, saving resources, and celebrating craftsmanship in every home.
1. Before You Begin – Understanding the Process
Here’s something most beginners miss: before grabbing your sandpaper or stain, take a moment to really look at your table. Is it solid wood or veneer? That one detail changes everything.
Solid wood tables can handle sanding, refinishing, and deep staining. Veneer tops, however, have only a thin wood layer — sand too much and you’ll go straight through to the core. If your table’s laminate, you’ll need special paints or a bonding primer to stick properly.
Now, gather your tools. You’ll typically need:
- Sandpaper (80, 150, and 220 grit)
- A paint scraper or putty knife
- Wood filler
- Tack cloth
- Mineral spirits or vinegar mix
- Paintbrushes or foam applicators
- Protective finish (like polyurethane, Danish oil, or tung oil)
And don’t forget to set up your workspace. Lay down drop cloths, open the windows, and wear gloves and a mask. Renovating a wooden table can get messy, especially if you’re stripping off old varnish or paint.
2. Cleaning and Removing the Old Finish
Let’s be honest — this is the least glamorous part, but it’s also the foundation of everything that follows.
Start by giving your table a deep clean. Mix equal parts vinegar and warm water, or wipe it with mineral spirits to lift off years of grime, wax, and residue. If you’re trying how to restore wood furniture with vinegar, this is a great first step — it’s eco-friendly and gentle.
Once the surface is clean, it’s time to remove the old finish.
Option 1: Using a Chemical Stripper
Apply a paint or varnish stripper according to the label’s instructions. Let it bubble up (that’s the old finish loosening), then gently scrape it away with a putty knife. A wire brush helps get into carved areas. Always wear gloves and work with good ventilation — this stuff’s powerful.
Option 2: Sanding It Off
If you prefer a hands-on, chemical-free route, sanding is your friend. Start with 80-grit sandpaper to cut through old varnish, move to 150-grit for smoothing, and finish with 220-grit for a silky surface. Sand with the grain to avoid swirl marks.
If you’re working on a refinishing wood table without stripping project, combine light sanding with a deglosser — a simple liquid that dulls the surface so new paint or finish adheres well.
Option 3: Refinishing Without Sanding
For quick makeovers, especially for beginners, how to refinish a table without sanding involves using a bonding primer or gel stain that adheres over the old finish. It won’t be as flawless as full stripping, but it’s ideal if you’re short on time or working on a smaller coffee table.
3. Repairing and Fixing Imperfections
Once the old finish is gone, the wood will tell its story. Scratches, cracks, and dents will become visible — and fixing them makes all the difference.
- Small dents: Dab a wet cloth and press a warm iron on top. The steam helps raise the dent.
- Cracks or gaps: Fill them with a good wood filler, slightly overfilling to allow for sanding later.
- Loose joints or wobbly legs: Tighten screws, add a drop of wood glue, and clamp overnight.
If you’re working on a refinish dining room table veneer top, be gentle — use light filler and minimal sanding to avoid thinning the veneer layer.
I’ve repaired tables that looked hopeless — even one that had a coffee cup burn right in the middle. After sanding and a coat of Danish oil, it looked brand new again. So, never underestimate a good repair job.
4. Sanding and Surface Smoothing
Sanding is where the magic happens. Here’s my golden rule: don’t rush it.
Start with coarse 80-grit sandpaper to level out rough patches, then switch to 150-grit for evening the surface, and finally 220-grit for that perfect finish. Sanding blocks help you keep even pressure. If your table has curved legs or edges, wrap sandpaper around a sponge or dowel to reach those spots.
After you’re done, use a tack cloth to wipe off every bit of dust — even the smallest particles can mess up your finish later.
Want that silky feel? Lightly sand between each layer of finish using ultra-fine (400+) grit. That’s what gives that “factory-smooth” result you see in high-end furniture stores.
5. Choosing the Right Finish
Now for the fun part — deciding what you want your table to look like. You’ve got plenty of options, depending on your taste and how much effort you want to put in.
Staining for a Natural Wood Look
If you love the wood grain, go with a stain and clear coat combo. Apply a wood conditioner first (especially for softwoods like pine) so the stain absorbs evenly. Then, wipe on your chosen oil-based stain with a lint-free cloth. Let it sit for a few minutes, then wipe off the extra.
When it comes to finishes, you can’t go wrong with:
- Polyurethane coat for durability (perfect for dining tables).
- Danish oil or tung oil for a natural matte look.
- Water-based finish if you want low odor and quick drying.
Painting for a Fresh New Look
If you’re curious about how to refinish a table with paint, choose chalk or milk paint for a vintage vibe, or satin latex for a clean, modern look. Apply two thin coats and lightly sand between them. Finish with a wax or matte sealer for protection.
Painting is great for how to renovate a wooden coffee table or small accent tables, especially when you want to match new decor.
Distressed and Creative Finishes
Want something unique? Try distressing — lightly sand the edges after painting for a rustic farmhouse feel. You can even mix stains or add metallic accents. I once did a two-tone table: dark walnut top with off-white legs. It instantly became the room’s centerpiece.
6. Drying, Curing, and Final Touches
After the final coat, patience is your best friend. Most finishes need at least 6–12 hours to dry before recoating. And here’s a pro tip — always check humidity. A humid room can double drying time.
Once you’re done, let your table cure fully for 2–3 days before heavy use. During curing time, avoid covering it with cloths or placing objects on top.
For that final touch:
- Buff gently with a soft cloth to enhance the sheen.
- Add a layer of furniture wax for extra depth and protection.
- Attach felt pads under the legs to prevent scratches on your floor.
That’s it — your table’s ready to shine again.
7. Creative and Eco-Friendly Ideas
If you enjoy experimenting, renovation can be more than just restoring. Try these:
- Eco-friendly restoration: Mix equal parts linseed oil and vinegar for a natural polish.
- Sustainable refinishing: Use reclaimed wood stains or non-toxic oils.
- Resin & epoxy art: Add a clear epoxy topcoat to make your wooden table pop with modern style.
These creative touches can transform a regular table into something with personality — and people will ask, “Where did you buy that?”
8. Maintenance & Long-Term Care
Once you’ve finished, maintaining that fresh look is easy.
- Wipe spills immediately — wood hates water.
- Use coasters and placemats to prevent rings.
- Reapply wax or oil every few months to maintain sheen.
- For a quick refresh, lightly sand and re-oil instead of a full refinish.
If you’re wondering how to refurbish a wooden table every few years, that’s all it takes — a bit of cleaning, a fresh coat, and some love.
9. Cost and Time Expectations
So, how much does it cost to refinish a wooden table? That depends on size and finish.
- Small tables: around $30–$60 for supplies.
- Large dining tables: $100–$150 if you already have tools.
Professional services, though, can run $300–$600, so DIY saves you a chunk of cash.
In terms of time:
- Cleaning & stripping: 3–4 hours
- Repairs & sanding: 3–6 hours
- Staining & sealing: 1–2 days (with drying)
You can usually finish a weekend project without rushing. If you’re working on how to refinish a small wooden table, you might even complete it in one day.
10. Safety Tips & Mistakes to Avoid
I’ve seen people make simple mistakes that ruin their hard work. Here’s what to watch out for:
- Don’t over-sand veneer tops; you’ll strip through the surface.
- Never mix water-based and oil-based products in one project.
- Don’t skip cleaning — dust or oil can cause blotchy stain marks.
- And please, don’t work with chemical strippers in closed rooms. Always wear gloves and eye protection.
Guess what? Once you know these small rules, everything becomes smoother, cleaner, and safer.
11. Before and After Inspiration
I’ll tell you a story — a client once brought me her grandmother’s dining table. It was dull, chipped, and covered in decades of polish. We stripped it, filled the cracks, and used a rich walnut stain. When she saw it again, she teared up. That’s the power of restoration.
If you take before and after pictures of your renovated wooden table, you’ll see the transformation more clearly — from faded and tired to glowing and full of life. It’s honestly one of the most satisfying parts of the process.
Step-by-Step Guide: Renovate Your Wooden Table Easily
| Step | Task | Description / Tools |
| 1. Clean | Wipe with vinegar or mineral spirits | Removes dirt, wax, and grease. |
| 2. Strip | Use sandpaper or chemical stripper | Takes off old varnish or paint. |
| 3. Repair | Fill cracks, fix joints | Use wood filler or glue clamps. |
| 4. Sand | 80 → 150 → 220 grit | Smooth surface, prep for finishing. |
| 5. Finish | Stain, paint, or oil | Use wood conditioner, polyurethane, or Danish oil. |
| 6. Seal & Cure | Apply topcoat, let dry | Protects against scratches and moisture. |
Quick Bullet Summary
- Clean your table thoroughly before starting.
- Strip old varnish or use deglosser for quick jobs.
- Sand in stages to create a smooth surface.
- Choose stain or paint based on your style.
- Seal with polyurethane or wax for long-term protection.
- Let it cure fully before use.
Common Questions (FAQs)
Can I renovate a wooden table without sanding?
Yes! Use a deglosser or bonding primer — perfect for quick projects or when working on veneer surfaces.
What’s the best finish for a dining table?
Polyurethane is the most durable.
For a natural look, try tung or Danish oil.
How long does refinishing take?
Usually 2–3 days including drying time, but small tables can be done in a day.
Can I use vinegar to clean wood?
Yes, in moderation. A mix of vinegar and oil works well for natural cleaning and shine.
How to refinish a table for beginners?
Start small. A coffee table or side table is a great beginner project — less pressure, quicker results.
What if I just want to redo the top?
Then focus on how to renovate a wooden table top — sand, stain, and seal only the top surface.
Is it worth restoring an old table?
Absolutely. Not only is it cheaper than buying new, but it also keeps beautiful wood pieces out of landfills.
How to bring a wood table back to life?
Clean the surface with vinegar and water, sand lightly, then apply a wood oil or stain. Finish with wax or polyurethane for a fresh, lasting shine.
How to make an old wooden table look modern?
Try painting it with chalk or matte paint, replacing old handles, or refinishing the top with a darker stain for a sleek, minimalist style.
Should I sand or strip my wood table?
If the old finish is thick or damaged, stripping is faster. For mild wear, sanding alone can smooth the surface enough for refinishing.
How to restore a wood table without sanding?
Use a liquid deglosser or gel stain that bonds over old finishes. It’s quick, low-mess, and perfect for beginners or veneer surfaces.
Is it better to stain or paint a table?
Staining keeps the natural grain visible and is ideal for solid wood. Painting works best if you want bold colors or to hide imperfections.
Expert Tips from Experience
Over the years, I’ve learned a few small tricks that make a big difference:
- Always test stain on a hidden section first.
- Apply stain in thin layers rather than one thick coat.
- Keep a tack cloth handy — it’s your best friend before finishing.
- And remember: the smoother your prep, the better your final shine.
The best part is, once you’ve done it once, you’ll want to refinish every wooden surface you own.
Conclusion
Renovating a wooden table isn’t just about saving money — it’s about bringing something back to life. You take a piece of furniture that’s seen better days and give it new meaning, new color, and a second chance.
Whether you’re renovating a small wooden table in your living room or reviving an old dining table passed down through family, each project teaches patience and pride. Take your time, enjoy the process, and don’t be afraid to experiment.
By the end, you’ll not only have a refreshed table — you’ll have a story worth telling every time someone sits down at it.
Disclaimer:
The information in this article is for educational and DIY purposes only. Always follow product safety instructions and use protective gear when working with tools or chemical finishes. Results may vary depending on wood type, product quality, and individual skill level.

I’m Bilal, the founder of Dwellify Home. With 6 years of practical experience in home remodeling, interior design, and décor consulting, I help people transform their spaces with simple, effective, and affordable ideas. I specialize in offering real-world tips, step-by-step guides, and product recommendations that make home improvement easier and more enjoyable. My mission is to empower homeowners and renters to create functional, beautiful spaces—one thoughtful update at a time.