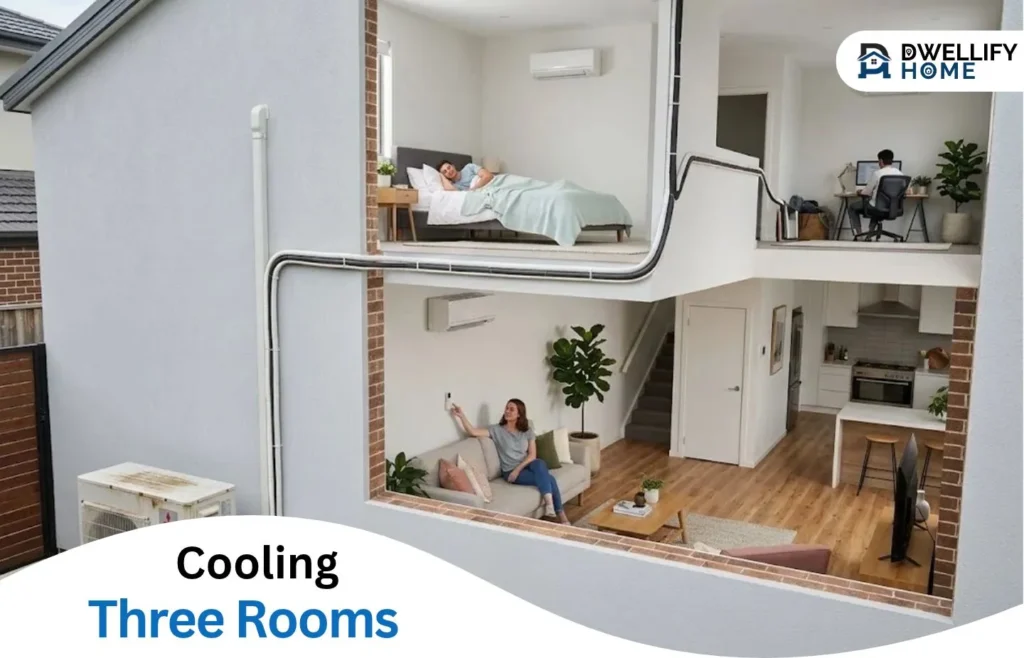
If your office heats up in the afternoon and the bedroom stays warm at bedtime, adjusting the living room thermostat can leave you chasing comfort around the house. A three-zone mini split gives each of those rooms its own indoor unit and temperature setting, with one outdoor unit serving all three.
List the rooms where you want separate temperature control, then note when you use each one and which doors stay closed. Their layout and cooling needs will help determine the equipment; the furniture will help you decide where it goes.
Different rooms, different temperature settings
Separate controls are useful when family members want different temperatures or use rooms at different times. Someone working at a desk all afternoon can adjust the office while the living room stays at a setting everyone else likes. At bedtime, the bedroom has its own control.
A 3 zone mini split system provides that arrangement through three connected indoor units. You’ll need a suitable mounting location in each area and a connection route from each unit to the outdoor equipment. Most residential multi-zone heat pumps share a heating or cooling mode across active units, with individual temperature settings within that mode.
For a house with just one warm office and otherwise comfortable rooms, a single-zone unit is a more focused option to discuss. The other rooms can continue using the existing system while the new installation serves the office.
Which rooms need their own indoor units?
Room boundaries help you decide where that control belongs. A bedroom with its door shut needs conditioned air delivered into the room. An open dining area connected to the living room may share a unit if the layout allows air to reach both spaces.
For example, an open living and dining area, a closed home office, and a bedroom give you three areas to discuss with an installer. The dining table adds another use within the living area; the office door creates a separate space. This is why counting the rooms on a real estate listing is less useful than looking at how they connect.
Sketch the rooms, mark doors that normally stay closed, and note which spaces your existing equipment will continue to serve. Include any additional bedroom you expect the new system to cool. Show whether the mini split will replace the cooling in each room or work alongside the equipment already there.
Use the sketch to compare multi zone mini split configurations. Combining two connected living spaces may reduce the number of units needed, while another enclosed bedroom may add one. The room layout should determine the zone count.
How much heating and cooling does each room need?
Size each room on its own
Two rooms with the same floor area can need different amounts of cooling. Afternoon sun through large office windows adds heat that a shaded bedroom may receive much less of. Ceiling height, insulation, and local weather also affect the room’s needs.
Equipment capacity is listed in BTU per hour, often shortened to BTU on product pages. It describes how much heat the unit can remove or supply in an hour. A room-by-room calculation, such as ACCA Manual J, estimates the capacity each space needs. That can lead to three different indoor unit sizes within the same system.
Have the calculated room loads and proposed unit sizes written on your plan. You’ll be able to see why the office and bedroom were assigned different equipment. Include heating needs in that comparison if the system will also keep those rooms warm in winter.
Sizing the outdoor unit
During a busy evening, the living room, office, and bedroom may all need cooling. The outdoor unit has to support the selected indoor units as they serve those rooms together. Its capacity and the manufacturer’s approved combinations therefore need to be checked against the room loads.
At night, the bedroom may be the only room calling for cooling. The installer should compare that smaller demand with the system’s minimum output, the lowest capacity it can deliver. Ask how the system will control the bedroom’s temperature once the office and living room have reached their settings.
Where should the indoor units go?
Place the furniture on your sketch before settling on a wall. In the bedroom, consider the path of air across the bed. In the office, look at where you’ll sit through a long afternoon. A unit that fits neatly above a desk still needs to deliver air comfortably around the room.
During the site visit, stand and sit where you normally do while discussing the proposed locations. Curtains, tall shelves, and cabinets can affect the available space and airflow. The installer can use the manufacturer’s placement requirements to narrow down the workable positions.
For the bedroom, consider sound as well as airflow. Compare published sound levels at the fan settings you expect to use, checking that the ratings use the same measurement conditions. Discuss where the unit would sit relative to the bed.
Include filter cleaning in the discussion. You will need access to the unit after the furniture is back in place. Each location also needs a route for its connections and for draining the water collected during cooling. Resolving those routes alongside the furniture plan helps you choose a position you can live with every day.
What should the full installation quote include?
Price the three rooms as one complete job. Two quotes can include the same equipment yet allow for different connection routes or finishing work. Your marked plan makes those differences easier to spot.
Check that the quote covers:
- The outdoor unit and the three specified indoor units.
- The required refrigerant lines, wiring, and condensate drainage.
- Electrical work and any permits required locally.
- Mounting, startup checks, and agreed wall repairs or finishing.
A bedroom on the far side of the house may need a longer pipe route than one beside the outdoor unit. A drain location can also add work. Have those routes included in the written quote, along with who repairs any affected wall surfaces.
If you’re buying the equipment yourself, arrange the installer first so you can agree on the package and the work they will undertake.
For the first appointment, note when each room gets uncomfortable and where people sit or sleep. Show the installer the office during its sunny hours if you can. Bring your notes so you can discuss the rooms you use during the day alongside the ones you want comfortable at night.
At Dwellifyhome.com, we aim to be transparent about the commercial relationships associated with our content. Some links may be affiliate or sponsored links that generate compensation from qualifying purchases.