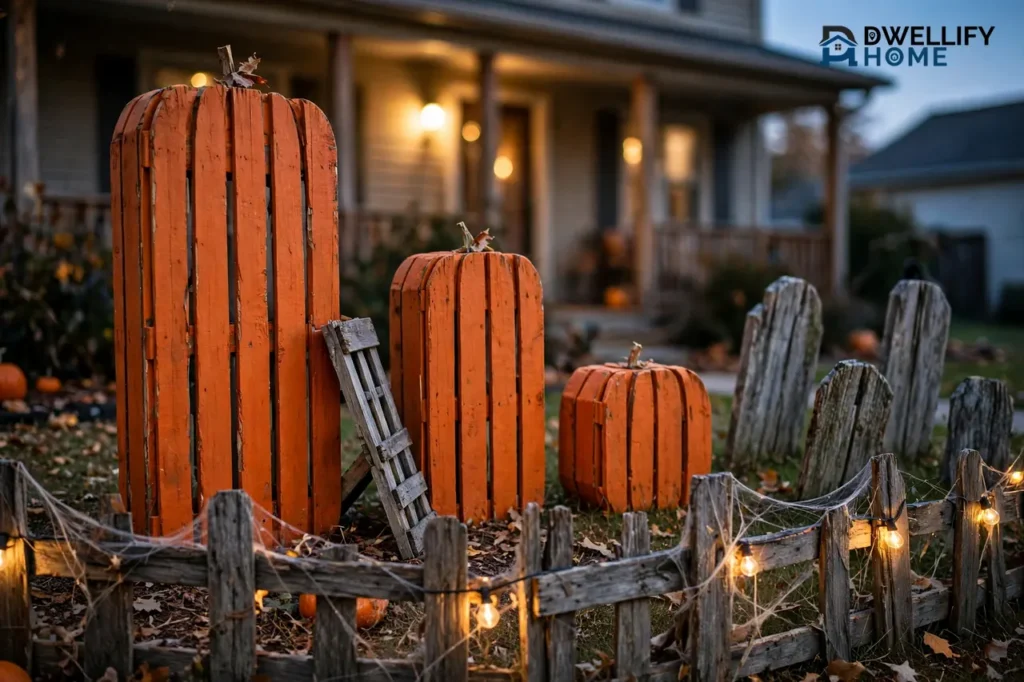
Pallet Halloween decorations are some of the cheapest, best-looking outdoor props you can build: a pumpkin trio, a row of tombstones, crooked signs, a graveyard fence, and a stand for a giant spider, all cut from free wooden pallets. One step comes before any building, and you cannot skip it. Check each pallet for an HT stamp, which means the wood was heat-treated, and walk away from any pallet stamped MB, which means it was fumigated with a chemical pesticide. With safe wood in hand, the prep and the five builds below are beginner-friendly weekend work.
This guide follows the order you will actually work in: pick a safe pallet, break it down without splitting the boards, build the projects, anchor them against October wind, and seal them to survive more than one season. Planning the whole yard at once? Pair these builds with a full plan for outside Halloween decorating ideas so each project has a spot before you start cutting.
Start With a Safe Pallet: Check the HT Stamp First
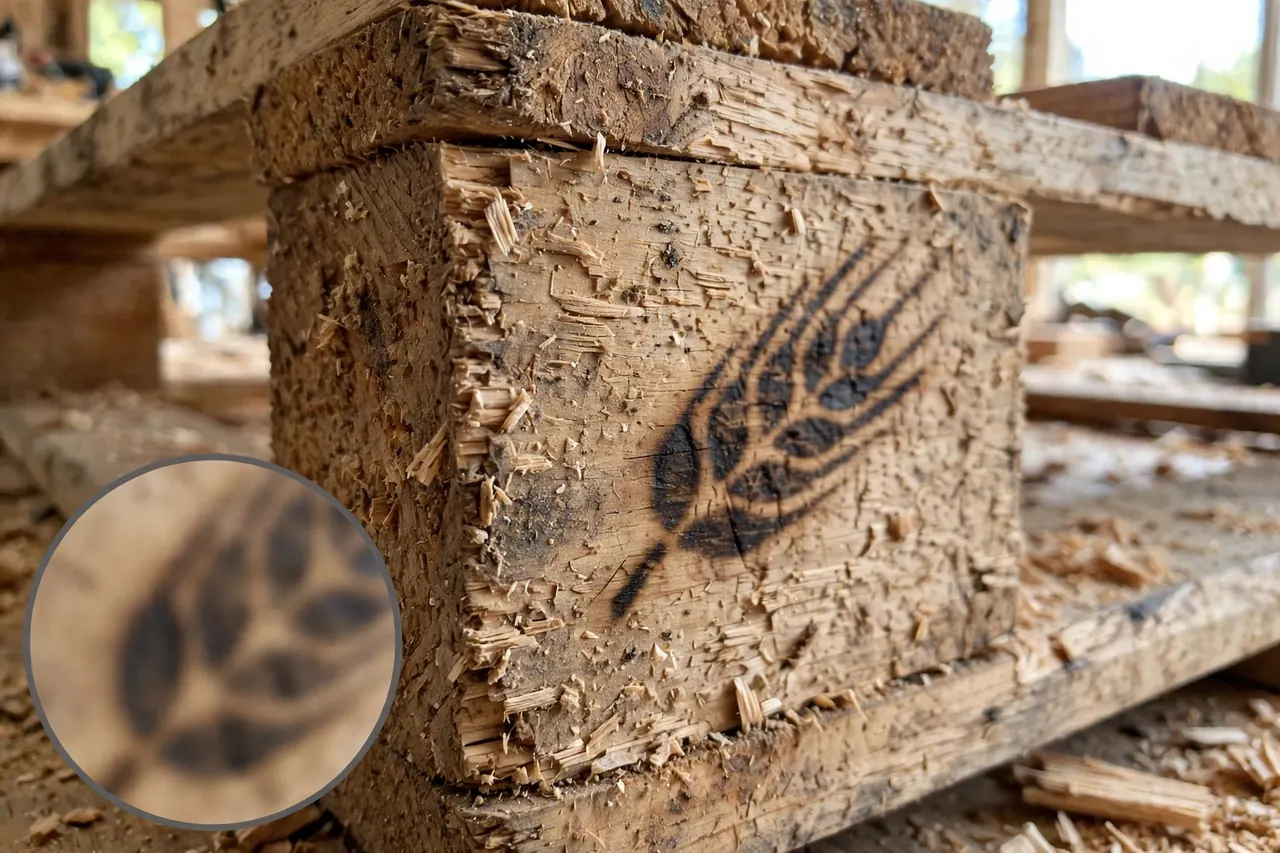
Not every free pallet is safe to bring home. Pallets that cross borders are treated to kill insects hiding in the wood, and the treatment method is printed right on the pallet. Under the international ISPM 15 standard, that treatment is one of two things: heat, which uses no chemicals at all, or fumigation with methyl bromide, a toxic pesticide gas. The U.S. Environmental Protection Agency notes that methyl bromide is a toxic, ozone-depleting substance whose production has been phased out in the United States, with limited exemptions. You do not want that wood leaning against your porch where kids touch it.
How to Read the Pallet Stamp
Look on the side of the pallet, on the thick support blocks or the long side rails (called stringers), for a burned-in or inked mark shaped like a stalk of wheat. That is the IPPC mark. It carries a country code, a producer number, and a two-letter treatment code. The treatment code is the part you need:
- HT means heat-treated. According to USDA APHIS, heat-treated wood packaging is heated until the wood core reaches at least 56 degrees Celsius (133 degrees Fahrenheit) and held there for at least 30 minutes. No chemicals are involved, so HT pallets are the ones to choose for home projects.
- MB means the pallet was fumigated with methyl bromide. Skip it, no matter how good the wood looks.
- DB means the wood was debarked. That is only a wood-prep step, not a safety treatment, so a DB code still needs an HT code beside it.
- No stamp at all usually means a domestic pallet that never crossed a border and was never required to be treated. Many DIYers use clean, unstamped domestic pallets, but the history is unknown, so inspect them extra carefully and keep them outdoors.
Pallets to Walk Away From
The stamp is only the first check. Even an HT pallet can be a bad pick if it carried the wrong cargo. Leave a pallet behind if you see any of these:
- Dark oil or chemical stains soaked into the boards, or a strong chemical smell.
- Colored pallets (bright blue, red, or brown) from chemical-industry pooling programs. Their wood can be treated or contaminated, and many are company property that should be returned, not taken.
- Cracked stringers, rotted or spongy boards, or heavy splintering that will not sand smooth.
A clean, dry, HT-stamped pallet with no stains and no smell is the goal; when in doubt, leave it and check the next stack.
Where to Find Free and Cheap Pallets
Good pallets rarely sit around for long, so ask before you grab. Businesses that receive goods on pallets often pay to have extras hauled away and are glad to give them to anyone who asks first.
- Hardware stores, garden centers, and flooring or tile shops, which receive heavy goods on sturdy pallets.
- Small manufacturers, printers, and warehouses at the back of industrial parks.
- Online listings on local marketplaces and community groups, where pallets are often posted free for pickup.
- Construction sites, but only with the site manager’s permission.
Ask which pallets you may take, because some are returnable deposit pallets the business does not own. Pick dry pallets with closely spaced deck boards, since tight boards give wider usable wood for pumpkins and tombstones. The standard North American pallet measures 48 by 40 inches, and one good pallet covers your first project. For more ways to use spare pallets, see these DIY pallet ideas.
Prep the Wood: Break It Down, Clean It, Sand It
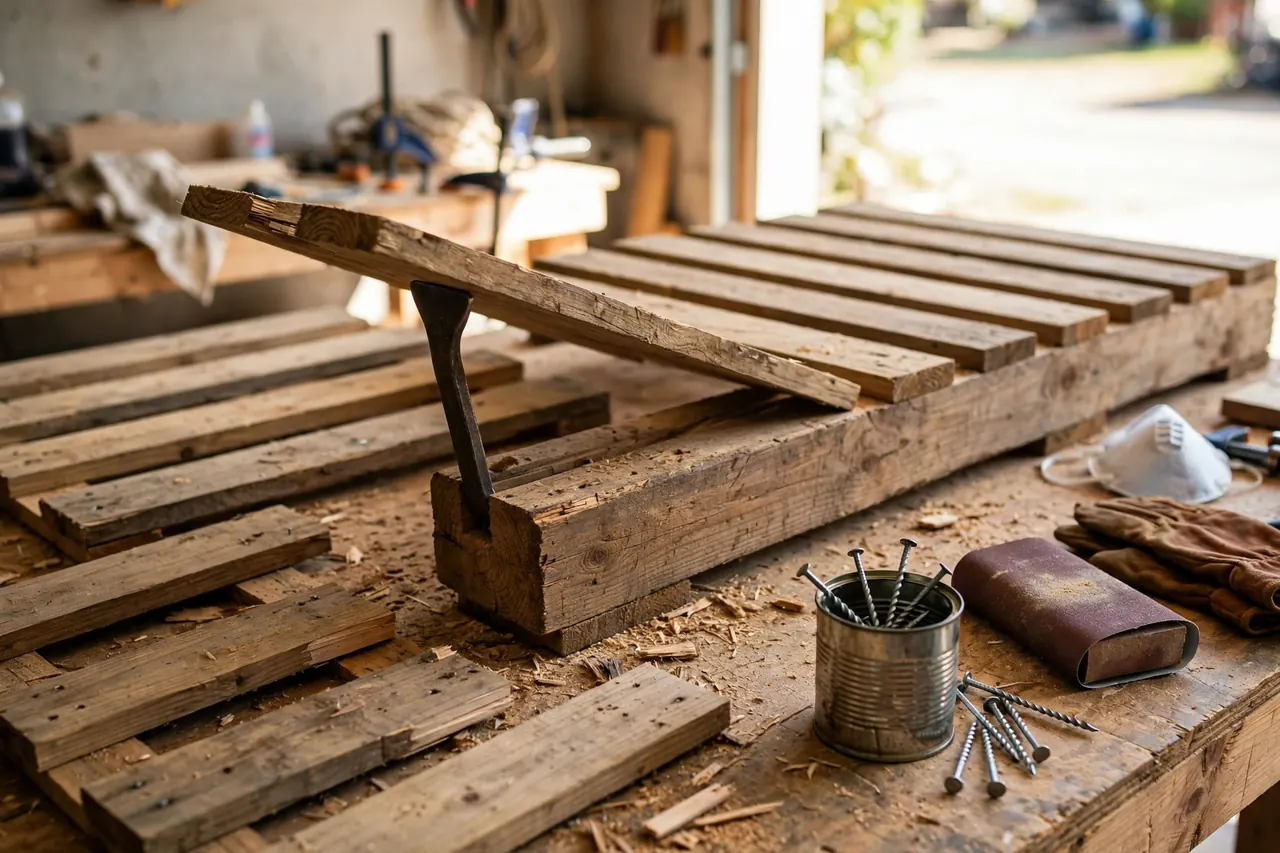
Prep is where pallet projects are won or lost. Pallet nails are spiral or ring-shank nails made to grip, so ripping boards off carelessly splits the wood you need most. Work slowly here and every build after it gets easier.
Take the Pallet Apart Without Splitting the Boards
- Set the pallet on a flat surface, deck boards facing up, and put on gloves and eye protection.
- Slide a pry bar or pallet buster under the end of a deck board, right beside a stringer, and lift gently until the board rises a little. Move to the middle stringer and lift there too, working back and forth in small lifts instead of forcing one end all the way up.
- If a board refuses to move, flip the pallet over and use a hammer and nail punch to drive the nails back through from the pointy side, then pry the loosened board off.
- For short pieces, such as tombstone tops, you can skip the fight: cut the deck boards free with a reciprocating saw or jigsaw between the stringers and accept shorter boards.
Caution: pallet wood hides bent nails and staples in odd places. Before any board goes near a saw blade, check both faces and the edges with a gloved hand.
Remove Nails and Staples Safely
Boards usually come off with the nails still in them, bent over or sticking straight out. Deal with every nail now, not later, because a forgotten nail point is the most common pallet-project injury. Knock straight nails out from the back with a hammer and punch, then pull them with the hammer claw. For bent or broken nails, grip them with end-cutting pliers and roll the pliers to lever the nail out. Drop removed nails straight into a can or bucket, so none end up in the grass where bare feet and mower blades will find them.
Wash and Sand
- Scrub each board with a stiff brush and soapy water, rinse, and stand the boards in the sun until fully dry, since paint will not bond to damp wood.
- Sand the faces you will see and touch: 80-grit first to knock down splinters and rough grain, then 120-grit so paint goes on smoothly.
- Wipe off the dust with a damp cloth and let the boards dry again before painting.
Wear a dust mask while sanding. Pallet wood is dirty from warehouses and truck beds, and you do not want that dust in your lungs. Back faces can stay rough on fence boards and tombstones, but every edge a trick-or-treater might brush against should be splinter-free.
Build 1: A Pallet Pumpkin Trio
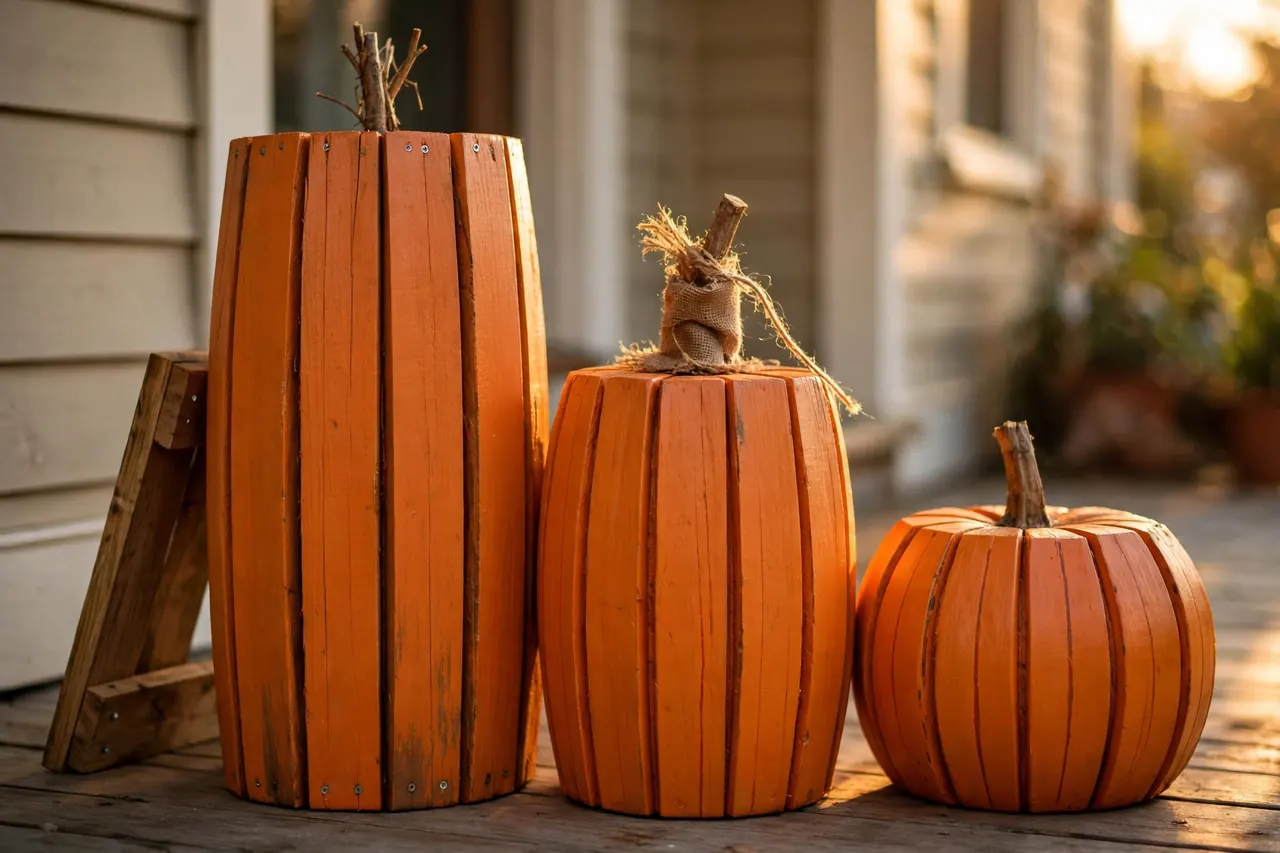
The pumpkin trio is the best first build: it forgives rough cuts, uses one to two pallets, and three pumpkins in different heights read as a set instead of a single prop.
- Lay three or four deck boards side by side on your work surface, good faces down, and screw two short cross pieces across the back to hold them together as one panel.
- Sketch a pumpkin outline on the panel with chalk: a wide oval with a flat bottom so it stands, plus a short stem at the top. Make the three pumpkins in three sizes: tall, medium, and squat.
- Cut along the chalk line with a jigsaw, keeping the flat bottom edge straight, because a rocking pumpkin never sits right.
- Sand the cut edges, then paint the pumpkin orange. Exterior latex paint works well. Add a darker orange or brown line down each board gap to fake the pumpkin’s ribs.
- Paint the stem brown or wrap it with a scrap of burlap or twine. For a jack-o’-lantern, paint the face on in black instead of cutting it out, so the prop stays solid and lasts for years.
- Add a small angled brace board on the back so each pumpkin stands on a porch or path without leaning on the house.
Success check: stand all three on flat ground and view them from the street. If the ribs and faces read clearly from the sidewalk, the scale is right. If they disappear, go one size bigger next time. Pallet wood is free, so a second, larger set costs only paint.
Build 2: Pallet Tombstones for a Graveyard Corner
Tombstones turn the pumpkin patch into a scene. One pallet can yield up to four tombstones if you use the deck boards carefully, which makes this the cheapest graveyard you will ever build.
- Join two or three deck boards into a panel as you did for the pumpkins, with cross pieces screwed across the back.
- Draw the tombstone top. For a rounded top, pin a string at the panel’s center, tie a pencil to it, and swing the pencil side to side to mark a smooth arc. For a spookier look, cut a stepped or pointed top instead.
- Cut the shape with a jigsaw and sand the edges.
- Paint the whole stone flat gray with exterior paint. Once dry, sponge on a slightly darker gray mix for a weathered stone effect, then dry-brush a lighter gray along the edges.
- Paint on an epitaph with a brush or paint pen. Short and funny beats long and clever, because guests read these at a glance in the dark: “RIP,” “Barry M. Deep,” “I. M. Gone.” Keep it friendly if your street is full of small kids.
- Screw a short stake to the back bottom edge, point down, and push it into the soil so the stone stands on its own.
Cluster three to five stones at slightly different angles rather than in a neat row; real graveyards are crooked, and crooked is easier. For full scene themes to build around your stones, browse these spooky Halloween yard ideas and pick one mood for the whole corner.
Build 3: A Crooked Pallet Fence and Backdrop
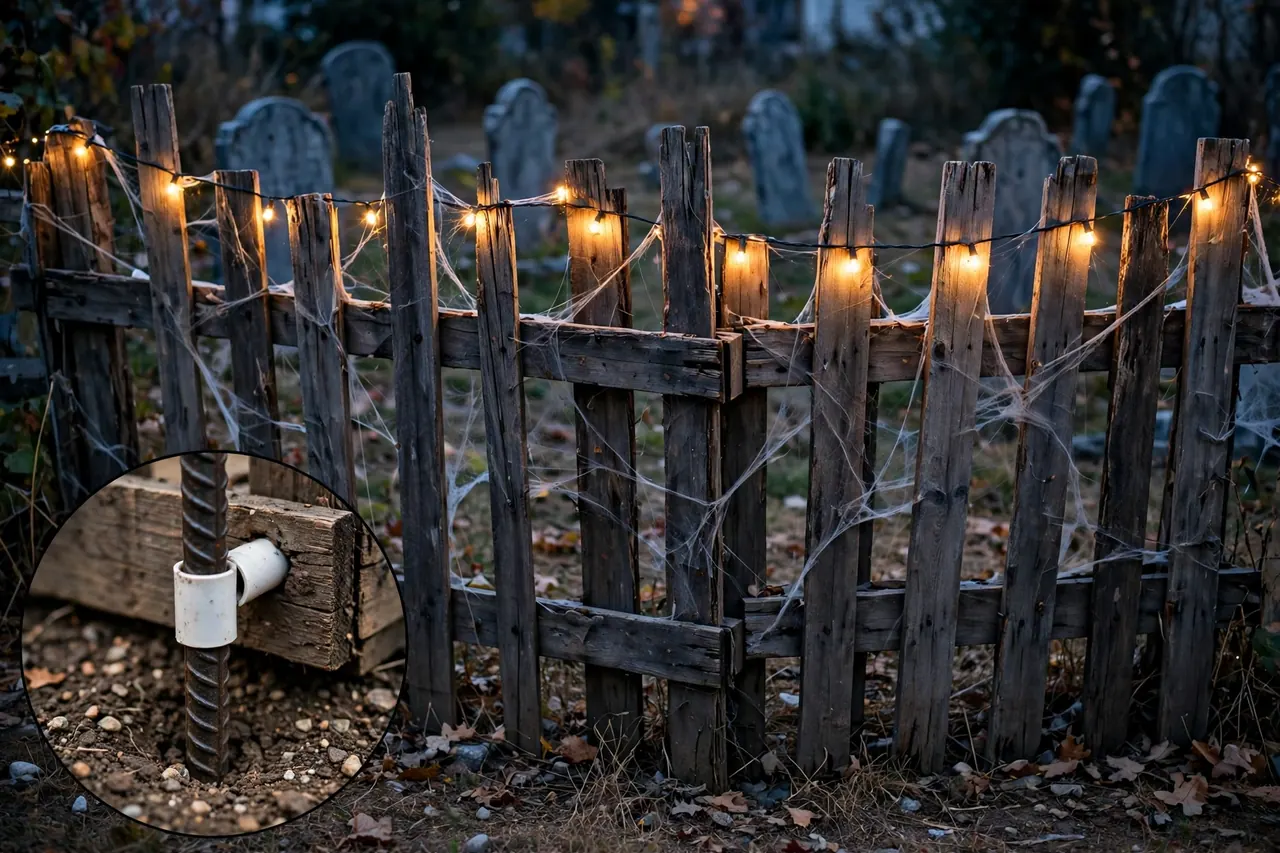
A short fence section does more for a Halloween yard than any single prop. It gives the graveyard a boundary, hides the edge of the scene, and makes everything behind it look intentional. The fastest version is a whole pallet stood upright behind the tombstones, draped with cobwebs; the better version is a proper fence panel from broken-down boards:
- Cut two horizontal rails from deck boards, each about 3 to 4 feet long.
- Cut six to eight vertical pickets, 2 to 2.5 feet long, and snip the top corners off each at an angle to make a rough point.
- Lay the rails parallel on the ground and the pickets across them, varying heights and angles slightly; perfection ruins the effect, so lean a few pickets on purpose.
- Screw each picket to both rails, two exterior screws per joint.
- Dry-brush gray or black paint over the panel for an older look, or leave the weathered wood as is.
To install the panel, drive two short lengths of rebar into the ground where it will stand, and slide the panel down over them through PVC pipe sleeves screwed to its back. The fence stands firm yet lifts off for storage in seconds. The full options are compared in the anchoring section below. At night, light the fence line with outdoor string lights or a lantern at each end so the scene glows instead of disappearing into the dark.
Build 4: Crooked Direction Signs
Signs are the fastest pallet build of all, and they fill awkward gaps between bigger props. Every offcut from the other builds is a sign waiting to happen.
- Pick boards at least 18 to 24 inches long, cut one end to a point with two angled cuts, and sand the face smooth enough to take paint, since lettering on rough grain bleeds and blurs.
- Paint the board a base color: black, purple, or weathered gray all read well after dark.
- Letter it with a contrasting paint and a flat brush, or use a stencil for cleaner text. Good signs point to places your scene suggests: “Graveyard,” “Witch’s Cottage,” “Pumpkin Patch,” “Enter If You Dare,” or “Candy This Way,” the one sign every trick-or-treater actually follows.
- Screw two or three finished signs to a single post at crooked angles, then drive the post into the ground or set it in a bucket of gravel on the porch.
Build 5: A Giant Spider Stand
Big store-bought spiders look impressive in the store and limp on the lawn, because their legs have nothing to hold them up. A pallet stand fixes that: a low platform and backdrop in one, which shows the spider off and keeps it off the wet grass.
- Use one whole pallet as the base platform, or build a flat panel from deck boards about 3 feet square.
- Attach a second pallet or panel upright at the back, screwed to the base with two angled brace boards, forming an L shape.
- Stretch fake cobweb material across the upright panel and over the base corners, stapling it down so the wind cannot strip it.
- Set the spider on the base, body against the webbed backdrop, legs spread across the platform. Tie the legs loosely to the boards with dark twine or zip ties so it holds its pose.
- Add a few small pallet offcuts painted as “egg sacs” or a warning sign at the front edge to finish the story.
Because the spider and stand are one unit, the display moves as a single piece at setup and stores stacked flat. If standalone creatures are the part you enjoy most, see our guide to do it yourself Halloween props.
How to Anchor Pallet Decorations So They Stay Put
Pallet wood is light, and October weather is not gentle. An unanchored tombstone becomes a kite on the first windy night, and a fence panel on a neighbor’s lawn undoes all your good work. Anchor every piece the day you set it out, with the method that matches where it stands; the same stake-and-brace thinking carries over to other DIY Halloween yard decorations.
Anchoring methods compared
| Method | Best for | How it works |
|---|---|---|
| Ground stake screwed to the back | Tombstones, signs, pumpkins on soil | A pointed stake attached to the prop is pushed into the ground, hidden behind the piece |
| Rebar and PVC sleeve | Fence panels, backdrops, spider stands | Rebar is driven into the ground; the panel slides over it through pipe sleeves and lifts off for storage |
| Kickstand brace | Pumpkins and signs on porches and patios | An angled board screwed to the back props the piece up like a picture frame, no ground needed |
| Gravel or sand bucket | Sign posts on hard surfaces | The post sits in a bucket of gravel or sand, heavy enough to resist wind and easy to move |
Test each piece with a firm push from the side after anchoring. If it rocks, add a second stake or move it out of the wind path between houses.
Seal the Wood So It Survives the Season
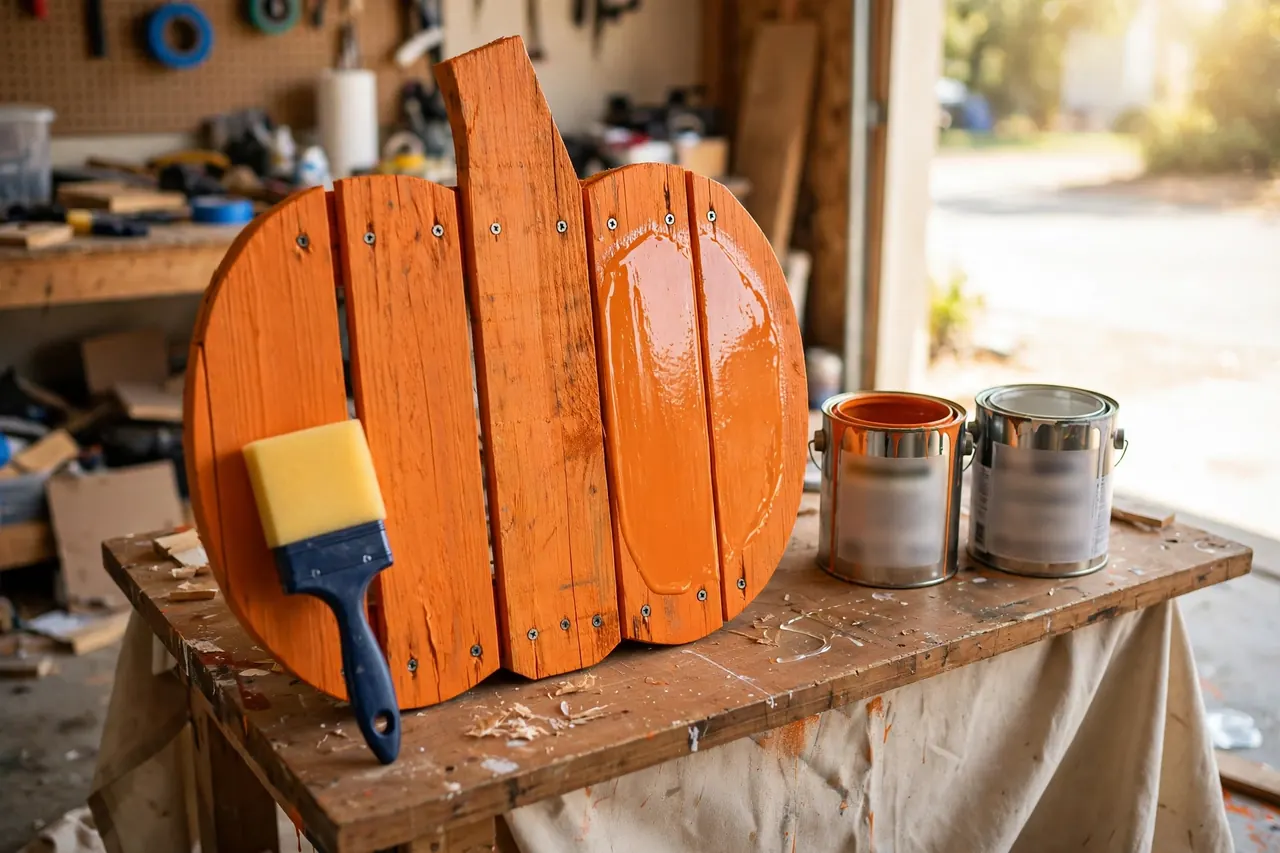
Pallet wood is packaging lumber, not outdoor lumber. It was never treated to resist rain, so unprotected pallet decorations soak up water, swell, and crack after a few wet weeks. Sealing is what turns a one-season prop into a decoration you unbox for years. Pieces built for a single night can skip it, but the pumpkin trio and tombstones take enough work that protecting them is worth the extra half hour.
- If you are painting, the paint itself is most of the protection. Use exterior latex paint, cover edges and end grain well, and give the bottom edge an extra coat, because that is where water wicks in.
- For the weathered wood look, use a clear exterior sealer or spar urethane rated for outdoor use, two coats, each dried per the can’s directions.
- Seal the back faces too, at least one coat. The back sits against damp ground and grass, and rot almost always starts where you cannot see it.
- Let everything cure fully before the pieces go outside, and bring them in during heavy storms if you can; even sealed pallet wood lasts longest out of puddles.
Store It Right and Reuse It Next Year
On November 1st, hose off the dirt, let every piece dry fully in the sun, and fix loose screws or splits while repairs are still easy. Store the pieces flat and stacked, off the ground, in the driest corner of the garage or shed: damp storage undoes a good sealer faster than rain does.
Note: pallet wood is a reused industrial material with an unknown history. Keep these projects outdoors, wash your hands after handling the wood, and never use pallet wood for food contact, children’s climbing toys, or indoor furniture. If a pallet’s stamp or history worries you, leave it and use the next one.
Related Guides
- Outside Halloween Decorating Ideas
- Do It Yourself Halloween Yard Decorations
- Spooky Halloween Yard Ideas
- 10 DIY Pallet Ideas
Frequently Asked Questions
Where can I find free pallets for Halloween decorations?
Ask at hardware stores, garden centers, tile and flooring shops, and small warehouses, which often give spare pallets away because removal costs them money. Local online marketplaces also list them free for pickup. Always ask first, since some pallets are returnable, and choose clean, dry, HT-stamped pallets.
How do I know if a pallet is safe to use?
Find the IPPC stamp on the side blocks or stringers and read the treatment code. HT means the wood was heat-treated with no chemicals and is the safe choice for home projects. MB means it was fumigated with methyl bromide, a toxic pesticide, so leave it. Reject any pallet with oil stains or a chemical smell, whatever the stamp says.
How do I keep my Halloween fence from falling over in the wind?
Drive two short rebar stakes into the ground, screw PVC pipe sleeves to the back of the panel, and slide the panel down over the rebar. The fence stands firm in gusty weather yet lifts straight off for storage. On hard ground, use a gravel-filled bucket or a kickstand brace instead.
Can I make these pallet projects without power tools?
Yes. A hand saw, hammer, pry bar, and screwdriver can complete every build here, including the pumpkins and tombstones. It takes longer and the cuts need more care, but nothing requires a power tool. Whatever you use, wear gloves and eye protection, because pallet wood hides splinters and bent nails.
Is it safe to use pallet wood inside my home?
Only with caution. Use clean, HT-stamped wood, scrub it, sand it smooth, and seal it first. Even then, a pallet’s history is never fully known, so the wood is best kept to outdoor decorations. Never use it for food surfaces, and avoid it for indoor furniture or children’s items.
Do I need to paint or seal the wood?
No, and the weathered look suits Halloween. But unprotected pallet wood absorbs rain and starts to split and rot within a season or two. Exterior paint, or a clear outdoor sealer for the bare-wood look, is what lets the same decorations return year after year.
Start this weekend with one pallet and the pumpkin trio. It is the fastest build, it teaches you how pallet wood behaves under a saw and a brush, and by Sunday night your porch will already look like Halloween found it. The rest can follow one pallet at a time.