If you’ve ever cooked in a kitchen that felt dim, harsh, or weirdly shadowy, you already know lighting isn’t a “later” decision. It shapes how safe you feel chopping, how clean the counters look, and whether the space feels welcoming at night.
Most kitchens don’t need more fixtures, they need smarter light in the right places. I’ve planned lighting for real homes where we changed nothing but the lighting plan, and the kitchen went from frustrating to effortless overnight.
Snippet-ready definition:
Kitchen lighting is the mix of ceiling, task, and accent lights that makes your kitchen bright enough to cook safely, comfortable enough to relax in, and balanced so counters stay shadow-free.
Mission Statement:
Dwellify Home helps homeowners design practical, comfortable spaces with real-world guidance, simple explanations, and honest recommendations that make everyday living easier.
Kitchen Lighting Basics (The Layered Lighting Method)
The best kitchens use a layered approach. That means you’re not depending on one ceiling fixture to do everything. Instead, you build a mix that covers the whole room and still gives you crisp light exactly where your hands work.
A simple way to think about it is this: you want the kitchen to feel evenly bright when you walk in, and then you want extra focused light where you prep, cook, and wash. After that, you add a touch of glow that makes the space feel finished, not clinical.
The 3 layers every well-lit kitchen uses
Ambient lighting is your base layer. It fills the room so you’re not walking into a cave, especially on cloudy days or in the evening.
Task lighting is the “get stuff done” layer. It’s what helps you see the true color of food, read a recipe, and spot a small spill before it becomes a slip.
Accent lighting is the mood and depth layer. It highlights texture, adds warmth, and keeps the kitchen from feeling flat.
The best part is that layering doesn’t have to mean complicated. You can get great results with a few well-chosen fixtures and smart placement.
Quick Guide Table: What to Use and Where
| Kitchen need | Best option | Quick placement tip |
| Even overall brightness | Recessed lights or a flush mount | Spread light evenly, then support work zones with task lighting |
| Shadow-free countertops | Under-cabinet LED strips | Run along most of the prep area, aim for continuous, diffused light |
| Clean look on low ceilings | Kitchen lighting flush mount | Choose a diffuser shade to reduce glare and soften reflections |
| Focused island or table lighting | Pendants or a linear fixture | Keep sightlines clear and center lights over the work surface |
| Softer nights, brighter cooking | Dimmers or smart scenes | Put ceiling, pendants, and under-cabinet lights on separate controls |
| Better food and finish color | High-CRI LED | Higher CRI helps colors look more natural and less “washed out” |
Step-by-step mini plan (fast and practical)
- Mark your zones: sink, stove, prep counter, island/table, pantry, walk paths.
- Pick the ceiling base: recessed or a ceiling fixture that spreads light well.
- Add task lighting: under-cabinet LED is usually the biggest upgrade.
- Style the island/table: pendants or a linear light, sized to your surface.
- Choose LED quality: comfortable color temperature and good CRI.
- Control it: separate switches and dimming make the kitchen feel premium.
Plan Your Kitchen Lighting First (Before You Buy Fixtures)
Before you fall in love with a pendant or a flush mount, do a quick plan. I always do this with clients because it prevents expensive mistakes, like beautiful lights that create shadows right on the cutting board.
Start by standing in your kitchen and noting the zones. Where do you actually work, and where do you just pass through? Kitchens are activity spaces, so lighting should follow how you move.
Also, take a moment to notice ceiling height, cabinet depth, and where your island or table sits. These details decide whether modern kitchen lighting looks sleek or feels cramped.
A quick planning checklist helps:
- Sketch the kitchen and mark sink, stove, prep counter, island, and table
- Note ceiling height and any beams or soffits
- Identify where shadows currently fall, especially near the backsplash
- Decide what should be bright, and what should feel softer at night
Best Lighting for Kitchen Ceiling (Choose the Right Ceiling Setup)
Let’s talk kitchen lighting ceiling options in a practical way. Your ceiling lights set the overall tone, but the goal is even coverage without glare.
When someone asks me the best lighting for kitchen ceiling, I usually answer with a question: are you working with a low ceiling, a medium ceiling, or a tall one? Because the right answer changes.
Flush mount vs semi-flush (best for low ceilings)
Kitchen lighting flush mount fixtures are great when you need clearance. They sit close to the ceiling and spread light widely, which helps small kitchens feel open.
Semi-flush gives you a little more style while still staying compact. If your ceiling is low, this is often the sweet spot. Just choose a shade that diffuses light, because clear glass can create sharp glare.
Recessed kitchen lighting (clean, modern, even light)
Recessed kitchen lighting is popular for a reason. It’s clean, it’s simple, and it works in almost any style.
The trick is placement. Recessed lights can either make your kitchen look professionally designed or make it feel like a grid of spotlights. We’ll fix that in the next section.
Track lighting or adjustable heads (flexible and practical)
Track lighting is underrated, especially in awkward kitchens. If your sink is in one spot and your prep zone is in another, adjustable heads let you aim light where it matters.
It’s also a practical option for rentals or for kitchens where wiring changes are limited.
Statement fixtures (when one focal piece makes sense)
Modern kitchen lighting often includes a standout fixture, like a linear light over an island. This works best when the statement piece is supported by good ambient and task lighting.
If the statement fixture is the only light source, it becomes frustrating fast. You’ll love how it looks, but you’ll hate how it works.
Recessed Kitchen Lighting Layout (Spacing, Placement and Common Mistakes)
Recessed lighting layout is where I see the most “almost right” kitchens. A few small adjustments can completely change how the room feels.
Here’s the thing: recessed lights are not just about symmetry. They’re about avoiding shadows and giving you even coverage.
Easy spacing rules (simple, practical)
A useful starting point is spacing recessed lights about half the ceiling height apart. For example, with an 8-foot ceiling, you often land around 4 feet between lights.
That’s a starting point, not a hard rule. If your kitchen is narrow, or you have a big island, you adjust based on zones.
Distance from cabinets (shadow prevention)
This is the professional move many people miss. If recessed lights are too far into the room, your body blocks the light when you stand at the counter. That creates shadows exactly where you’re chopping.
In many kitchens, placing recessed lights closer to the cabinet line helps. The light lands on the countertop instead of behind you. It’s a small change that makes daily cooking easier.
Avoid glare and dark corners
Too many downlights can create harsh glare, especially on glossy cabinets or polished stone. Dark corners also happen when the lights are evenly spaced in a grid but not aimed at the zones.
A better approach is to think in zones. Light the work areas well, then fill the rest with soft, even ambient light.
Task Lighting That Makes Cooking Easier
Task lighting is where kitchens become pleasant to use. It’s the difference between guessing and seeing clearly.
I’ve walked into kitchens with expensive finishes and still found one big issue: the counters were dim because there was no real task layer. Once we added task lighting, everything felt more premium.
Under-cabinet lighting is the hero here. LED strips create continuous light, which looks clean and modern. Puck lights can work too, but they often create bright spots and darker gaps unless you use enough of them.
A few task lighting spots to think about:
- Under cabinet lighting along prep counters
- A focused light at the sink, because that’s where you handle knives and glassware
- Good lighting at the cooktop, often supported by the range hood light
- Pantry lighting, because nobody enjoys hunting for ingredients in a dim closet
If you want one upgrade that feels instantly luxurious, under-cabinet LED is usually it.
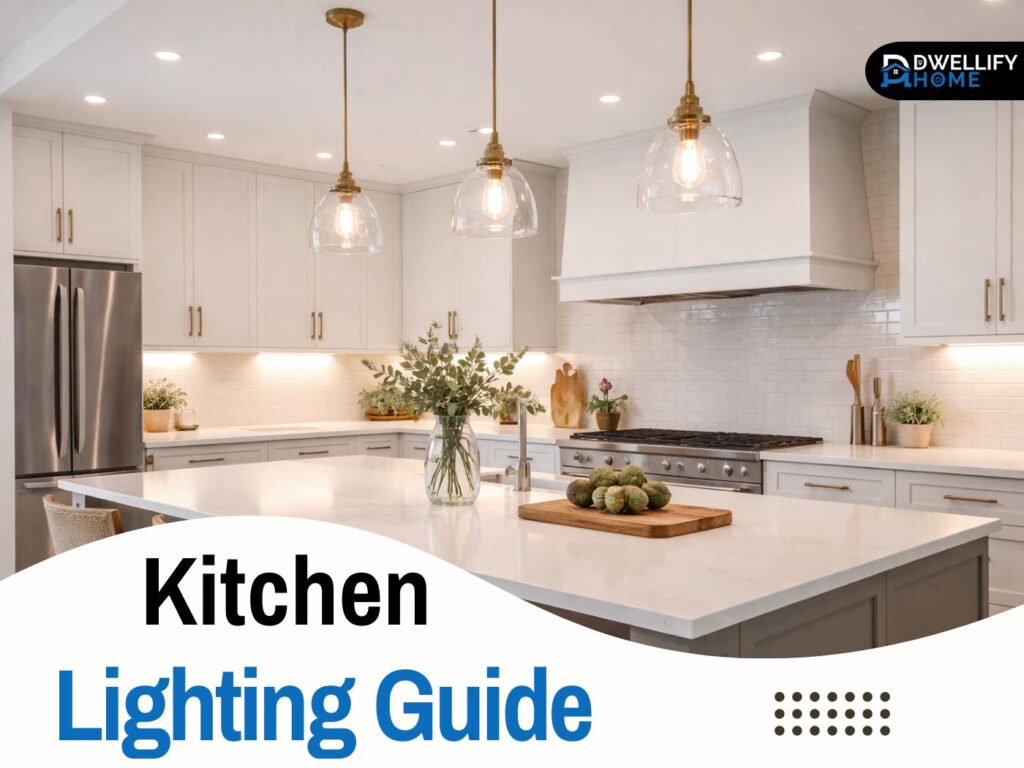
Kitchen Lighting Over Table and Island (Pendant Rules That Designers Use)
Kitchen lighting over table and island areas is part function and part style. Pendants can anchor the space, but they need to be sized and hung properly.
Guess what, most “pendant problems” are not the pendants. It’s the height and spacing.
Pendant hanging height (the 30 to 36 inch starting point)
A common starting point is hanging pendants so the bottom sits about 30 to 36 inches above the countertop or table surface.
If your ceilings are higher, you may go a bit higher to keep things proportional. If the pendants are large and chunky, you may also adjust up slightly so the sightline feels open.
How many pendants and spacing between them
For most islands, two or three pendants look balanced. The size of the island and the pendant shape decide which works best.
Spacing matters. You want enough distance so the light spreads evenly, but not so much that the pendants look like they’re drifting apart. A simple way to check is to stand at different angles and make sure the pendants don’t block views across the kitchen.
If you have a long table, a linear fixture can be cleaner than multiple pendants. It reads modern and gives more even light.
Kitchen Lighting LED Guide (Brightness, Color Temperature, and Light Quality)
Kitchen lighting LED options are excellent today, but quality varies more than people expect. Two bulbs can look the same on the box and feel totally different in a real kitchen.
Let’s keep it simple.
Brightness is measured in lumens. For kitchens, you usually want a bright ambient base, and then stronger light at work zones. Instead of blasting the whole kitchen with overly bright ceiling lights, it’s nicer to balance ambient with focused task lighting.
Color temperature is measured in Kelvin. Warm light feels cozy. Cooler light feels crisp. Many kitchens do well around a neutral range, especially when you cook often, because it keeps surfaces looking clear without feeling cold.
Now, the expert detail that’s worth knowing: CRI, which is color rendering. Higher CRI lighting shows colors more accurately. That means your tomatoes look red, not dull, and your wood tones don’t look gray.
If you’ve ever noticed food looking unappetizing under certain lights, it’s often a quality issue, not your paint color.
Kitchen Lighting Ideas That Look Good and Work in Real Life
Let’s get into kitchen lighting ideas that aren’t just pretty photos. The best setups look good, but they also make daily life easier.
One of my favorite “real home” combinations is this: recessed for general coverage, pendants for the island, and under-cabinet LED for counters. It works in classic kitchens and in modern kitchen lighting styles.
A few practical ideas that consistently deliver:
- Use a diffused flush mount in a smaller kitchen, then add under-cabinet LED for task light
- Mix finishes thoughtfully, like matte black hardware with warm brass accents, but keep it to two main metals
- Add toe-kick lighting for a soft nighttime glow, especially if you get water at night or have kids
- Put a small light inside glass-front cabinets or open shelves to add depth
On top of that, lighting is a great way to make a budget kitchen feel upgraded. Even simple fixtures look expensive when the light is soft, even, and well controlled.
Kitchen Lighting Controls (The Upgrade That Changes Everything)
If you do nothing else, add dimming. Dimmers are the easiest way to make a kitchen feel flexible.
Bright light is great for cooking, but it’s not what you want at 10 pm when you’re grabbing water. With dimmers, your kitchen can shift from task-focused to calm and cozy.
Smart controls can take it further. You can create simple scenes like:
- Cooking mode: bright ambient plus strong task light
- Dinner mode: pendants softly on, under-cabinet low, ceiling lights dimmed
- Night mode: toe-kick or a single low light for safe navigation
Motion sensors in pantry areas are also a small upgrade that feels surprisingly luxurious.
Kitchen Lighting Mistakes (And Quick Fixes)
I’ve seen the same mistakes in fancy homes and small apartments, so don’t feel bad if yours has one or two.
One ceiling light only. It creates shadows and makes the room feel flat. Fix it by adding under-cabinet lighting or a couple of recessed lights in key zones.
Recessed lights placed too far from cabinets. That causes shadowy counters. Adjust placement, or add a proper task layer.
Mixed bulb colors. Warm bulbs in one fixture and cool bulbs in another makes the kitchen feel off. Match color temperature across the space.
Glare from clear glass or exposed bulbs. If your eyes feel tired in the kitchen, glare might be the issue. Use diffused shades or bulbs designed for softer spread.
Everything on one switch. Kitchens work better when lighting is zoned. Separate your ceiling lights, island lights, and task lighting if you can.
Safety + Practical Buying Checks (Short, Trustworthy EEAT Section)
Lighting should feel great, but it also needs to be safe and sensible.
Near sinks, look for fixtures that are appropriate for moisture, because splashes happen. Over cooking zones, keep fixtures away from heat and grease where possible, and make sure anything above a cooktop is installed with proper clearance.
If you’re adding new wiring, moving switches, or installing heavy fixtures, it’s smart to call a licensed electrician. It’s not just about safety, it’s also about doing it once and doing it right.
FAQs
1) What kind of lighting is best for a kitchen?
A layered setup works best: ceiling ambient light for the whole room, task lighting for counters and sink (especially under-cabinet LED), and a bit of accent light for warmth and depth.
2) What is the current trend for kitchen lighting?
In 2026, designers lean toward warmer, layered lighting, more decorative fixtures (like sconces and statement pieces), and integrated LED in shelves or cabinetry, with dimming for flexibility.
3) What are some common kitchen lighting mistakes?
The big ones are: relying on one ceiling light, placing recessed lights so they create counter shadows, mixing bulb colors (warm and cool together), using glary clear bulbs, and putting everything on one switch.
4) What is the best ceiling light fixture for a kitchen?
It depends on your ceiling height and layout. For low ceilings, a flush mount or semi-flush is usually the cleanest choice. For a modern look with great coverage, recessed lighting works well when spaced and placed correctly.
5) What LED color temperature should I use in a kitchen?
Most real homes feel best with warm-to-neutral white for comfort, then brighter task light where you prep and cook. Warmer tones are especially popular right now because they feel calmer and less harsh at night.
Conclusion
A kitchen feels “right” when the light supports real life. You want even ambient light, strong task lighting where your hands work, and a touch of accent glow that makes the room feel warm and finished.
If you’re updating your setup, start with zones and layers, then choose the best ceiling option for your space. Add under-cabinet LED if your counters feel shadowy, and don’t underestimate dimmers. That one change can make your kitchen feel calm at night and bright when you need to cook.
Do it this way, and your lighting won’t just look nice. It’ll make the kitchen easier to use, safer for daily tasks, and more comfortable for everyone who gathers there.
Disclaimer:
This article is for general information and design guidance only. Electrical work can be dangerous, so for wiring changes, new circuits, or fixture installation, consult a licensed electrician and follow local codes and manufacturer instructions.

I’m Bilal, the founder of Dwellify Home. With 6 years of practical experience in home remodeling, interior design, and décor consulting, I help people transform their spaces with simple, effective, and affordable ideas. I specialize in offering real-world tips, step-by-step guides, and product recommendations that make home improvement easier and more enjoyable. My mission is to empower homeowners and renters to create functional, beautiful spaces—one thoughtful update at a time.