Wood Christmas decorations outside work best when you pick the right wood, seal every surface, and anchor each piece well. Wooden reindeer, slatted trees, crates, signs, and cutouts give your yard a warm, handmade look that plastic and shiny store displays just cannot copy. This guide shows you which outdoor wooden Christmas decorations to choose, how to protect them from rain and snow, and how to store them so they come back out next year looking just as good.
Here is the honest truth up front: bare wood will not last long outside. Rain soaks in, sun fades the color, and freezing nights open small cracks. However, a sealed wooden piece on a sheltered porch or a well-anchored spot in the yard can last for many seasons. The trick is not buying more decorations. The trick is choosing a few strong wood pieces, placing them with care, and giving them one good coat of protection each year.
Wooden Reindeer and Yard Cutouts That Steal the Show
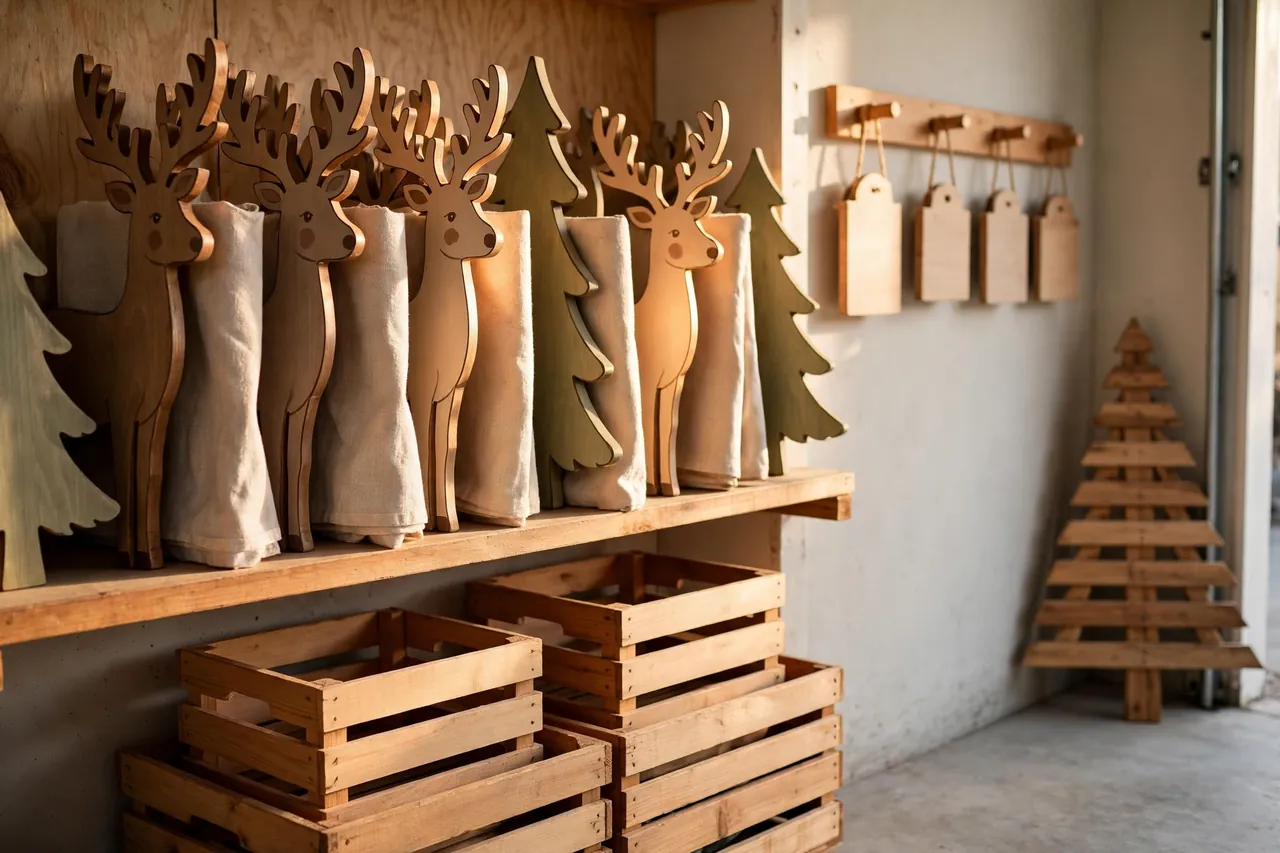
Nothing says Christmas in the yard quite like a wooden reindeer. Flat plywood cutouts of reindeer, Santa, snowmen, and trees stand tall in the lawn, and they read clearly from the street even after dark. A pair of reindeer by the walkway, one slightly taller than the other, looks natural and friendly, while a whole herd can quickly look crowded. Give each piece room to breathe, and let the lawn and the house stay part of the picture.
When you shop for wooden Christmas outdoor decorations, look at the back as well as the front. A good cutout has smooth, sanded edges, paint or stain on every side, and a solid base or stake that holds it upright. Thin, unsealed plywood bends and peels fast, so skip pieces that feel flimsy or show bare wood along the cut edges. If you love a design but the finish looks weak, you can still buy it and seal it yourself before it goes outside. The sealing steps later in this guide show you how.
Place tall cutouts where the wind cannot grab them like a sail. A spot near a fence, a hedge, or the side of the porch breaks the wind and keeps the piece steady. Keep cutouts away from paths where people might bump into a stake, and never block a walkway, a gate, or a driveway just for a photo moment. A beautiful yard display should still be a safe yard to walk through.

Wooden Trees, Crates, and Porch Displays That Feel Handmade
Slatted wooden trees are the easiest way to bring a rustic look to a porch. Builders make them from fence pickets or pallet boards laid across a central trunk, with gaps between the slats so light and shadow play across the wood. They look lovely bare, with warm white lights tucked behind the slats, or with a few wooden ornaments hung from the boards. Because they are flat, they lean neatly against a wall and need very little floor space.
Wooden crates do the quiet, useful work of a porch display. Stack two or three crates near the door, fill them with greenery, pinecones, and a few wrapped boxes, and you have a display that looks full without looking fussy. Turn one crate on its side and it becomes a little shelf for a wooden lantern frame or a small carved tree. Keep the crates off wet ground with small wooden feet or a stone slab under them, because a crate that sits in a puddle will rot from the bottom up.
A vintage-style wooden sled leaning by the door adds instant Christmas charm, and it pairs well with crates and greenery. Choose a sled in sound shape, with no loose runners or sharp hardware sticking out, and tie it or wedge it so it cannot slide onto the walkway. A wooden wagon filled low with evergreen branches works the same way. Keep the load low enough that you can still see the wagon shape, and park it where no one can trip over the handle.
Mix sizes on purpose. Wood outdoor Christmas decorations look best in a trio: one tall tree, one medium crate stack, and one low display near the steps give the eye three places to land. When every piece is the same height, the porch looks flat. When one piece towers over the rest, it looks like an accident. Step back to the street, or to the end of the walkway, and check the balance before you call the display done.
Wooden Signs and Cutouts for the Front Door and Walkway
Wooden signs greet people before they even reach your door. A tall porch sign that reads “Merry Christmas,” a small stake sign that points toward the “North Pole,” or a round wooden sign on the door itself all work, because wood feels warm next to brick, stone, and painted siding. Painted signs in cream, deep red, and forest green suit most houses, while a natural stain suits a cabin or farmhouse style best.
Christmas outdoor wood decorations also suit a walkway, where small wooden stakes and cutouts guide guests in without shouting. Space them evenly, keep them the same height, and use one color story across the whole path. A row of wooden Christmas yard decorations in mixed colors, mixed sizes, and mixed styles looks messy fast, even when each piece is pretty on its own. Pick one theme, such as natural wood and cream, or red and green on dark stain, and repeat it from the curb to the door.
Outdoor wood decorations for Christmas also include simple shapes that beginners can make or buy with confidence: wooden stars, snowflakes, gift boxes, and candy-cane markers. These small pieces fill gaps between bigger displays and soften hard edges like steps and planters. If a gap still looks empty after you add one small piece, add greenery first, not another decoration. Greenery ties wood pieces together and keeps the display calm.

Pick Wood That Can Handle Winter
Not all wood handles winter the same way, so the wood you choose matters as much as the design. Cedar and redwood resist rot and insects better than most woods, which makes them strong picks for pieces that will live outside year after year. Exterior-grade plywood works well for wide, flat cutouts, because it stays flat and holds paint nicely when you seal its edges well. Pine costs less and paints easily, but it needs thorough sealing, because it soaks up water fast and can warp if you leave it bare.
Before you buy or build, check the wood with your hands and eyes. It should feel dry, solid, and free of soft spots, deep cracks, and loose knots. Soft, spongy wood already holds moisture, and no coat of sealer can fix rot that has already started. For a piece you plan to keep for years, spending a little more on cedar or exterior plywood pays off in fewer repairs and fewer replacements.
The table below sums up the common choices, so you can match the wood to the job.
| Wood type | Best for | What to watch for |
|---|---|---|
| Cedar | Slatted trees, signs, trim, and long-life pieces | Costs more; still needs a sealer for color |
| Exterior plywood | Wide reindeer, Santa, and tree cutouts | Seal every cut edge, or water gets in fast |
| Pine | Budget signs, crates, and painted pieces | Needs full sealing; can warp if left bare |
| Reclaimed pallet wood | Rustic trees, crates, and signs | Check for nails, dirt, and weak boards first |
Reclaimed wood deserves one extra caution. Old pallet boards can hide nails, staples, and grime, so pull every fastener, sand the boards well, and skip any board that smells odd or feels soft. A clean reclaimed board gives you a beautiful, weathered look for free, but a dirty board gives you splinters and a weak display.
Seal Wood So It Survives Rain, Snow, and Sun
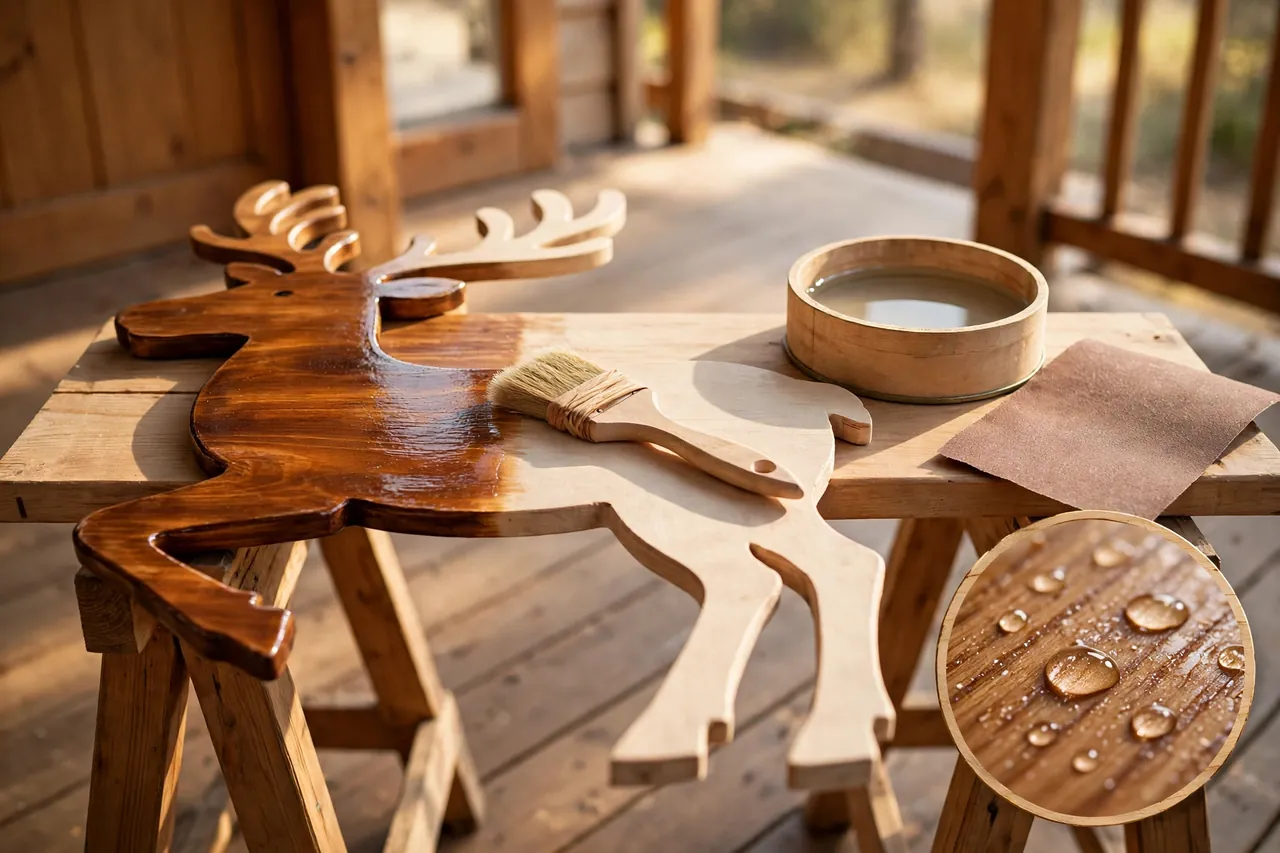
Sealing is the step that turns a one-season decoration into a keepsake. Water is the main enemy: it soaks into bare wood, feeds the fungi that cause rot, and freezes in cracks on cold nights. Sunlight hurts wood too, because it breaks down the surface and fades paint and stain. A good outdoor finish fights both problems at once, but only if you cover every surface, including the back, the bottom, and the cut edges.
Follow these steps, and let each coat dry fully before you move to the next one:
- Clean the wood and sand it smooth. Brush off dirt, sand rough edges, and wipe away dust so the finish can grip the surface.
- Fill cracks and holes with exterior wood filler. Let the filler dry, then sand it flush so water has nowhere to pool.
- Paint or stain the piece with an exterior-rated product. Exterior paint seals wood very well on its own, while stain lets the grain show through.
- Top natural or stained wood with a clear outdoor sealer or marine spar varnish. Pay extra attention to edges, joints, and the base, where water lingers longest.
- Let the piece cure in a dry, ventilated spot, following the time on the product label. A finish that feels dry to the touch may still need more time to harden fully.
Painted pieces need less fuss than clear-finished pieces, because good exterior paint already seals the wood and blocks sunlight from the fibers. Clear finishes, on the other hand, wear down faster and may need sanding and a fresh coat when they crack or peel. Penetrating deck sealers offer a simpler path: they soak into the wood instead of forming a film, so they will not crack or peel, and you can recoat them after a quick clean. Whichever finish you choose, check the label to confirm it suits outdoor use, and recoat at least once a season or as the maker directs. This Old House advises sealing all surfaces of wooden ornaments and signs and inspecting them often for water damage, and Woodworker’s Journal notes that marine spar varnish stands up to wood movement and sun better than most varnishes, though even it needs renewal over time.
Seal before the first rain, not after. Outdoor wood Christmas decorations that go out bare in a November storm may already hold enough water to peel their first coat of paint. If you buy a finished piece late in the season, give it one extra clear coat on a dry day and let it cure indoors before it faces the weather.
Anchor Wood Pieces So Wind Cannot Take Them
Wind is the surprise enemy of wood Christmas decorations outside. A flat plywood reindeer catches wind like a sail, and a tall slatted tree can tip on a gusty night. A fallen piece can crack, scratch a car, or hurt someone, so anchoring is not an optional extra. It is part of the display.
Start with a wide, heavy base. A broad wooden foot, a crate filled with stones, or a stake driven deep into firm soil all beat a narrow foot on soft ground. On a hard porch or patio, use sandbags or heavy planters behind the piece, where guests cannot see them, rather than thin wire that trips people. On a lawn, drive stakes at an angle away from the piece, so the wind pulls against the stake instead of lifting it straight out.
Keep tall pieces out of wind tunnels. The gap between two houses, the corner of a garage, and an open hilltop all funnel wind and push harder than a sheltered wall does. If your yard is wide open, group pieces together near a hedge or fence, or choose lower, wider displays that wind can flow around. After the first strong storm, walk the display and check every stake, screw, and joint. Tighten what loosened, and move any piece that leaned, even a little, before the next storm finds it.
Never hang a heavy wooden piece from a weak hook, a thin nail, or a gutter. Use rust-resistant screws and hardware rated for outdoor use, and hang signs from a solid beam or a sturdy bracket. Rust stains wood, weakens screws, and can drop a sign onto the walkway without warning.
Light Wood Displays Safely
Lights turn wood from pretty in daylight to magical at night, and they deserve the same care as the wood itself. Use only lights and cords rated for outdoor use, and check the tag before you buy. Indoor lights have thinner insulation and unsealed connections, so cold, rain, and sun can crack them and create a shock or fire risk. Outdoor-rated strings and cords carry thicker, weather-resistant jackets built for the job.
Plug every outdoor display into a GFCI-protected outlet. A GFCI outlet cuts power in milliseconds if current leaks through water or a damaged cord, and that fast shutoff can prevent a serious shock. Press the “Test” button on the outlet before the season starts: the power should cut at once, and the “Reset” button should bring it back. If the test fails, or if your outdoor outlet has no GFCI protection at all, call an electrician and get it fixed before you plug in a single light. A portable GFCI adapter adds protection when a hardwired GFCI outlet is not available, but it is a backup, not a replacement for a proper outlet.
Keep connections off the ground and out of puddles. Raise plugs on a small wooden block or a brick, cover outdoor connections with a weatherproof cover, and run cords where feet, shovels, and snow blowers cannot catch them. Do not overload one outlet with string after string: follow the maker’s limit for strands joined end to end, and spread a big display across more than one circuit when you need to. Check cords each week for cracks, stiff spots, and chew marks, and replace any damaged strand at once, even if it still lights up.
Battery lights solve the cord problem for small wooden pieces, and they suit signs, crates, and cutouts far from an outlet. Choose outdoor-rated battery boxes, keep the box sheltered from direct rain, and set a timer so the lights switch off on their own. Solar lights work well too, but only where the small panel gets real daylight; a panel buried under snow or tucked in deep shade will fade early each night.
Build a Simple DIY Wooden Tree in a Weekend
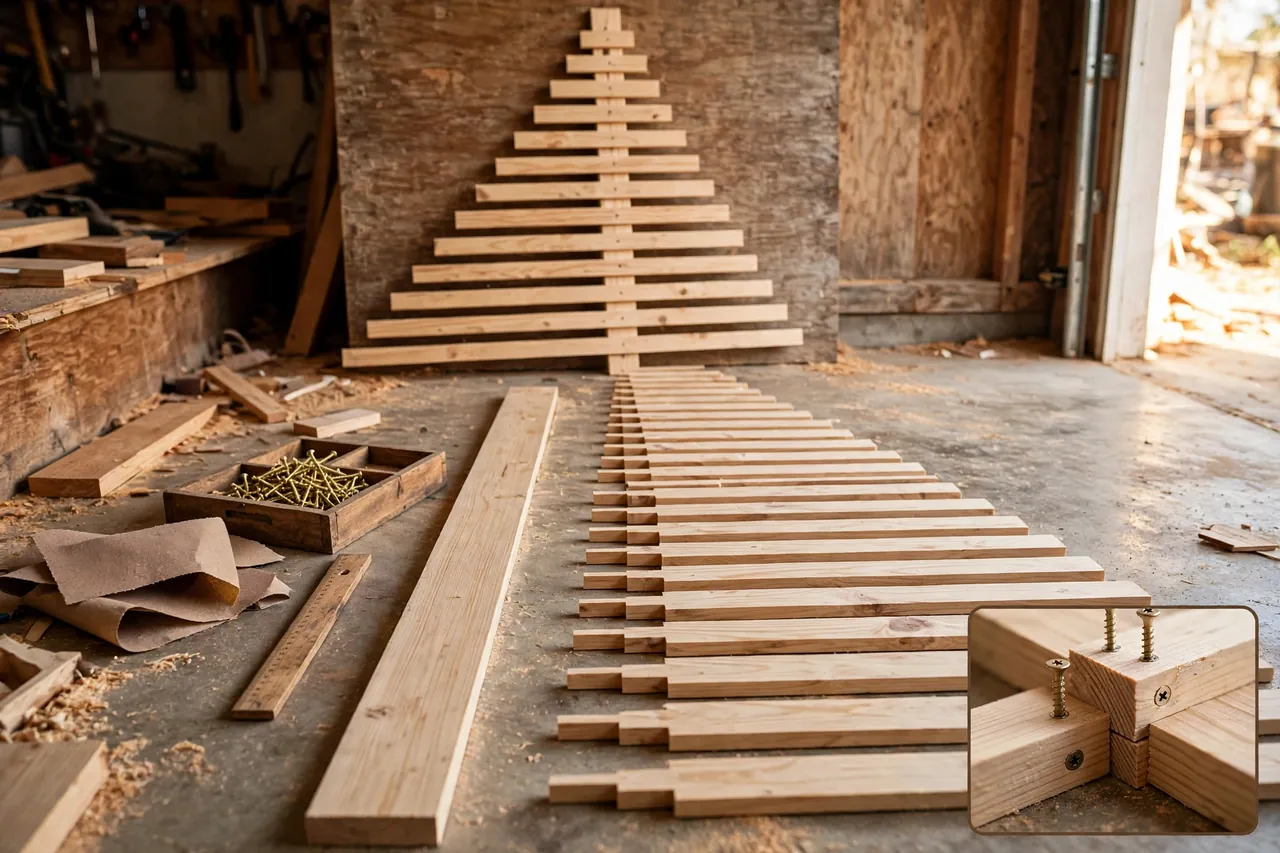
A slatted wooden tree is the friendliest first wood project for Christmas, because it uses straight cuts, simple joints, and no fancy curves. You need fence pickets or pallet boards, one sturdy board for the trunk, exterior screws, exterior paint or stain, and a clear outdoor sealer. Measure twice, cut once, and dry-fit the slats on the ground before you screw anything down, so you can fix the spacing while it is still easy.
Work safely from the first cut to the last coat. Wear eye protection and gloves, keep your hands clear of the saw blade, and clamp boards down instead of holding them near the cut. Let an experienced adult handle power saws, and keep children away from cutting and drilling. Sand every edge until it feels smooth, because a Christmas decoration that gives splinters will not stay a favorite for long.
Follow this simple order, and the tree comes together in a few relaxed hours:
- Cut the trunk board to your chosen height, and cut a pointed stake at the bottom if the tree will stand in soil.
- Cut slats in shrinking lengths, longest at the bottom and shortest at the top, and lay them out on the trunk with even gaps.
- Screw each slat to the trunk from the back, using two screws per slat so nothing twists loose in the wind.
- Sand the whole tree, paint or stain it, and let it dry fully in a ventilated space.
- Brush on a clear outdoor sealer, paying extra care to the cut ends, and let it cure before the tree goes outside.
Stand the tree against a wall, stake it into the lawn, or set it in a heavy crate base, and check it from the street. Add lights behind the slats for a warm glow, or leave the wood bare and let the grain do the talking. Either way, you have a decoration that cost little, took one weekend, and can come back for years with one fresh coat of sealer each fall.
Care and Storage: Make Wood Pieces Last Year After Year
January care decides whether your wood pieces last one season or ten. When the holidays end, bring each piece in on a dry day, brush off dirt and leaves, and let it dry fully indoors before you store it. A piece stored damp will grow mold in the box and greet you with stains next December.
Check each piece before you pack it, and fix small problems while they are still small. Touch up chipped paint, reseal a worn edge, tighten a loose screw, and replace a rusted fastener with a rust-resistant one. A ten-minute fix in January saves a full rebuild next fall, and it keeps the piece looking loved rather than tired.
Store flat cutouts upright, with soft spacers between painted faces so the paint does not stick or scratch. Keep crates nested or stacked with the heaviest at the bottom, and hang small signs on a wall hook rather than piling them in a box. Choose a dry, covered spot, such as a garage shelf or a spare room, and keep pieces off a concrete floor where damp can creep in. Label each box with its contents, so next year’s setup takes minutes, not a treasure hunt.
Christmas yard wood decorations earn their keep when you treat them like furniture, not like disposable decor. A cedar tree, a sealed reindeer, and a painted sign that you store dry and touch up once a year will look better at year five than a cheap replacement looks at year one. Wood ages with grace when you give it a little care, and that soft, weathered warmth is exactly why people choose wood in the first place.
Related Guides
If you are planning the whole outside of your house, these Dwellify Home guides help with the next step. Christmas Decor Exterior Ideas for a Yard That Glows All Season covers the full yard picture, while Christmas Decor on Porch layers a porch display step by step. For the entry itself, Christmas Decorations on Front Door shows how to dress the door without crowding it, and Best Outdoor String Lights for 2026 helps you light wood displays safely. When the season ends, Christmas Tree Storage Bags offers packing ideas that suit wooden pieces too.
Frequently Asked Questions
What wood is best for outdoor Christmas yard decorations?
Exterior-grade plywood works well for wide cutouts, while cedar is a strong choice for slatted trees, signs, and trim. Pine costs less and paints easily, but it needs thorough outdoor sealing. Seal all faces and edges, and match the board thickness to the size and weight of the piece.
Can plywood Christmas yard decorations stay outside?
Yes, exterior-grade plywood can stay outside when you protect its faces, cut edges, and screw points with paint or sealer. It still lasts longer in a sheltered spot, and it should never sit in standing water or wet soil. Check the finish during the season, and let the piece dry fully before storage.
How do you keep wooden Christmas decorations from blowing over?
Use a broad, weighted base or stakes suited to your surface and local weather, and keep tall pieces out of open wind channels. Make the support part of the design from the start, not an afterthought. Ask an experienced adult to review tall, heavy, or top-heavy pieces before a storm.
How do I seal wooden outdoor Christmas decorations?
Clean and sand the wood, fill cracks with exterior filler, then paint with exterior paint or stain the piece. Top natural or stained wood with a clear outdoor sealer or marine spar varnish, covering the back, bottom, and edges. Let it cure fully, and recoat at least once a season.
What is the easiest wooden Christmas yard decoration for beginners?
Simple slatted trees, wooden crates filled with greenery, stake signs, and gift-box displays use straight cuts and simple finishes, so beginners can build them with confidence. Keep the design bold and simple, and let an experienced adult handle or supervise any power-tool cuts.
How long do wood Christmas decorations outside last?
Sealed, well-stored wood pieces can last many seasons, while bare or poorly sealed pieces may warp, peel, or rot within one wet winter. Cedar and exterior plywood last longest, and dry storage plus a fresh coat of sealer each fall adds years to any wooden piece.
Safety note: outdoor electrical work and power-tool work carry real risk. Use GFCI-protected, outdoor-rated lights and cords, anchor tall pieces well, and ask a qualified electrician or an experienced adult for help with wiring, high displays, or any cut you are unsure about. If a cord, outlet, or piece looks damaged, do not use it until it is repaired or replaced.
Start with one strong wood piece this year, such as a sealed reindeer by the walkway or a slatted tree on the porch, and build around it next year. Seal it well, anchor it well, and store it dry, and your wood Christmas display will greet your guests with the same warm, handmade welcome every December.