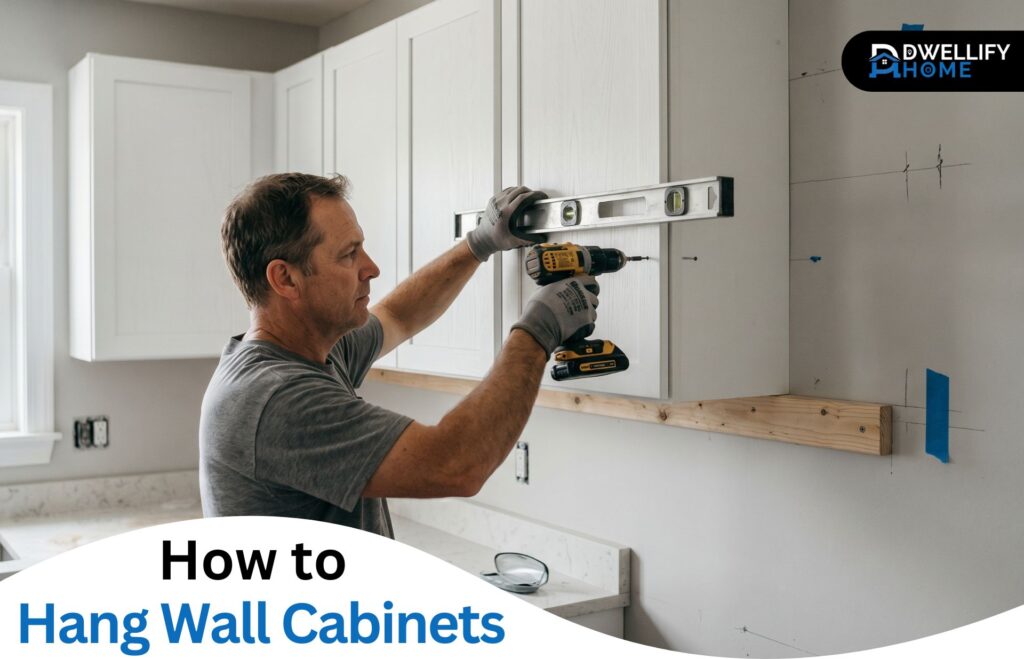
Wall cabinets look straightforward until you’re standing in front of a bare wall with a drill in your hand. After over 15 years of working on kitchen renovations and home installations, I can tell you the process isn’t complicated — but it does require patience, the right sequence, and a few details most tutorials gloss over. Get those right, and your cabinets will sit level, hold their load, and look like a professional installed them.
Snippet-Ready Definition
Hanging wall cabinets involves locating wall studs, drawing a level reference line, and securing cabinets with cabinet screws through a temporary ledger board — ensuring a safe, level, and long-lasting installation on any wall.
About Dwellify Home
At Dwellify Home, we help homeowners make practical, informed decisions about their living spaces — from installation guides to décor choices — with advice that’s grounded in real experience, not trends.
What to Think About Before You Pick Up a Drill
The mistakes that haunt most DIY cabinet installations happen before a single screw goes into the wall.
Start by measuring the full width of the space you’re working with. Map out where each cabinet will sit in relation to windows, doors, appliances, and any outlets on the wall. Outlets hidden behind a cabinet back are a headache you don’t want to deal with after the fact — plan around them now.
Also consider whether your cabinets are framed or frameless. Framed cabinets (the most common in North American kitchens) have a solid face frame around the front, which is what you’ll connect adjacent units through. Frameless cabinets are joined through the cabinet sides. The hanging process is similar, but the connection method differs — knowing this upfront saves confusion mid-installation.
Quick Reference: Cabinet Installation at a Glance
| Element | Recommended Standard |
| Cabinet height from floor | 54 inches |
| Space above countertop | 18–24 inches |
| Screw type | Washer-head cabinet screws |
| Screw length | 2.5–3 inches |
| Screws per stud | 2 minimum (top and bottom rail) |
| Ledger board size | Straight 2×4 |
| Solo install method | Ledger board + V-notch brace |
| No-stud option | Toggle bolts or French cleat |
Key Steps Before You Drill
- Measure the full wall space and map cabinet positions around outlets, windows, and appliances
- Confirm standard cabinet height for your ceiling height and countertop layout
- Gather all tools before starting — mid-job hardware runs cause misalignment errors
- Remove cabinet doors and shelves to reduce weight before lifting
- Verify stud locations with pilot holes, not just a stud finder reading
How High Should Wall Cabinets Be Hung?
The standard starting point is 54 inches from the floor to the bottom of the cabinet. That puts the cabinet base roughly 18 to 24 inches above a standard countertop and gives most people comfortable reach without straining.
That said, it’s not a rigid rule. Taller households often go a few inches higher. If you have a range hood, its height may dictate where upper cabinets on either side begin. Ceiling height matters too — in rooms with 8-foot ceilings, going much above 54 inches can leave an awkward gap between cabinet tops and the ceiling.
Mark this height clearly on the wall before anything else. It anchors every measurement that follows.
Tools and Materials You’ll Need
Gather everything before you start. Stopping mid-installation to make a hardware run throws off your workflow and your measurements.
- Stud finder and pencil
- Laser level or quality bubble level
- Drill or impact driver with countersink bit
- Cabinet screws (washer-head, 2.5 to 3 inches long)
- Bar clamps (for joining face frames)
- Straight 2×4 board (ledger)
- Shims
- Measuring tape
- Safety glasses
One thing worth emphasizing: use dedicated cabinet screws, not drywall screws. Drywall screws are brittle and can snap under lateral load. Cabinet screws have a washer-style head that distributes weight across the hanging rail instead of biting through it. This is not a place to substitute.
Step 1: Locate and Mark Your Wall Studs
Studs are your anchor points. Cabinets secured only to drywall will eventually pull away from the wall — it’s not a matter of if, it’s when.
Run your stud finder across the wall and mark each stud from floor to ceiling with a pencil. Then verify each location by drilling a small pilot hole. Stud finders are useful tools, but they’re not infallible, especially near outlets or in older homes with irregular framing. Confirming positions physically takes two minutes and prevents a lot of frustration.
Step 2: Draw a Level Reference Line
Using your laser level or bubble level, draw a clean horizontal line across the entire installation area at the bottom-of-cabinet height you marked earlier.
One important detail: always start from the highest point of your floor, not an arbitrary spot. Floors are rarely perfectly level. Starting from the highest point ensures all cabinets sit on the same plane rather than creating a visually obvious step across the run.
Step 3: Install the Ledger Board
Take a straight 2×4 and screw it into the wall studs directly along your reference line. The top edge of this board should align with the bottom-of-cabinet line.
This ledger is temporary, but it does something essential — it holds the full weight of each cabinet while you position and fasten it. Without it, you’re trying to hold a heavy cabinet overhead with one hand and drive screws with the other. That’s how things go wrong. The ledger turns a difficult two-person job into a manageable one.
Step 4: Prepare Your Cabinets Before They Go Up
Before lifting anything, remove all cabinet doors and shelves. This reduces weight significantly and removes the risk of door hinges or shelf pins getting damaged during installation.
On the inside back of each cabinet, locate the hanging rail — the horizontal piece along the top and bottom of the cabinet back. Pre-drill clearance holes through the rail at the stud locations. Transfer your stud measurements from the wall onto the inside of each cabinet so you know exactly where to drive screws once the unit is up.
Also check now for any outlet boxes that will end up inside a cabinet. It’s far easier to cut an opening in the cabinet back while it’s still on the floor than after it’s been mounted.
Step 5: Hang the First Cabinet
Always start from a corner. If your layout doesn’t include a corner unit, begin from the far left and work right.
Lift the cabinet onto the ledger board, align it with your wall markings, and check that it’s both level (side to side) and plumb (front to back and vertically). Drive cabinet screws through the hanging rail and into the studs — at least two screws per stud, one through the top rail and one through the bottom. Don’t fully tighten them yet. You’ll do a final pass once everything is in position.
Step 6: Set and Connect Adjacent Cabinets
Position the next cabinet on the ledger, flush against the first. Use a long level across the front faces of both cabinets to confirm they’re even.
Clamp the face frames together firmly with bar clamps before connecting them. Once clamped and aligned, drill through the face frame of the first cabinet into the second, then drive a cabinet screw through to join them. For frameless cabinets, drive connecting screws through the cabinet sides near the front, middle, and rear. Keep all mounting screws snug but not fully tightened until the full run is set and you’re satisfied with the alignment.
Step 7: Shim for Uneven or Bowed Walls
Most walls have some degree of irregularity. A wall that looks flat often bows inward or outward by a quarter inch or more in places.
Before fully tightening any screws, slide shims behind the cabinet back wherever gaps exist between the cabinet and wall. This prevents the cabinet from bowing or twisting when the screws are driven in tight. Once the shims are in the right position, score them with a utility knife and snap off the excess so nothing sticks out past the cabinet edge.
Step 8: Final Tightening, Cleanup, and Finishing Touches
Once all cabinets are positioned, leveled, shimmed, and connected to each other, do a full tightening pass on every screw — wall screws and face frame connectors.
Remove the ledger board and patch any nail holes with spackle. Run a thin bead of acrylic caulk around the cabinet perimeter where it meets the wall, or fit any filler strips between cabinets and walls. Rehang the doors, adjust the hinges so each door sits even and closes cleanly, then install your hardware, interior shelving, or organizers.
How to Hang Wall Cabinets Without Studs
Sometimes the stud layout doesn’t cooperate with your cabinet plan. It happens more than people expect.
Heavy-duty toggle bolts or snap toggles rated for the cabinet’s loaded weight are the most reliable option in these situations. These anchors expand behind the drywall and distribute load across a wider area. Check the weight rating on the packaging — you need anchors rated for the full loaded weight of the cabinet, not just the cabinet itself.
A French cleat system is another strong option. A beveled strip of wood or aluminum is attached to the studs across a wider span, and the cabinet hooks onto a matching strip mounted to its back. This spreads the load well and makes future adjustments easy.
Avoid light-duty plastic anchors for anything that will carry real weight. They’re simply not designed for it.
How to Hang Wall Cabinets by Yourself
Solo installation is entirely doable. The ledger board is your best friend here.
For extra support, cut a piece of scrap lumber with a V-notch in one end. Wedge it under the bottom of the cabinet to brace it against the ledger while you drive screws. A cabinet jack — a purpose-built lifting tool available at most tool rental shops — works even better for heavier units.
The key is never letting the cabinet’s weight rest on your arms while you’re trying to position and fasten it. Let the ledger and your brace do that work.
Hanging Wall Cabinets in a Laundry Room or Garage
The process is the same as a kitchen installation, but the wall material often isn’t.
Concrete or masonry walls require masonry anchors and a hammer drill. Standard cabinet screws won’t penetrate concrete — you’ll strip them before they catch. If the wall has metal studs instead of wood, use fine-thread self-tapping screws rated for metal framing, and be aware that metal studs carry less load than wood ones.
In laundry rooms specifically, consider moisture. Solid wood cabinets in high-humidity environments can swell over time. Cabinets with a moisture-resistant finish or MDF core with a sealed surface tend to perform better in that environment long-term.
Common Mistakes That Can Ruin the Job
A few errors show up repeatedly in DIY cabinet installations:
- Anchoring into drywall only — the most dangerous mistake, and the most common
- Using drywall screws instead of cabinet screws
- Not removing cabinet doors before lifting, which adds unnecessary weight and risk
- Skipping the ledger board and trying to hold cabinets manually while fastening
- Starting from the middle of a run instead of a corner, which compounds alignment errors
- Fully tightening screws before all cabinets are connected, which locks in misalignment
- Not shimming behind bowed walls before tightening, which causes the cabinet back to rack
Each of these has a real consequence. The good news is that avoiding them costs nothing extra — just attention.
FAQs
What’s the easiest way to hang wall cabinets?
Install a temporary 2×4 ledger board along your level reference line first. It holds the cabinet’s weight while you position and fasten it — making the job manageable even if you’re working alone.
Do you hang cabinets with screws or nails?
Always screws — specifically washer-head cabinet screws, 2.5 to 3 inches long. Nails don’t have the holding strength for loaded cabinets, and drywall screws are too brittle. Cabinet screws are designed to bear lateral and downward load over time.
How are cabinets anchored to the wall?
Cabinets are anchored by driving cabinet screws through the hanging rail (the horizontal board on the inside back of the cabinet) directly into wall studs. Where studs aren’t available, heavy-duty toggle bolts or a French cleat system are used instead.
Can cabinets be hung on drywall?
Drywall alone can’t support the weight of a loaded cabinet safely over time. If studs aren’t where you need them, use toggle bolts or snap anchors rated for the cabinet’s full loaded weight — not standard plastic anchors, which aren’t built for this application.
Conclusion
Knowing how to hang wall cabinets correctly comes down to preparation, sequence, and a few non-negotiable details: anchor into studs, use the right screws, set your ledger before anything goes up, and don’t rush the leveling. Follow the steps in order and you’ll end up with cabinets that are solid, straight, and built to stay that way.
The first set always takes the longest. By the time you’re on your third or fourth cabinet, the process starts to feel natural. Trust the sequence, double-check your level at each stage, and the result will speak for itself.
Disclaimer
The information on this site is for general guidance only. Always consult a qualified professional for structural, electrical, or load-bearing concerns specific to your home. Dwellify Home is not liable for outcomes resulting from DIY projects undertaken based on content published here.