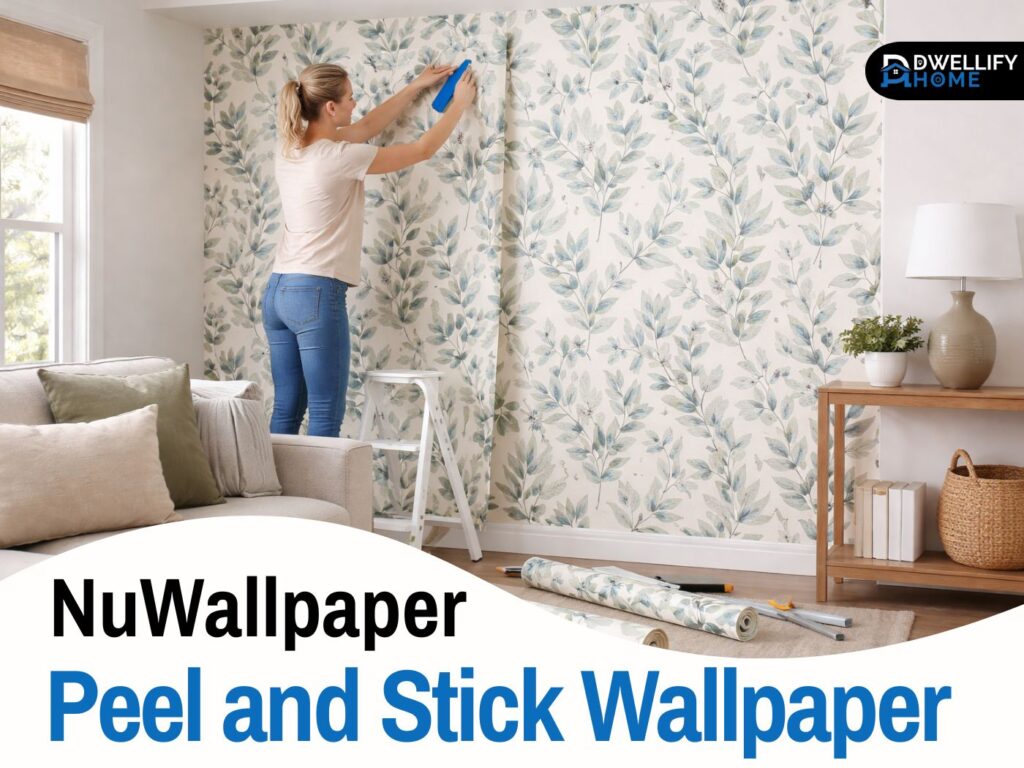
If you’ve been thinking about using NuWallpaper peel and stick wallpaper, you’re probably hoping for the same thing most homeowners and renters want. A real upgrade without the mess of paste, the stress of commitment, or the fear of wrecking your walls.
I’ve installed removable wallpaper in real homes for years, including NuWallpaper on smooth painted drywall, lightly textured walls, and a few “maybe it’ll work” surfaces that taught hard lessons. In this guide, I’ll walk you through what NuWallpaper is like in day-to-day life, where it shines, where it struggles, and how to get a clean, professional finish.
Snippet-ready definition:
NuWallpaper peel and stick wallpaper is a removable, self-adhesive wall covering that installs without paste. It’s designed for smooth walls, can be repositioned during install, and typically removes cleanly when applied to fully cured paint.
Mission Statement:
At Dwellify Home, our mission is to help you make confident, practical home updates with clear guidance, honest expectations, and real-world tips that respect your time, budget, and walls.
NuWallpaper Peel and Stick Wallpaper: Quick Overview (What It Is)
NuWallpaper is a self-adhesive, removable wallpaper. You peel off the backing, stick it to the wall, and smooth it down as you go. There’s no paste bucket, no soak time, and no long drying window.
In most normal rooms, it behaves like a repositionable wall covering. That means you can lift and re-place sections during install if you catch a crooked line early. It’s a big reason renters like it, and why it works well for accent walls, nurseries, and quick refreshes before guests or photos.
That said, it’s still wallpaper. The wall surface matters more than the brand name. The cleanest installs I’ve seen come from good prep and patient alignment, not from rushing because it feels “easy.”
Quick Guide Table (comparison-style, fast to scan)
| What you’re deciding | My installer take | Best practice |
| Best wall type | Smooth, clean, painted drywall gives the cleanest seams | Wipe wall, let dry, then do a small test panel first |
| Textured walls | Light texture can be hit-or-miss; heavy texture is usually a no | If texture is obvious, choose paint or traditional wallpaper instead |
| Humidity (bathroom/kitchen) | Edges and seams can lift over time | Avoid steamy walls; test for a week if you must use it |
| Roll size and coverage | Most NuWallpaper rolls are 20.5 in x 18 ft and cover about 30.75 sq ft | Measure carefully and buy extra for pattern matching |
| Color consistency | Lot differences can show up across rolls | Buy all rolls at once and check run/lot numbers before cutting |
Step-by-step mini guide (super practical)
- Clean the wall (dust is the #1 reason edges lift).
- Mark a straight guideline with a level or plumb line.
- Cut the first panel long so you can trim cleanly at top and bottom.
- Peel backing slowly and smooth in small sections.
- Match pattern first, then seam (don’t force the seam and ruin alignment).
- Trim with a fresh blade for sharp edges.
- Check run/lot numbers before starting if you have multiple rolls.
NuWallpaper Peel and Stick Wallpaper Review (Real-World Pros & Cons)
The biggest upside is speed. A small accent wall can realistically be done in an afternoon with basic tools. And if you choose a pattern with a little texture or movement, it hides tiny seams and minor wall flaws better than you’d expect.
Another plus is control. Traditional wallpaper can feel like a one-way door. With peel-and-stick, you can step back, adjust, and fix small mistakes without panicking.
Now the honest downsides. On lightly textured walls, results are mixed. I’ve had installs that held fine for months, and others where seams slowly lifted at the edges. Humidity and wall dust are usually the real culprit. Also, if you buy multiple rolls from different lots, slight color differences can show up, especially on solids and tight geometric prints.
If you want a quick summary, it’s a strong option when the wall is right and the room is dry and stable.
Design & Material Quality (What You’re Actually Getting)
Most NuWallpaper rolls have a vinyl feel with printed designs. Some patterns look surprisingly “real” once they’re on the wall and the lighting hits them evenly. Others can look a bit flat if the print is very high-contrast or if the wall has bumps underneath.
Pay attention to the finish. Many removable wallpapers have a mild sheen. That’s not a bad thing, but it can highlight seams under strong side lighting. If your room has a big window that casts light across the wall, seams and overlaps become more visible.
Also, pattern repeat matters. If the pattern repeats often, you’ll waste more material matching it. That’s why two people can buy the same “coverage” and have different roll counts. One chose a pattern with a large repeat, the other didn’t.
Best Places to Use NuWallpaper (And Where to Avoid It)
I’ve seen the best results in bedrooms, living rooms, dining rooms, and nurseries. These rooms tend to have stable temperature, lower moisture, and fewer greasy residues in the air. An entryway accent wall can also look great if people aren’t constantly brushing against it.
If you’re deciding between an accent wall and a full room, start with an accent wall. It’s cheaper, faster, and it lets you learn how the material behaves without committing to four walls.
Where I’m more cautious is high-humidity spaces. Steamy bathrooms, laundry areas, and walls near showers often cause edge lift over time. Kitchens can work, but the wall behind a stove is tough. Airborne oil and frequent wiping can weaken edges.
If you really want the look in a tricky room, I usually recommend doing a test panel for a week. It tells you more than any product description ever will.
Surface Checklist (The Make-or-Break Step Most People Skip)
Best surfaces
Smooth painted drywall is the easiest win. If the wall is clean, dry, and the paint has fully cured, peel-and-stick tends to lay flat and stay put. Satin or eggshell paint often holds well. Super flat paint can be more fragile during removal, so it needs extra care.
If you’re not sure your wall is ready, wipe it down with a damp cloth and let it dry fully. Then stick a small strip behind a door or in a corner and leave it for a day.
Surfaces to avoid
Heavily textured walls are the biggest problem. The wallpaper only touches the high points, so it doesn’t get a full bond. Over time, gravity and air pockets start working against you.
I also avoid raw brick, unfinished wood, dusty plaster, and fresh paint that hasn’t cured. If the wall feels chalky when you rub it, that’s a red flag. Adhesive needs a clean, solid surface.
Tools You Need (Simple List)
You don’t need a toolbox full of gadgets. A few basics make a huge difference.
- Tape measure
- Level or plumb line tool
- Sharp utility knife with extra blades
- Straight edge or metal ruler
- Smoothing tool or plastic squeegee
- Step ladder
- Microfiber cloth for cleaning the wall
If you’re doing a tall wall or a large print, having a second person helps a lot. It keeps the top aligned while you smooth downward.
How to Install NuWallpaper Peel and Stick Wallpaper (So It Looks Professional)
Step-by-step overview
Start by measuring the wall height and cutting your first panel a little long, usually 2 to 3 inches extra. That gives you room to trim cleanly at the ceiling and baseboard.
Next, make a vertical guideline. This is where most DIY installs go wrong. Walls are rarely perfectly square, and if your first panel is off by even a little, the error grows with every strip.
Peel the backing slowly, not all at once. I like to peel 8 to 12 inches, stick the top, align to the guideline, and smooth downward. Then peel more backing and continue. Work in small sections so you can correct bubbles before they become big wrinkles.
When you add the next strip, match the pattern first, then focus on the seam. Most installs look best with a clean butt seam. If the wall has slight texture or the pattern is forgiving, a tiny overlap can hide gaps. Just keep it consistent.
Trim with a sharp blade. Dull blades tear vinyl and make edges look fuzzy. I swap blades more often than people expect, especially on long installs.
Expert Tips That Prevent the Most Common Mistakes
A trick I use in real homes is starting on the least visible side of the wall. If there’s a learning curve, let it happen where it won’t bother you every day.
Also, don’t fight gravity. Work top-down and smooth outward from the center. If you trap air at the edges, it can turn into long bubbles that are harder to fix later.
If you’re working alone, fold the lower part of the panel gently onto itself while you align the top. It keeps the adhesive from grabbing the wall too early. Once the top is straight, you can unfold and smooth down in stages.
One more thing, keep an eye on room temperature. Cold rooms make vinyl stiffer. Very warm rooms can make adhesive more grabby. A comfortable indoor temp gives the easiest handling.
Common Problems (Bubbles, Wrinkles, Seams) and Easy Fixes
Bubbles usually come from smoothing too fast or peeling too much backing at once. If you see a bubble, lift the wallpaper back to that spot and smooth again. Don’t press harder and hope it disappears, that can stretch the material.
Seams lifting is often a surface issue. Dust, texture, or moisture are the usual suspects. In bathrooms or kitchens, I’ve seen seams lift even with careful installs. If you notice lifting early, press it back down and check your room humidity. A small dehumidifier can make a bigger difference than people think.
Crooked panels happen when the first strip wasn’t plumb. If you catch it within the first strip or two, it’s worth resetting. It feels annoying, but it saves you from a wall that looks slightly off forever.
Pattern mismatch is usually a cutting mistake. Before you cut multiple strips, line up the pattern and confirm where it repeats. For large repeats, you’ll waste more material, so plan for it when buying.
Removal, Reuse & Wall Safety (Honest Expectations)
Removal is where peel-and-stick either earns trust or breaks it. On well-cured paint, removal can be smooth. I pull slowly downward at a low angle, keeping steady pressure. That angle matters because it reduces stress on the paint.
On low-quality paint or paint that didn’t cure properly, there’s a risk of peeling. I’ve seen it most on very flat paint and older rental touch-ups where the wall was repainted in a hurry.
Can you reuse it? Sometimes. If you remove a strip carefully and keep the adhesive clean, you might reuse it on a different smooth surface. In real life, large panels often stretch a little during removal, so I treat reuse as a bonus, not a promise.
Cleaning & Maintenance (Keeping It Looking Fresh)
Most peel-and-stick wallpaper does fine with gentle cleaning. A lightly damp microfiber cloth is usually enough for dust or smudges. Avoid harsh cleaners and anything oily because it can affect the adhesive at the edges.
If you have kids or pets, pay attention to corners and lower edges. Those are the first places that get bumped. If you notice a corner starting to lift, press it down early before lint and dust collect underneath.
In kitchens, I recommend using it away from direct grease and steam zones. The more you wipe and scrub, the more stress you put on seams.
Buying Guide (Amazon + Roll Count + Avoiding “Wrong Roll” Mistakes)
NuWallpaper peel and stick wallpaper Amazon tips
Buying on Amazon can be convenient, but it’s worth slowing down for a minute. Look for reviews with real photos in normal lighting. Those photos tell you how the finish looks and whether seams are noticeable.
Order an extra roll when the pattern repeat is large or when you’re doing a full wall. It’s also smart if you’re matching a bold print. A small mismatch can bother you daily.
Also, watch for lot differences. If you buy rolls weeks apart, colors can vary slightly. It’s not always obvious in the package, but it can show on the wall. That’s why I prefer buying all rolls at once, whether it’s NuWallpaper or any peel and stick wallpaper Amazon listing.
Best Peel and Stick Wallpaper: Where NuWallpaper Ranks vs Other Brands
NuWallpaper sits in a solid middle ground. It’s approachable for DIY, has lots of designs, and can look really clean in the right room. For rentals and quick updates, it often makes sense.
If you want a more premium look or you’re working with a very visible wall under strong light, you may prefer a higher-end removable wallpaper. Some premium brands have thicker material and cleaner seam behavior, though the price jumps.
If your wall is textured or the room is humid, no brand is magic. In those cases, prep and location matter more than the label.
NuWallpaper vs Other Popular Peel-and-Stick Brands (Quick Comparison)
RoomMates peel and stick wallpaper is often a good pick for playful patterns and family-friendly spaces. I’ve used it in kids’ rooms and seen it hold up well when the wall is smooth and clean.
NextWall peel and stick wallpaper tends to lean into bold, trendy designs. It can look great for accent walls, especially if you want something graphic and modern.
Wallshoppe peel and stick wallpaper feels more design-forward and premium. If you’re picky about print quality and want a more curated look, it’s worth comparing, especially for a statement wall.
Wall Blush peel and stick wallpaper usually fits softer, artistic styles. It’s a nice direction when you want a calmer mural-like feel rather than a tight repeating print.
For any of these, the same rule applies. Choose the brand that fits your style, then make sure your wall and room conditions support a good bond.
FAQs
1) What is the downside to peel and stick wallpaper?
The biggest downside is that it’s picky about surfaces. On textured walls, dusty paint, or high-humidity areas, you can get bubbles, seam lift, or weak adhesion. It also may not love “non-stick” paints.
2) How long does NuWallpaper last?
On smooth, clean, fully cured painted walls in normal rooms, it can last years for many households. In humid areas or on imperfect surfaces, edges may lift sooner, so longevity depends heavily on prep and room conditions.
3) What is the best brand of peel and stick wallpaper?
“Best” depends on your goal. NuWallpaper is a strong choice for DIY accent walls and rentals, while some premium brands like Wallshoppe target higher-end looks. RoomMates and NextWall are also popular options to compare for style and budget.
4) How much does NuWallpaper cost?
Prices vary by retailer, pattern, and sales. Common roll pricing ranges roughly from the low $20s on marketplaces to around $40–$50 at major retailers, with most rolls sized 20.5 in x 18 ft (about 30.75 sq ft coverage).
5) Can NuWallpaper be removed without damaging paint?
Often yes, when the wall paint is well-cured and in good condition. Slow removal at a low angle helps. Damage is more likely on low-quality paint, very flat paint, or paint that wasn’t cured properly before install.
Conclusion
If you’re considering NuWallpaper peel and stick wallpaper, here’s the practical takeaway. It’s a strong choice for smooth, clean walls in low-humidity rooms, especially when you want a change without long-term commitment.
The installs that look professional usually come down to three things. A plumb first panel, slow smoothing in small sections, and buying enough material to match the pattern without stress.
Before you commit to a full wall, do a small test panel in an out-of-the-way spot. It gives you a real feel for adhesion, removal, and how the finish looks in your lighting. If that test goes well, you can move forward confidently and get a result that looks intentional, not rushed.
Disclaimer:
Results can vary based on wall texture, paint type, surface cleanliness, humidity, and installation method. Always test a small section first and follow the manufacturer’s directions for your specific product and surface.

I’m Bilal, the founder of Dwellify Home. With 6 years of practical experience in home remodeling, interior design, and décor consulting, I help people transform their spaces with simple, effective, and affordable ideas. I specialize in offering real-world tips, step-by-step guides, and product recommendations that make home improvement easier and more enjoyable. My mission is to empower homeowners and renters to create functional, beautiful spaces—one thoughtful update at a time.