
You can make a Christmas ribbon tree by covering a cone, wire frame, or tomato cage with loops, spirals, or wrapped layers of ribbon until the ribbon itself forms the shape of a tree. Start at the bottom, work upward in rows, and hide the form completely so no bare cone or wire shows through. A small tabletop tree takes about an hour, and you only need ribbon, a form, scissors, and glue or pins.
Learning how to make a Christmas tree with ribbon is one of the easiest holiday crafts for a beginner. There is no sewing, no power tools, and no expensive kit. If a row looks thin, you simply add another loop. If a loop sits crooked, you pull it off and stick it back on. That forgiving nature is exactly why ribbon trees make such a good first Christmas project.
What Is a Christmas Ribbon Tree?
A Christmas ribbon tree is a decorative tree built entirely out of ribbon. The ribbon is the foliage, the shape, and the color all at once. Underneath it sits a simple form, usually a foam cone, a cardboard cone, or an upside-down wire tomato cage, that gives the tree its height and taper.
This is a different project from decorating a regular tree. Here, you are not adding ribbon to branches that already exist. You are building the whole tree from ribbon, row by row, until the form disappears under layers of loops or wraps. The finished tree stands on a table, a mantel, or a porch, and it folds flat or packs away far more easily than a boxed artificial tree.
Ribbon trees also suit small homes beautifully. A 12-inch cone tree fits on a bookshelf, a nightstand, or a windowsill. A 4-foot tomato-cage tree fills an entryway corner without the weight, needles, or storage headache of a full-size tree. And because you choose the ribbon, the tree matches your exact color scheme, from classic red and green to icy silver, rustic burlap, or bold plaid.
Pick Your Tree Form First
Your form decides the size, the cost, and the method. Choose it before you buy ribbon, because each form takes a different amount and style of ribbon. The three forms below cover almost every ribbon tree you will see, from a tiny desk tree to a porch-sized showpiece.
A foam cone is the easiest starting point for a beginner. Foam holds pins well, takes hot glue without melting at normal craft temperatures, and comes in sizes from about 6 inches to 18 inches. A cardboard cone costs almost nothing, since you roll it yourself from card stock, and it works well for the loop method. A wire tomato cage, turned upside down, gives you a tall, open frame for a full-size tree, and its rings give you ready-made rows to attach ribbon to.
Table: Choosing your ribbon tree form
| Form | Best size | Best method |
|---|---|---|
| Foam cone | 6 to 18 inches | Loops or spiral wrap |
| Cardboard cone | 8 to 14 inches | Loops |
| Tomato cage | 3 to 5 feet | Layered wraps and loops |
| Wall frame | 2 to 4 feet tall | Horizontal ribbon rows |
For your first tree, pick a foam cone between 9 and 12 inches tall. It is big enough to look impressive on a mantel, small enough to finish in one sitting, and cheap enough that a mistake costs you nothing. Save the tomato cage for your second tree, once you know how ribbon behaves in your hands.
Choose the Right Ribbon
Ribbon choice changes the whole look of the tree, so spend a minute on it before you cut anything. Wired ribbon is the most forgiving choice for a beginner. A thin wire runs along each edge, so loops hold their shape, spirals stay open, and drooping ends can be bent back into place with your fingers.
Velvet ribbon gives a soft, rich, high-end look, especially in deep green, burgundy, or navy. Satin ribbon looks smooth and shiny, and it catches light beautifully, but it can slip, so use a little extra glue at each attachment point. Grosgrain ribbon has a ribbed texture that grips well and suits a rustic or farmhouse tree. Sheer or organza ribbon looks airy and light, but you will need more of it, because it covers less of the form per row.
Width matters too. For a tabletop cone, ribbon between 1 and 1.5 inches wide gives neat, even rows. Wider ribbon, 2 to 2.5 inches, works better on a tomato-cage tree, where each row has much farther to travel. Narrow ribbon under 1 inch looks fussy and takes far more rows to cover the same cone, so save it for tiny trees or for accent rows near the top.
Buy one extra roll beyond what you think you need. Running out of ribbon halfway up a tree is the most common frustration in this project, and dye lots can differ slightly between rolls. Having a spare roll from the same batch keeps your color perfectly even from base to tip.
Supplies You Need
Gather everything before you start, so you are not hunting for scissors with glue drying on a loop. You probably own most of this already.
- A foam cone, cardboard cone, or tomato cage in your chosen size
- Wired ribbon, 1 to 2.5 inches wide depending on tree size
- A hot glue gun with glue sticks, or straight pins for a foam cone
- Sharp scissors that cut ribbon cleanly without fraying
- A ruler or measuring tape for even loop lengths
- A small base, pot, or wood slice if your tree needs to stand upright
- Optional finishing touches: a star topper, mini ornaments, or battery fairy lights
On safety, treat the hot glue gun with respect. Keep your fingers clear of the nozzle, work on a heat-safe surface, and set the gun on its stand, never flat on the table, between loops. Keep scissors closed when you are not cutting, and keep small pins away from young children and pets.
How to Make a Loop Ribbon Tree, Step by Step
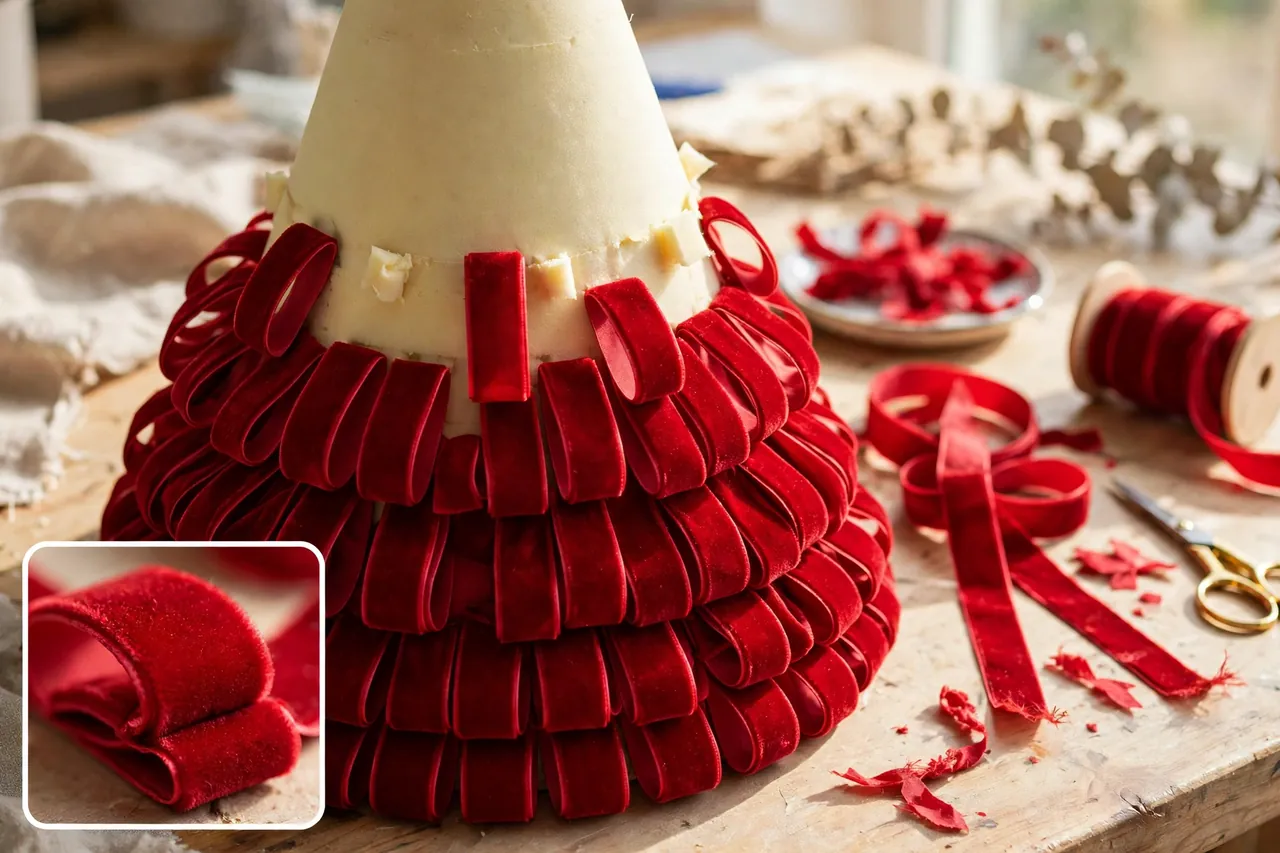
The loop method is the classic way to make a Christmas ribbon tree, and it gives the fullest, most tree-like result. Each loop acts like a little branch, and rows of loops stacked upward hide the cone completely. Crafters who make velvet loop trees commonly use 1-inch ribbon on a small foam cone, cut into equal strips and glued in rows from the bottom up, as shown in the velvet ribbon loop tree tutorial.
- Cover the top of the cone first. Glue one strip of ribbon across the flat top, then glue a second strip across it in the opposite direction, so no foam shows at the tip.
- Cut your ribbon into equal strips. For a 12-inch cone with 1.5-inch ribbon, 4-inch strips work well. Keep every strip the same length so your rows look even.
- Make a loop. Fold one strip so its two ends meet, and add a small dot of hot glue to hold the ends together. Let it set for a few seconds.
- Glue the first row at the bottom. Press each loop onto the cone just above the base edge, with the loop curving slightly over the edge, so the bottom rim disappears. Overlap loops a little so no foam peeks through.
- Work around the cone in a full circle before moving up. Finish one complete row, then start the next row slightly higher, overlapping it enough to hide the glued ends of the row below.
- Keep your rows closer together as you climb. The cone narrows toward the top, so each row needs fewer loops, but the overlap matters more, because gaps show more easily on a narrow tip.
- Finish at the very top. Glue your last row right along the top edge, then check the tree from every side and fill any thin spot with one extra loop.
Step back often while you work. A tree that looks perfect from the front can hide a bare patch at the back, and it is much easier to add a loop now than to notice the gap after you have displayed it. Turn the cone slowly after every two rows and look for foam showing through.
For a fuller tree, use slightly longer strips on the bottom rows and shorter strips near the top. Longer loops at the base make the tree look wide and grounded, while shorter loops at the tip keep the point neat and tidy. This one change takes a tree from flat-looking to genuinely tree-shaped.
Try the Spiral Wrap Method for a Faster Tree
If the loop method sounds slow, the spiral wrap method is your shortcut. Instead of hundreds of loops, you wind one long length of ribbon around the cone in a continuous spiral, overlapping each pass, until the cone is covered. It takes less time and less ribbon, and it gives a sleek, modern tree.
- Pin or glue the ribbon end at the bottom of the cone, with the ribbon edge just touching the base.
- Wind the ribbon upward around the cone at a steady angle, overlapping the previous pass by at least half an inch so no foam shows.
- Keep the ribbon flat and snug against the cone. If it twists or gaps, unwind that pass and redo it rather than gluing over a wrinkle.
- When you reach the top, wrap the ribbon over the tip, pin or glue the end in place, and trim any excess.
The spiral method works best with ribbon that has some body, such as wired or grosgrain ribbon, because floppy ribbon slides out of line as you wind. Crafters using this method on a 6-inch foam cone pin the ribbon at the base and overlap each row by at least half an inch for full coverage, as described in the spiral ribbon tree guide. If your ribbon is sheer, wind it around twice on the first row to build up coverage before you start climbing.
Make a Layered Wire-Ribbon Tree
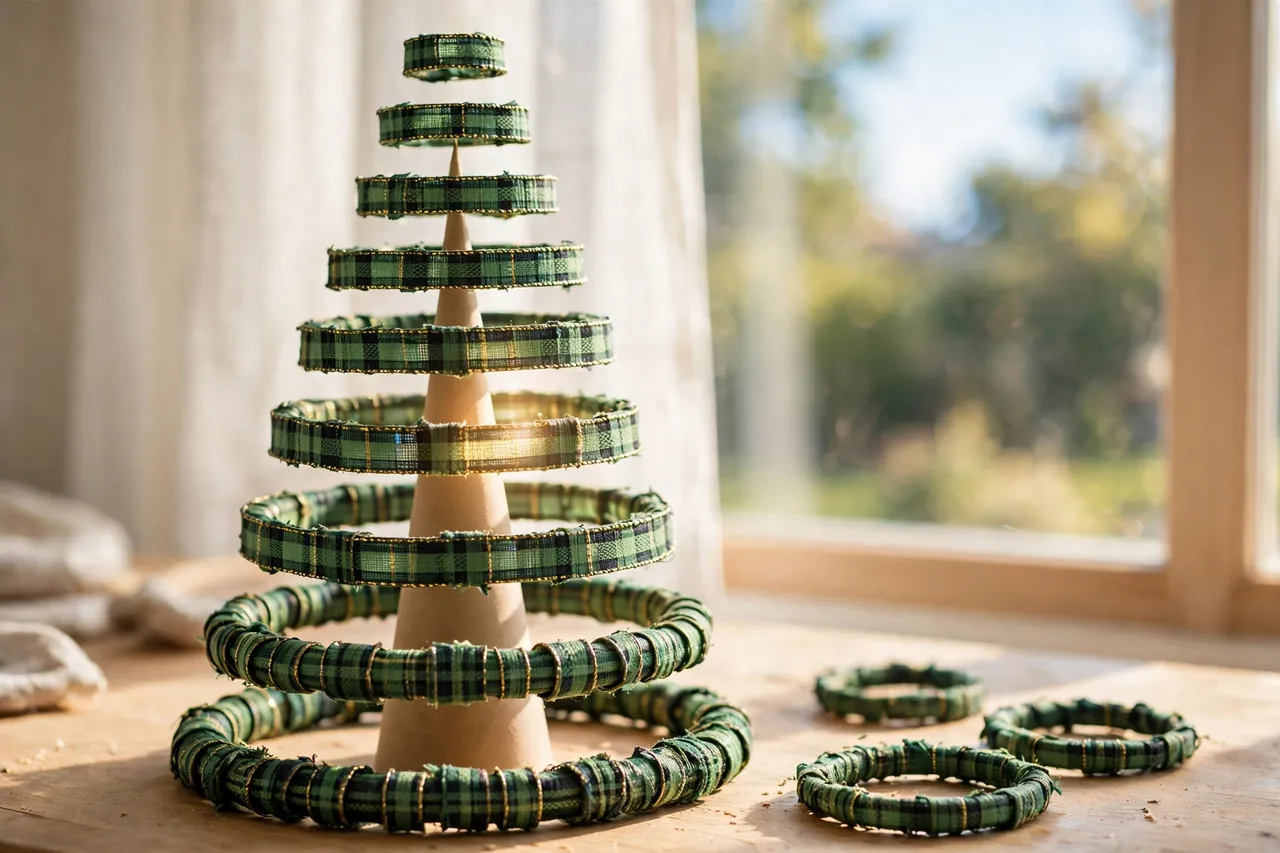
The layered method uses wired ribbon formed into stacked circles, and it creates a striking, sculptural tree with open, airy layers. Each layer is a circle of wired ribbon slightly smaller than the one below it, stacked over a paper or foam cone. This method suits wired ribbon best, because the wire holds each circle open and round.
- Make a paper cone from card stock by drawing a semicircle, cutting it out, and rolling it into a cone shape, then taping the seam firmly.
- Cut your wired ribbon into lengths that decrease as you go up. Start with the longest length for the bottom layer and cut each next length a few inches shorter.
- Form each length into a circle. Twist the wire ends together firmly, trim the excess wire, and fold the ribbon ends under with a small piece of double-sided tape.
- Slide the largest circle over the cone first, then stack the smaller circles above it, spacing them evenly so the cone peeks through only slightly, or not at all.
- Secure each layer to the cone with tape or a dot of glue if you want a permanent tree, or leave the layers loose if you want to take the tree apart for storage.
This is a wonderful method for a gift tree, because the layers look impressive but the steps stay simple. Choose two or three ribbon colors that share one accent color, for example green plaid with a red stripe, and alternate them by layer for a tree that looks designed rather than random.
Build a Full-Size Tomato-Cage Ribbon Tree
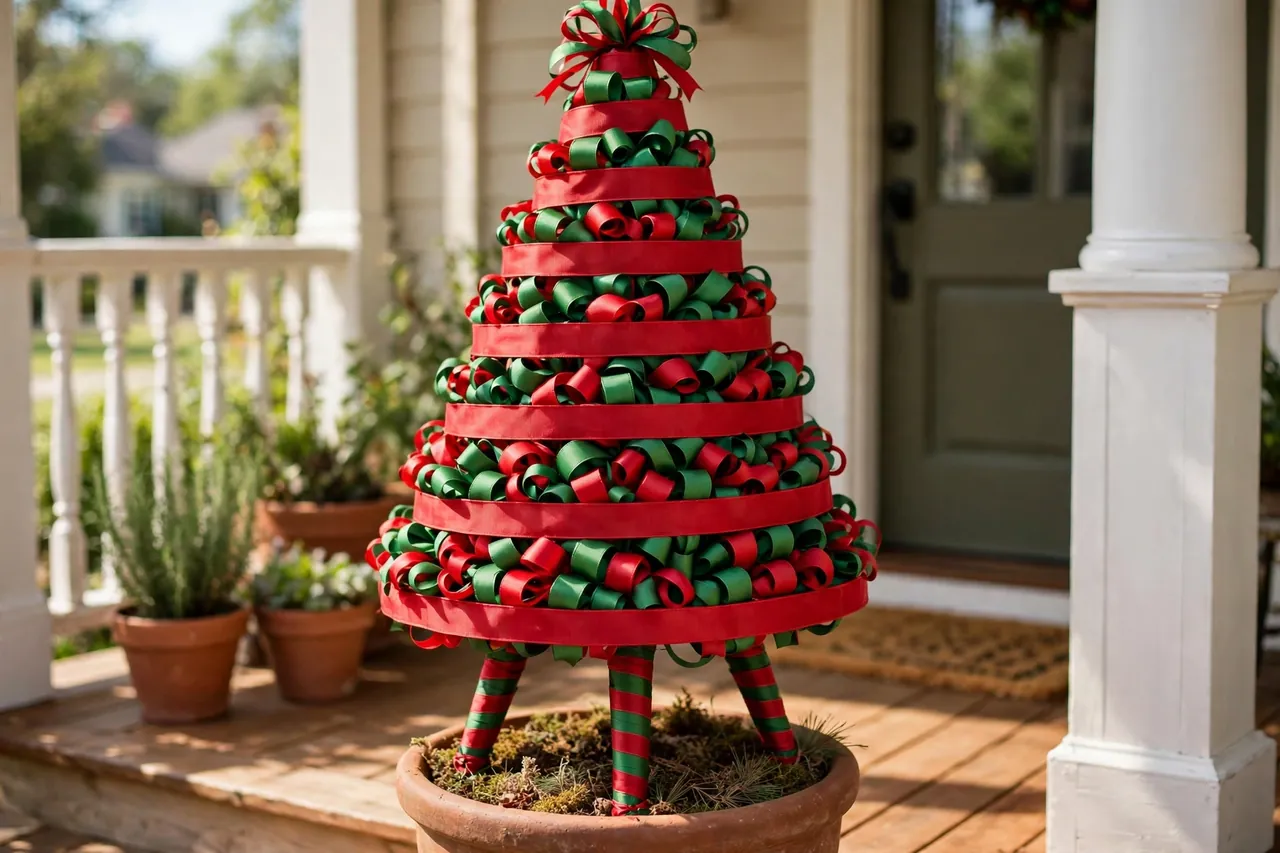
When you want a ribbon tree that fills a porch or an entryway, an upside-down tomato cage is the smartest frame you can use. It is light, cheap, and already shaped like a tree, with rings that mark out your rows for you. A standard 3- to 4-foot cage makes a tree tall enough to stand beside a front door.
- Flip the cage upside down so its narrow legs point up. Gather the legs together at the top and bind them tightly with twine, zip ties, or floral wire to form the tree tip.
- Set the cage in a sturdy pot, bucket, or urn, and weigh the base down with bricks or stones if it will stand outside, so wind cannot topple it.
- Wrap wide ribbon around the cage in horizontal rows, starting at the bottom ring and working upward, securing each row to the wire with zip ties, floral wire, or hot glue.
- Add loops of ribbon between the rows to fill out the shape. Pinch a short length of wired ribbon into a loop, fasten it with a pipe cleaner or wire, and attach it to the cage frame.
- Work all the way to the tip, making your loops smaller as the cage narrows, and finish by wrapping ribbon around the bound legs so no bare wire shows at the top.
Outdoor trees need weather-proof thinking. Use polyester or outdoor-rated ribbon rather than velvet or satin, which soak up rain and fade fast. Check the tree after the first windy day and re-tighten any row that has slipped, because a loose row at the bottom can unravel the whole tree in a storm.

Make a Flat Wall Ribbon Tree
No floor space? Make a flat ribbon tree for a wall or a door. This version uses horizontal rows of ribbon, longest at the bottom and shortest at the top, mounted on a board, a felt backing, or directly on the wall with removable hooks. It gives you the full Christmas-tree silhouette in almost zero depth, which makes it perfect for apartments, dorm rooms, and narrow hallways.
- Mark your tree shape lightly on the wall or backing with painter’s tape, with the widest row at the bottom and a point at the top.
- Cut ribbon lengths to match each row, making each higher row a little shorter than the one below it.
- Attach the bottom row first, draping the ribbon slightly so it sags into a gentle curve like a branch line, and secure both ends.
- Add each higher row the same way, spacing the rows evenly, until you reach a short top row and a star or topper at the point.
- Step back and adjust any row that looks uneven before you press everything firmly into place.
A wall tree is also the easiest ribbon tree to involve children in, since there is no hot glue near a tall frame and no heavy base to tip over. Let kids choose the ribbon colors and place the rows, and keep the cutting and mounting steps for an adult.
How Much Ribbon Do You Need?
Ribbon amounts vary with the method, the ribbon width, and how full you want the tree, so treat every number here as a planning estimate, not a guarantee. Measure your own cone first, then buy a little extra. The table below gives realistic starting points for the loop method, which uses the most ribbon of all the methods.
Table: Ribbon estimates for loop-method trees
| Tree height | Ribbon width | Estimate |
|---|---|---|
| 6 inches | 1 inch | 1 to 2 rolls |
| 12 inches | 1.5 inches | 2 to 3 rolls |
| 18 inches | 1.5 inches | 3 to 4 rolls |
| 3 to 4 feet | 2.5 inches | 6 or more rolls |
Standard craft ribbon rolls commonly hold 9 to 10 yards, so check the yardage printed on your roll and do the math before you leave the store. A loop tree eats ribbon faster than you expect, because every loop uses a full strip plus a little overlap at the glued ends. If you are between sizes, buy the larger amount. Leftover ribbon keeps for years and always finds a use next Christmas.

Decorate and Finish Your Ribbon Tree
A ribbon tree can stand beautifully bare, with the ribbon pattern doing all the work. But a few finishing touches turn it from a craft into a centerpiece. The trick is restraint. Because the tree is already colorful and textured, a handful of small accents beats a pile of decorations.
Start with the topper. A small star, a tiny angel, or a single large loop of matching ribbon at the tip finishes the silhouette and draws the eye upward. Glue or pin it firmly, since toppers take the most handling when you move the tree. Next, add battery-operated fairy lights if you want glow. Wind them loosely through the loops or rows, keeping the battery pack hidden at the back of the base, and never use plug-in lights that heat up against ribbon and foam.
Mini ornaments work well on medium and large ribbon trees. Choose lightweight ornaments, hang them from short loops of thread tucked between ribbon rows, and space them unevenly rather than in a perfect grid, which looks more natural. On a small cone tree, skip ornaments entirely or use only three or four tiny ones, so the ribbon stays the star of the show.
Finally, set the tree on a base that suits it. A wood slice, a small cake stand, or a wrapped box lifts a tabletop tree to eye level and hides the flat foam bottom. For a tomato-cage tree, a decorative pot with a little greenery tucked around the base hides the cage feet and grounds the whole display.
Fix Common Ribbon Tree Problems
Almost every ribbon tree problem has a quick fix, and most of them show up on the first tree you make. Work through this list before you decide a tree is ruined, because it almost never is.
- Foam or wire shows through a gap. Add one extra loop or a short piece of ribbon over the bare spot, and overlap it into the rows on either side.
- Loops keep popping off. Use a larger dot of glue, hold each loop for five full seconds, and switch from craft glue to hot glue on foam, since craft glue grips foam poorly.
- Rows look uneven. Cut all strips to the same length with a ruler before you start, and mark row heights lightly on the cone with a pencil.
- The tree leans to one side. Check that the cone sits flat on the table, and add loops to the thin side until the silhouette looks balanced from the front.
- Ribbon frays at the cut ends. Cut with sharp scissors, and seal the ends of synthetic ribbon by briefly passing the cut edge near a flame, well away from children and flammable materials, or use a dot of clear-drying glue.
- The top looks messy. Re-cover the tip with two crossed strips of ribbon, then add your topper over the join to hide it completely.
- Colors clash. Limit yourself to three colors at most, with one main color, one supporting color, and one accent, and repeat that same trio on every row.
Store Your Ribbon Tree for Next Year
A ribbon tree stores far better than a real tree, but it still needs a little care. Dust it gently with a soft brush or a cool hair dryer before packing it away, and never crush it under heavier decorations in a box. Place a tabletop cone tree in a box lined with tissue paper, with tissue tucked lightly around the loops so they hold their shape.
For a tomato-cage tree, you can either keep it assembled in a large bag in the garage, or remove the ribbon rows and fold the cage flat for storage. Label the box with the ribbon colors and the tree size, so next December you know exactly what you are opening. If you used pins rather than glue on a foam tree, you can even pull the loops off, store them flat, and rebuild the tree in minutes next year.
Related Guides
If you enjoyed building a tree out of ribbon, these guides will help you carry the same handmade style through the rest of your holiday decorating. Try ideas for DIY Christmas wreaths for a matching front-door project, explore miniature Christmas tree decorations for tiny accents that suit a tabletop ribbon tree, pick a look with Christmas tree themes, or finish the room with Christmas stocking decorating ideas.
Frequently Asked Questions
What do I need to make a Christmas ribbon tree?
You need a form, such as a foam cone or an upside-down tomato cage, wired ribbon in your chosen colors, scissors, and hot glue or pins. A ruler helps you cut even strips, and a star topper, mini ornaments, or battery fairy lights make optional finishing touches.
How do you make a Christmas tree out of ribbon?
Cover a cone or wire frame with ribbon until the ribbon itself forms the tree shape. Glue ribbon loops in rows from the bottom up, wind ribbon in an overlapping spiral, or stack wired ribbon circles in decreasing sizes, hiding the form completely as you go.
How much ribbon do I need for a ribbon tree?
It depends on the tree size and method, but a 12-inch loop-method tree usually takes 2 to 3 rolls of 1.5-inch ribbon, while a 3- to 4-foot tomato-cage tree can take 6 or more rolls of wide ribbon. Always buy one extra roll, since loop trees use ribbon faster than most crafters expect.
Can I make a ribbon tree without a foam cone?
Yes, you can roll a cone from card stock, use an upside-down tomato cage for a large tree, or build a flat wall tree from horizontal ribbon rows. The cone is simply the easiest form for a beginner, not the only one that works.
What kind of ribbon works best for a ribbon tree?
Wired ribbon works best for most beginners because its edge wires hold loops and spirals in shape. Velvet looks rich and luxurious, satin looks shiny and festive, and grosgrain grips well for a rustic tree. Choose ribbon 1 to 1.5 inches wide for tabletop trees and 2 to 2.5 inches wide for large trees.
How do I keep my ribbon tree from looking thin or patchy?
Overlap every row enough to hide the row below it, and check the tree from all sides as you work. Longer loops on the bottom rows add fullness, and one extra loop fills any bare patch. If the form still shows, add a second, staggered layer of loops over the thin area.
A ribbon tree is a small project with a big payoff. Pick a form, pick ribbon you love, and start at the bottom row. In about an hour, you will have a handmade tree that matches your home exactly, packs away neatly, and comes back out next year ready to shine. Gather your supplies today, make your first tree this weekend, and let it be the start of a whole handmade holiday.