Easy Halloween crafts do not need a craft room, a big budget, or advanced skills. The best beginner projects use things most homes already have — black paper, fabric scraps, empty jars, and leftover wood — and most of them take 30 minutes or less of hands-on time.
Even better, the crafts in this guide are made to be displayed, not just made. Each one doubles as home decor for a mantel, a table, a window, or the front porch, so your effort shows all October instead of ending up in a drawer.
Below are paper, fabric, jar, and wood projects with full steps, a picker table, and display and storage tips so your work lasts for next year too.
What Makes a Halloween Craft Truly Easy?
A craft earns the word “easy” when it passes four tests. It uses basic supplies, it needs no special tool beyond scissors, glue, and paint, it forgives small mistakes, and it looks finished without perfect technique.
That last test matters most for adults and families crafting for the home. A wobbly paper bat still looks great in a group of twelve. A fabric pumpkin with slightly uneven folds still looks like a pumpkin. Projects that hide beginner mistakes are the ones you will actually enjoy making.
Every project in this guide also meets three practical rules:
- Low cost: the main material is paper, a fabric scrap, a recycled jar, or a wood offcut.
- Quick: hands-on time is 30 minutes or less, not counting paint or glue drying time.
- Display-ready: each finished piece has a clear home on a shelf, wall, window, table, or porch.
If younger children are your main crafters, our guide to kids Halloween crafts covers that side — shorter steps, no hot glue, nothing sharp. This guide stays focused on decor that grown-ups and older kids can make together.
Pick Your Project: A Quick Guide
Use this table to choose by the material you already have and the time you can spare. Times are hands-on estimates for a first try.
Easy Halloween Crafts at a Glance
| Project | Main Material | Hands-On Time | Best Display Spot |
|---|---|---|---|
| Paper bat wall flock | Black cardstock | 20–30 minutes | Wall, mirror, or window |
| Ghost garland | White paper or tissue | 15–20 minutes | Mantel or doorway |
| No-sew fabric pumpkins | Fabric scrap and filling | About 20 minutes each | Table or shelf |
| Cheesecloth ghosts | Cheesecloth and glue | 20 minutes, plus drying | Table centerpiece |
| Mason jar lanterns | Glass jars and tissue paper | 20–30 minutes | Windowsill or porch step |
| Wood block pumpkins | Scrap 2×4 or pallet wood | 30 minutes, plus drying | Porch or mantel |
| Milk jug ghost luminaries | Recycled plastic jugs | 10 minutes each | Walkway or porch |
Short on everything? Start with the milk jug ghosts or the paper bats — both need almost nothing and decorate a room or porch within the hour.
Before You Start: Supplies and Safety Basics
Most of these projects share one small supply kit. Gather it once and you can make almost everything in this guide.
- Scissors and a craft knife (for adult hands only)
- White glue, a glue stick, and a low-temperature hot glue gun
- Acrylic craft paint in black, orange, and white, plus foam brushes
- Black cardstock or construction paper
- Twine, string, or clear fishing line for hanging
- Battery-operated tea lights or LED candles
- Painter’s tape and removable adhesive dots for walls
One safety rule shapes several projects here: use battery lights, never real flames, inside or near paper and fabric crafts. The National Fire Protection Association (NFPA) reports that between 2019 and 2023, an estimated average of 832 home structure fires a year began with decorations. Nearly half started because a decoration sat too close to a heat source, and about a third started with candles. The NFPA’s Halloween fire safety guidance is simple: put a battery-operated candle or glow stick in jack-o’-lanterns and keep decorations away from open flames and other heat sources.
A few smaller habits help too. Keep paper and fabric pieces away from bulbs, heaters, and the fireplace. Do the cutting and hot gluing yourself if young kids are helping. If you spray paint, work outside or in a ventilated spot and let pieces dry fully first.
Paper Crafts: Bats, Garlands, and Window Silhouettes

Paper is the cheapest and most forgiving craft material you own. It stores flat, costs almost nothing, and one pack of black cardstock can decorate a whole room. If paper turns out to be your favorite material, our guide to Halloween crafts using construction paper goes deeper into paper-only projects and techniques.
Flying Bat Wall Flock
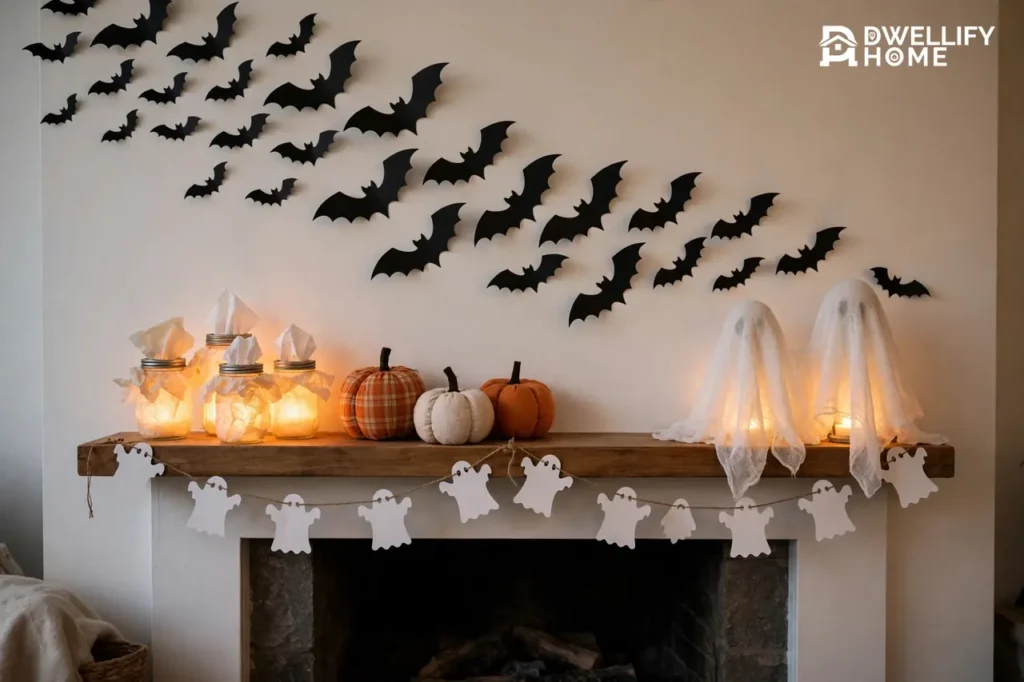
A group of paper bats flying across a wall is the fastest way to make a plain room feel like Halloween. The trick is repetition: one bat looks like a mistake, fifteen look like a design.
- Black cardstock or thick construction paper
- Pencil, scissors, and removable adhesive dots
- Fold a sheet of cardstock in half and draw half a bat shape along the fold — one wing, one ear, and half the body. A bat about 6 to 8 inches wide works well.
- Cut along the line and unfold. You now have a symmetrical bat, and the fold line gives it a natural center crease.
- Use the first bat as a template to trace and cut 11 to 19 more. Vary the size slightly for a more natural flock.
- Fold each bat gently along the center line so the wings angle forward, like it is mid-flight.
- Stick the bats to the wall with removable adhesive dots, arranging them in a loose sweeping curve — from a corner, over a mirror, or up a staircase wall.
Success check: step back and squint. The group should read as one moving shape, not scattered spots. If it looks random, tighten the spacing and make the curve clearer.
Ghost Garland
This classic fold-and-cut garland takes about fifteen minutes.
- Fold a long strip of white paper back and forth, accordion style, each fold about 4 inches wide.
- Draw a simple ghost on the top fold — a rounded head, a wavy bottom, and arms that reach both edges of the fold. The arms must touch the edges, or your ghosts will not connect.
- Cut around the ghost, leaving the arm edges uncut.
- Unfold carefully, add faces with a black marker, and hang the chain of ghosts on twine across a mantel or doorway.
Window Silhouettes and Paper-Bag Luminaries
For windows, cut large simple shapes — a black cat, a haunted house, a row of tombstones — from black paper and tape them inside the glass. From the street at dusk, the lit window turns your shapes into a shadow show.
For a porch or walkway glow, draw or cut a face on a plain paper lunch bag, fold the top edge down once for strength, and set a battery-operated tea light inside. Never use a real candle in a paper bag. Line up five or six bags along the steps for an instant Halloween welcome.
Fabric Crafts: No-Sew Pumpkins and Cheesecloth Ghosts

Fabric crafts add the soft texture that paper cannot. They also store well and come back out year after year, which makes them worth the few extra minutes. Not sure which fabric to grab? Our guide to home decor fabrics explains how common materials behave, and almost any cotton, flannel, or burlap scrap works here.
No-Sew Fabric Pumpkins
This is the most-loved easy fabric craft for a reason: no sewing, no pattern, and it uses up fabric scraps, old flannel shirts, or thrifted sweaters.
- A square of fabric, roughly 18 to 20 inches
- A roll of toilet paper, or soft stuffing
- A short twig, cinnamon stick, or piece of cork for the stem
- Twine or a rubber band
- Lay the fabric flat, patterned side down, and set the toilet paper roll in the center. The roll gives the pumpkin its shape with zero sewing. For a softer pumpkin, use a ball of stuffing instead.
- Pull one corner of fabric up and tuck it firmly into the center hole of the roll.
- Work your way around, tucking each corner and side into the hole. Keep the tension even so the folds spread around the pumpkin like natural ridges.
- Push the twig or cinnamon stick into the center as a stem.
- Wrap twine around the stem a few times, tie it off, and trim the ends.
Make three in different sizes and fabrics — one plaid, one plain orange, one cream — and group them on a tray. Odd numbers and mixed textures are what make them look like decor instead of a craft project. Expect about 20 minutes for the first pumpkin and much less for each one after.
Cheesecloth Ghosts
These little standing ghosts look impressive and ask for almost no skill.
- Make a simple form: a ball of foil or a small balloon taped on top of a bottle or an upside-down cup.
- Mix equal parts white glue and water in a bowl. Soak a piece of cheesecloth in the mix and squeeze out the extra.
- Drape the cloth over the form so it pools slightly at the base, like a ghost floating.
- Let it dry fully — several hours or overnight. The cloth will hold its ghost shape.
- Lift the ghost off the form, glue on two small black felt circles for eyes, and set a battery tea light underneath for a soft glow.
Common mistake: pulling the ghost off the form too early. If the cloth still feels cool and damp, it will collapse. Wait until it is stiff and dry all the way through.
Jar and Bottle Crafts: Lanterns and Potion Bottles

Glass jars are the recycler’s best friend. Clean jam jars, mason jars, and sauce jars all become lanterns with a few scraps of tissue paper — and because the light inside them is battery-powered, they are safe on a windowsill, a table, or a porch step.
Tissue Paper Jar Lanterns
- Wash the jar and dry it well so the glue sticks.
- Brush a thin layer of white glue or decoupage medium over the outside of the jar.
- Press torn pieces of orange, white, or green tissue paper over the glue until the jar is covered. Torn edges blend better than cut edges.
- Cut eyes, a nose, and a grin from black paper and glue them on — a jack-o’-lantern face for orange, a ghost face for white, a monster face for green.
- Brush one more thin coat of glue over the top to seal it, let it dry, and drop in a battery tea light.
The tissue filters the light into a warm glow, and the faces appear as dark silhouettes. A row of three on a windowsill reads clearly from the street.
Mummy Jars and Potion Bottles
For a mummy jar, wrap a clean jar with strips of white gauze or torn white fabric, gluing as you go. Leave one small gap, glue on two googly eyes or black paper circles, and the mummy is peeking out. Add a battery tea light and the gauze glows.
For potion bottles, fill odd-shaped bottles and jars with water tinted by a drop or two of food coloring — swamp green, purple, and orange work well. Add a paper label with a name like “Spider Venom” or “Witch’s Brew,” and group the bottles on a tray or shelf. Keep real household chemicals out of craft bottles, and label play potions clearly if kids are around, so nobody mistakes them for a drink.
Wood Scrap Crafts: Block Pumpkins and Mini Signs
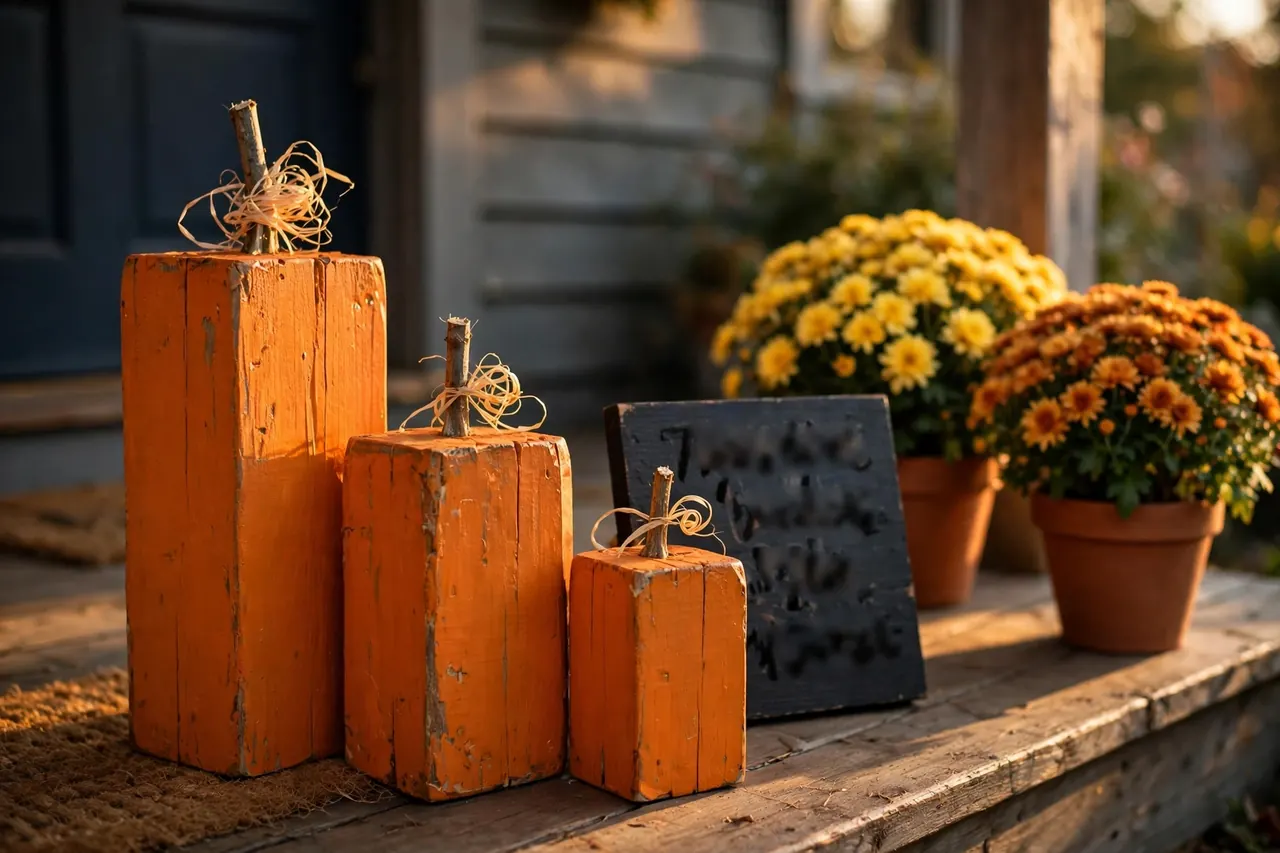
If you have a garage, you probably have the makings of the sturdiest craft in this guide. Wood offcuts, pallet scraps, and leftover 2×4 ends become pumpkins and signs that survive years of Octobers. Before you paint, check each scrap for nails, staples, and splinters, and sand rough edges smooth.
Wood Block Pumpkins
- Choose three wood blocks of different heights — cut-offs from a 2×4 or 4×4 post are ideal. An adult should do any sawing; many lumber stores will cut scraps to size for you.
- Sand the blocks lightly so paint grips and no splinters remain.
- Paint the blocks orange and let them dry. A second coat makes the color rich and even.
- Glue or screw a short piece of twig, dowel, or thick rope on top as a stem.
- Add a raffia bow or a curl of twine at the stem, then group the three blocks together on the porch, hearth, or mantel.
Paint faces on them if you like, but plain blocks in mixed heights often look classier. You can also paint the backs with a fall leaf design, turn them around after Halloween, and keep them out through Thanksgiving.
Mini Wood Signs
A flat scrap board becomes a mini sign in minutes. Paint the board black or white, let it dry, then paint or stencil a short word — “Boo,” “Spooky,” or “Trick or Treat.” Keep the lettering big and simple; one word reads better from across the room than a whole sentence.
Five-Minute Finishing Touches
Already crafted your main pieces? These three quick adds fill the gaps.
- Milk jug ghost luminaries: Draw a ghost face on a clean, empty plastic milk jug with a black permanent marker, cut a small opening in the back (adult step), and slip in a battery tea light or a few glow sticks. Line three or four along the walkway.
- Stretchy spider webs: Pull cotton webbing thin and stretch it across a bookshelf corner, a mirror, or a porch rail. The thinner you stretch it, the more real it looks. Add two or three plastic spiders per web — more looks messy, not scarier.
- No-carve painted pumpkins: Skip the carving tools entirely. Paint a real or craft pumpkin with simple faces, stripes, or polka dots. If you like a softer, earthy look, our guide to terracotta pumpkins shows how to get that clay finish and style them indoors or out.
Prefer your Halloween with more scare than charm? These friendly crafts are the base layer — our guide to DIY scary Halloween decorations covers the darker, spookier side of the season.
How to Display Your Crafts So the Room Looks Cohesive

Good crafts can still look scattered if they are placed one by one around a room. Three simple display rules fix that.
Pick one color palette. Choose classic orange and black, soft white and cream, or black and purple — and let most of your crafts follow it. A fabric pumpkin in your palette ties in; three random colors fight each other.
Group in zones, not singles. Build two or three displays instead of spreading pieces everywhere: a mantel group, an entry table group, and a porch group. Within each zone, cluster three to five pieces at different heights — a jar lantern on a book, a fabric pumpkin beside it, bats on the wall above. If you are styling the mantel itself, our Halloween mantel decor guide and these fireplace mantelpiece ideas show how to arrange the shelf like a designer would.
Add light last. Battery tea lights in the jar lanterns, a string of warm lights behind the ghost garland, and the porch luminaries switched on at dusk pull the whole display together. Light is what turns daytime crafts into evening atmosphere.
Thinking bigger for the front door? A wreath is the classic finishing piece, and our step-by-step guide to how to make a Halloween wreath walks through it.
Storing Your Crafts So They Survive to Next Year
Ten minutes of care in November saves you from re-making everything next October.
- Paper: Store bats and garlands flat in a folder or between book pages so they do not curl or tear.
- Fabric: Shake out pumpkins and ghosts, let them dry fully, and store them in a breathable box. Add a note of any piece that needs a repair.
- Glass: Wrap jar lanterns in newspaper or tissue so the tissue-paper coating does not scuff.
- Wood: Wipe blocks clean and store them dry. Wood crafts are the hardiest — a quick dust is all they need next year.
- All crafts: Take the batteries out of tea lights before storing, so a leaked battery does not ruin a lantern.
A quick safety note: these are low-risk paper, fabric, and paint projects, but homes and helpers differ. Adults should handle craft knives, hot glue, and spray paint, keep finished paper and fabric decor away from open flames and heat, and choose battery lights for anything that glows.
Related Guides
- Kids Halloween Crafts — children-first projects with ages, safety, and supervision in mind.
- Halloween Crafts Using Construction Paper — paper-only projects and techniques.
- Halloween Mantel Decor — styling the mantel shelf with your finished pieces.
- How to Make a Halloween Wreath — a themed wreath for the front door.
- Terracotta Pumpkins — the clay-look finish, outdoor tips, and styling ideas.
- DIY Scary Halloween Decorations — when you want the spooky look instead of the friendly one.
Frequently Asked Questions
What are some budget-friendly homemade Halloween decoration ideas?
The cheapest decorations come from things you already own. Paper bats and ghost garlands cost pennies, fabric pumpkins use scraps and a toilet paper roll, and milk jug luminaries recycle packaging. Jar lanterns, wood block pumpkins, and painted pumpkins stay low-cost because the main material is a scrap.
How can I make my Halloween decorations look cohesive?
Pick one palette — such as orange and black, or white and cream — and repeat it across rooms. Then group pieces into two or three displays instead of scattering them, mix heights inside each group, and use the same motif, like bats or ghosts, more than once. Repetition is what makes homemade pieces look planned.
What are safe decoration options for homes with children?
Choose battery-operated tea lights instead of real candles in every lantern, pumpkin, and luminary. Let adults handle craft knives, hot glue, and spray paint. Keep paper and fabric decor away from heaters, bulbs, and fireplaces, skip tiny loose parts where toddlers play, and keep walkways and exits clear of decorations.
How do I incorporate lighting in homemade Halloween decorations?
Put battery tea lights inside jar lanterns, milk jug ghosts, and paper-bag luminaries for a safe glow. Run a warm string of lights behind a ghost garland or along the mantel. Lighting works best added last, once your groups are placed, so you can see exactly where the display needs a lift.
How can I make my outdoor Halloween decorations weather-resistant?
Choose wood, glass, and plastic for outdoor pieces, since paper and cheesecloth will not survive rain. Wood block pumpkins and milk jug luminaries handle porches well; seal painted wood with a clear outdoor coat if it will sit in the open. Bring paper and fabric pieces under a covered porch when the weather turns.
Start With One Craft Tonight
You do not need all ten projects. Pick the one that matches what is already in your cupboard — a pack of black paper, a fabric scrap, a clean jar — and make it tonight. One finished, glowing, well-placed craft does more for your home than a box of half-started ones.