Most caulking failures I’ve been called back to fix have nothing to do with the caulk itself. They come down to what’s sitting underneath it, or more often, what isn’t. A foam backer rod is one of those small, cheap materials that quietly decides whether your sealant lasts six months or six years. Skip it, use the wrong type, or push it in at the wrong depth, and you’ll be redoing the joint sooner than you think. This guide walks through the types, the sizes, and the installation details that actually matter on real projects.
The Short Answer
A backer rod is a flexible foam cord placed inside a joint before sealant or caulk is applied. It controls sealant depth, prevents three-sided adhesion, and helps the seal flex and last longer.
Mission Statement
Dwellify Home is built to help homeowners make practical, stylish, and informed decisions about their living spaces. From everyday upkeep to thoughtful upgrades, we share clear, trustworthy guidance that makes home improvement feel approachable rather than overwhelming.
What Is a Backer Rod?
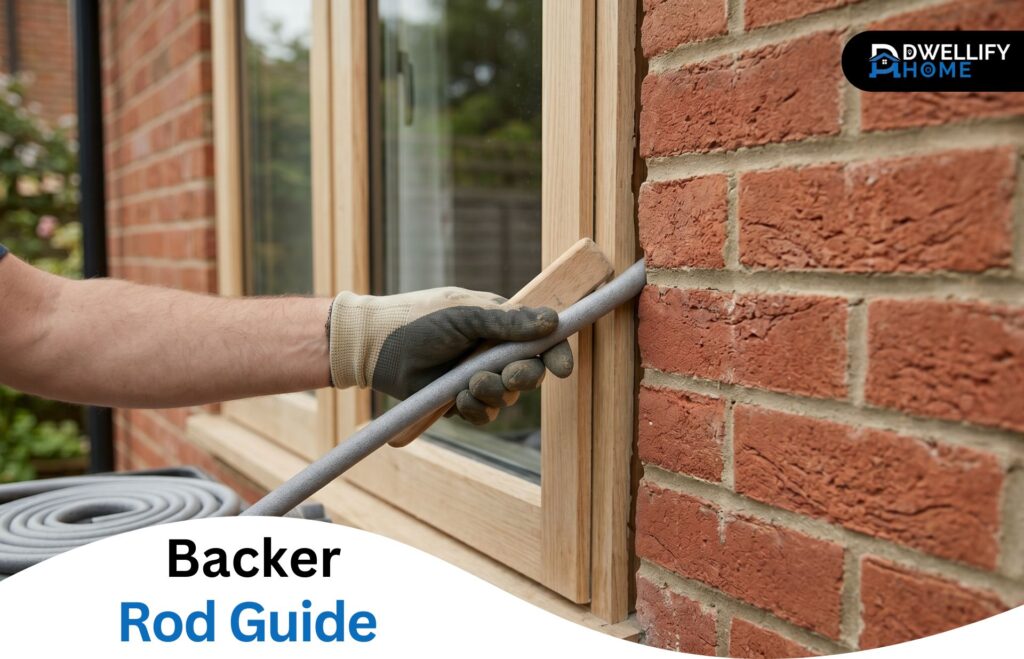
A backer rod is a flexible foam cord that goes inside a joint or gap before you apply caulk or sealant. Picture a long, soft, foam rope, usually round, that slides into a crack between two surfaces. It comes in coils or pre-cut lengths and is made from materials like polyethylene or polyurethane.
The point of it is simple. Deep joints don’t need to be filled top to bottom with sealant. That would waste material, cost more, and actually weaken the seal. The backer rod fills the bottom of the joint so the sealant only sits on top, in a thin, controlled layer where it can do its job.
You’ll see it tucked behind caulk in expansion joints, around windows, along driveways, and in any seam where two materials meet and need a flexible, weather-tight seal.
Quick Comparison: Backer Rod Types at a Glance
| Type | Best For | Water Resistance | Compressibility |
| Closed-Cell | Outdoor, concrete, driveways | High | Moderate |
| Open-Cell | Indoor, dry vertical joints | Low (absorbs water) | High |
| Bi-Cellular / Hybrid | Irregular joints, tricky installs | High | High |
Key Uses of a Backer Rod
- Filling concrete expansion and control joints
- Sealing around exterior windows and doors
- Backing caulk in driveway and pavement cracks
- Supporting sealant in tub-to-tile gaps
- Filling wide joints in log home chinking
- Reducing wasted sealant in deep gaps
What a Backer Rod Actually Does in a Sealant Joint
A backer rod has three jobs: it acts as a bond breaker so the sealant only sticks to two sides instead of three, it shapes the sealant into an hourglass profile that flexes properly, and it controls how deep the sealant sits so you don’t waste material or trap it too thick.
That first one, the bond breaker function, is the part most homeowners don’t realize matters. When sealant sticks to the bottom of the joint and both sides at the same time, that’s called three-sided adhesion. The moment the joint moves, even a tiny amount from temperature change or settling, the sealant tears. The backer rod blocks that bottom contact so the sealant can stretch and compress freely.
The hourglass shape is the second piece. A properly installed backer rod pushes the sealant into a thinner middle and thicker edges. That shape is what gives the seal its movement capability. It’s the difference between a joint that flexes for years and one that splits the first cold winter.
And third, the rod controls depth. Without it, you’d be filling a 1-inch deep joint with 1 inch of sealant, which is overkill and prone to failure. The rod takes up that depth so your sealant only needs to be a half inch or less.
The Main Types of Backer Rod
Three main types are sold today, and each one has a clear job. Picking the wrong one is one of the most common mistakes I see, especially when people grab whatever’s on the shelf without checking what’s inside.
Closed-Cell Backer Rod
Closed-cell rod is dense, water-resistant, and the one most homeowners end up using. It’s made of polyethylene foam with a sealed outer skin, so it doesn’t soak up water. That makes it the right choice for outdoor work, concrete joints, driveways, and anywhere moisture is in the picture.
The one thing to watch for is puncturing it during installation. If you stab it with a screwdriver or compress it too hard, the trapped gas inside can escape into your fresh sealant and cause bubbles. Use a blunt tool, push gently, and you won’t have an issue.
Open-Cell Backer Rod
Open-cell rod is softer, more compressible, and breathable. It’s usually polyurethane foam, and the cells are open, which means it doesn’t trap air the way closed-cell does. That’s actually useful when you’re using sealants that cure with moisture, because air can pass through and help the sealant cure from both sides.
The downside is water. Open-cell rod will absorb it. So you don’t use this on horizontal joints that can pool water, like a flat driveway crack or a ground-level expansion joint. Keep it for vertical joints, indoor work, and dry environments.
Bi-Cellular / Hybrid Backer Rod
Hybrid rod is the best of both. It has a closed-cell skin on the outside and an open-cell core inside. So it resists water like closed-cell, but compresses easily like open-cell. And because the skin doesn’t trap pressurized air the same way, it won’t out-gas if you nick it during install.
It costs a little more, but if you’re working on a tricky joint with irregular widths or you’re worried about bubbling, it’s the safer choice.
Quick Side-by-Side: Which Type Fits Which Job
- Outdoor concrete, driveways, sidewalks: Closed-cell
- Indoor caulking, vertical wall joints, dry areas: Open-cell
- Irregular joints, tricky installs, anywhere bubbling has been a problem: Bi-cellular
- Around windows and doors (exterior): Closed-cell or bi-cellular
- Hot-pour sealant applications (highways, parking lots): Specialty closed-cell rated for high temperature
Backer Rod Sizes Explained
Backer rod comes in standard diameters: 1/4″, 3/8″, 1/2″, 5/8″, 3/4″, 1″, and larger sizes up to 2″ or more for industrial work. Lengths vary by brand, usually sold in coils of 100 to 1,100 feet, with shorter packs available at retail stores for small jobs.
The sizing rule that matters: the rod needs to be larger than the joint width so it compresses snugly inside. For joints under 3/4 inch wide, pick a rod about 1/8 inch larger than the gap. So a 1/2-inch joint takes a 5/8-inch rod. For wider joints, go about 25 to 30 percent larger than the joint width.
Don’t try to stretch a smaller rod to fit, and don’t force an oversized one in by mashing it down. Either mistake leaves you with a poor seal. A snug compression fit is what holds the rod in place and gives the sealant the right shape on top.
If you’re shopping retail, the most common sizes you’ll see are 1/4 backer rod for tight gaps and 5/8 for typical exterior caulking jobs around windows and trim.
Where Backer Rod Is Commonly Used
A backer rod shows up anywhere two surfaces meet and need a flexible seal. The most common spots include:
- Concrete expansion and control joints in driveways, sidewalks, patios, and garage floors
- Around windows and doors, especially exterior installations where weather seals matter
- Exterior cladding seams, stucco, and EIFS panel joints
- Pavement cracks and joints in asphalt or concrete roads
- Bathroom gaps, like the joint between a tub and tile wall
- Log home chinking between logs
- Curtain wall and storefront construction in commercial work
Each of these has its own quirks. A driveway joint sees water, freeze-thaw, and traffic, so you want closed-cell. A bathtub gap is small and indoors, so a thin closed-cell rod is plenty. A log home gap is wide and irregular, which is where bi-cellular or specialty trapezoidal shapes earn their keep.
How to Choose the Right Backer Rod for Your Project
Start with the joint itself. Measure the width and the depth, then ask yourself five quick questions:
- How wide is the gap? This decides the rod diameter.
- Is it indoors or outdoors? Outdoor and wet areas mean closed-cell or bi-cellular.
- Is the joint horizontal or vertical? Horizontal joints exposed to water rule out open-cell.
- How much will the joint move? Joints with heavy thermal movement or building settlement need a properly sized rod and a flexible sealant pairing.
- What sealant are you using? Hot-pour sealants need rod that can handle the heat. Cold-applied sealants are more forgiving.
If you’re not sure, closed-cell polyethylene foam backer rod handles the majority of residential and light commercial jobs without issue. It’s the safe default when in doubt.
One thing worth saying: don’t overthink brand. Once the sealant cures, the rod has done its job. Stick to a recognized manufacturer with ASTM compliance on the label, and you’re fine.
Pairing Backer Rod With the Right Sealant
The single most important pairing rule is the 2:1 width-to-depth ratio. The sealant on top of the rod should be roughly half as deep as the joint is wide. So a 1/2-inch wide joint should have about 1/4 inch of sealant depth above the rod. That ratio is what gives the sealant the flexibility to stretch and compress without tearing.
For sealant compatibility:
- Silicone sealants work well with closed-cell and bi-cellular rod. Stick to ASTM C920-rated silicone for outdoor and wet areas.
- Polyurethane sealants pair well with all three rod types. Open-cell is especially helpful here because polyurethanes cure with moisture, and the breathable rod lets the sealant cure from both sides.
- Hybrid (MS polymer) sealants are forgiving and pair with most rod types.
- Hot-pour sealants for roads and pavement need closed-cell rod rated for high temperatures.
Avoid pairing standard acrylic latex caulks with backer rod for high-movement joints. They don’t have the elasticity to handle the flex, and the rod’s benefit gets wasted.
How to Install a Backer Rod Step by Step
Backer rod installation comes down to four steps: clean the joint, choose the right size rod, push it to the correct depth, then apply and tool the sealant on top. Done properly, the whole process takes minutes per linear foot and gives you a seal that holds for years.
Here’s how I do it on a typical job:
- Clean the joint thoroughly. Brush out dust, scrape away old sealant, and let it dry. Any debris left behind weakens the bond. A wire brush, vacuum, or compressed air all work.
- Pick the correct rod diameter. It should be 1/8 inch larger than the joint for narrow gaps, or 25 to 30 percent larger for wider ones.
- Push the rod in to the right depth. The sealant on top should be about half the joint width. Use a putty knife, a wooden dowel, or a proper insertion tool. Don’t use anything sharp that could puncture closed-cell rod.
- Apply the sealant in a steady bead across the joint. Make sure it contacts both sides of the joint, not just sitting on top of the rod.
- Tool the sealant with a spatula, a damp finger, or a sealant tool. This presses the sealant into firm contact with both sidewalls, gives you that hourglass shape, and finishes the surface clean.
A few extras that help: keep the rod in one continuous piece if possible, don’t twist or stretch it as you push it in, and work in shorter sections so the sealant doesn’t skin over before you tool it.
Common Mistakes to Avoid During Installation
Most failed sealant joints I’ve inspected come down to four mistakes, and all of them are easy to avoid once you know what to watch for:
- Stretching the rod as you install it. A stretched rod recoils slowly over time, which pulls the sealant with it and creates voids. Push it in without tension.
- Puncturing closed-cell rod with a sharp tool. That trapped gas escapes into your fresh sealant and creates bubbles that crack open weeks later. Use blunt tools only.
- Setting the rod at the wrong depth. Too shallow and the sealant is too thin to flex. Too deep and you’ve wasted sealant and risk three-sided adhesion in spots. Aim for that 2:1 ratio every time.
- Using open-cell rod in a wet horizontal joint. It absorbs water, holds it against the underside of the sealant, and the joint fails from below. Save open-cell for dry, vertical work.
The other one worth mentioning: don’t reuse old rod. If you’re recaulking, dig out the old material and put in fresh rod. It’s cheap, and you don’t want decades-old foam holding up your new sealant.
Where to Buy Backer Rod and What to Check on the Label
Backer rod is sold at most home improvement stores, sealant specialty suppliers, and online. Lowe’s carry the common residential sizes. For larger jobs or specialty rod, you’ll get better pricing through a sealant supplier or distributor.
When you check the label, look for four things:
- Diameter that matches your joint width (with the right oversize allowance)
- Length that covers your run with a little extra
- Cell type clearly stated as closed-cell, open-cell, or bi-cellular
- ASTM compliance, specifically ASTM C 1330 for backer rod, with the type listed (Type B, C, or O depending on the cell structure)
The ASTM listing is the quiet trust signal. It means the rod has been tested to meet recognized industry specifications. If a product doesn’t list one, that’s worth noting before you buy.
Expert Tips for a Long-Lasting Seal
A few small habits separate joints that hold for ten years from joints that fail in two:
- Inspect the joint before resealing. If the existing rod is intact and the joint is clean, you can sometimes recaulk over it. If the rod is brittle, missing, or waterlogged, dig it out and start fresh.
- Watch for early warning signs. A sealant that’s pulling away on one side, a hairline crack down the middle, or a bubbled surface are all cues that something failed underneath.
- Don’t recaulk over a failing joint. New sealant on top of bad rod or three-sided adhesion will fail just as fast as the original.
- Match the season. Avoid installing backer rod and sealant in extreme heat or cold. Most products perform best between 40°F and 90°F during install.
- Keep a spare coil. A 100-foot coil of common-size closed-cell rod costs very little and saves a trip when you spot a failing joint mid-project.
Years of small habits like these are what keep a sealed building tight and dry.
Frequently Asked Questions
What’s the difference between open-cell and closed-cell backer rod?
Closed-cell rod is dense, water-resistant, and best for outdoor and wet applications. Open-cell rod is softer, breathable, and absorbs water, so it’s used for indoor, dry, vertical joints. Bi-cellular rod is a hybrid that combines water resistance with high compressibility.
What size backer rod do I need for a 1/2″ joint?
For a 1/2-inch wide joint, use a 5/8-inch backer rod. The general rule is to pick a rod about 1/8 inch larger than the joint width so it compresses snugly inside without needing to be forced.
Can I use backer rod without caulk or sealant?
No. A backer rod isn’t a sealant on its own. It’s a backing material that supports the sealant above it. Used alone, it won’t keep out water, air, or pests, and it’s not designed to handle exposure without a sealant cap.
Is foam backer rod waterproof?
Closed-cell and bi-cellular backer rod are water-resistant and don’t absorb moisture. Open-cell rod absorbs water and isn’t suitable for wet environments. None of them are fully waterproof on their own. The sealant on top is what creates the actual weather seal.
How long does backer rod last in an outdoor joint?
Properly installed closed-cell or bi-cellular rod can last as long as the sealant above it, which is typically 10 to 20 years for quality outdoor sealants. The rod itself rarely fails first. The sealant usually goes before the rod does.
Can backer rod be reused?
It’s not worth reusing. Once you’ve removed it from a joint, the foam may be compressed, contaminated, or damaged. Fresh rod is inexpensive, and a new piece gives the new sealant the best chance of holding up.
Do you caulk over a backer rod?
Yes. The backer rod sits inside the joint first, and caulk or sealant is applied directly over it. The rod controls how deep the caulk goes and supports the bead so it shapes properly and flexes with movement.
What can I use instead of a backer rod?
For shallow joints where a rod won’t fit, bond breaker tape is the common substitute. It prevents three-sided adhesion the same way a rod does. For very wide gaps, foam strips or rope caulk can work, but neither performs as well as a properly sized backer rod.
What are the common mistakes when using a backing rod?
The four most common mistakes are stretching the rod during install, puncturing closed-cell rod with a sharp tool, setting it at the wrong depth, and using open-cell rod in wet horizontal joints. Each one shortens the life of the sealant above it.
When not to use backer rod?
Skip the rod when the joint is too shallow to fit one, when the gap is narrow enough that sealant alone gives a proper 2:1 width-to-depth ratio, or when the manufacturer’s spec sheet calls for bond breaker tape instead. Open-cell rod should also be avoided in horizontal outdoor joints exposed to water.
What size backer rod fits a 1/2 inch joint?
A 5/8 inch backer rod fits a 1/2 inch joint. The standard rule is to choose a rod about 1/8 inch larger than the joint width so it compresses snugly without being forced.
Conclusion
Backer rod is one of those quiet materials that decides how long a sealed joint lasts. Pick the right type for the environment, match the diameter to the joint, install it at the correct depth, and pair it with the right sealant. That’s the whole game. A few minutes of care during install saves years of recaulking down the line, and once you’ve done it properly a few times, it becomes second nature.
Disclaimer
This content is shared for general informational purposes only. Individual results, project conditions, and personal preferences may vary, so readers are encouraged to use their own judgment and consult a qualified professional when needed.