Candle wax on fabric is one of those stains that looks worse than it usually is. Most people panic, grab a cloth, and start rubbing — and that’s exactly what turns a manageable situation into a real problem. Over the years, treating hundreds of wax-damaged garments, tablecloths, upholstery pieces, and specialty fabrics has made one thing clear: wax is almost always removable when you approach it correctly.
This guide walks you through every step — from fresh spills to set-in stains, from cotton to silk, and from tablecloths to fabric couches.
The Short Answer
To remove candle wax from fabric, harden the wax with ice, scrape off the excess, then use a warm iron and paper towel to lift the residue. Pre-treat any remaining oily or dye stain with a stain remover before laundering.
Mission Statement
At Dwellify Home, we help homeowners make practical, well-informed decisions about their living spaces — from everyday home care to thoughtful décor choices. Our goal is to give you clear, honest guidance that works in the real world, not just in theory.
Why Candle Wax Stains Are Trickier Than They Look
A candle wax stain is actually two problems at once — the physical wax embedded in the fabric fibers, and the oily or colored residue it leaves behind. Most methods fail because they only address one. Understanding both is what makes removal actually work the first time.
The Two Problems You’re Dealing With — Wax and Residue
The wax itself is a solid — it sits in and on the fabric fibers after cooling. That part is the easier problem to solve. The trickier issue is what comes after you remove the wax: a faint grease-like stain, and sometimes a color stain from dyed wax.
A lot of people think they’ve handled the problem once the visible wax is gone. Then they toss the item in the dryer, the heat sets the oily residue permanently, and the stain is now much harder to clear. Treat both problems in sequence, and you’ll get clean results.
How Paraffin, Soy, and Beeswax Behave Differently on Fabric
Not all candle wax behaves the same way. Paraffin wax — the most common type — hardens quickly and tends to sit closer to the surface of the fiber. It’s generally the easiest to remove.
Soy wax is softer and oilier by nature. Even after you remove the solid portion, it almost always leaves behind a greasy residue that needs an extra treatment step. Beeswax is the densest of the three — it penetrates textured fibers deeply and can be quite stubborn on materials like wool or knits. Knowing your wax type helps you set realistic expectations before you begin.
Key Steps at a Glance
- Let the wax fully harden before touching it — rubbing warm wax spreads it deeper
- Freeze with an ice pack for 10 minutes, then scrape with a dull knife or credit card
- Place white paper towels above and below the stain, press with a low-heat iron — no steam
- Treat the leftover oily or dye residue with rubbing alcohol or an enzyme-based stain remover
- Wash at the warmest safe temperature and inspect before the dryer — heat sets any remaining stain permanently
What to Check Before You Treat Any Wax Stain
Before applying any removal method, check the care label on your fabric. The wrong heat level or solvent on a delicate material can cause permanent damage. Knowing your fabric type — cotton, polyester, silk, or synthetic blend — determines which method is safe to use.
How to Read Your Fabric Care Label (And Why It Matters Here)
The care label is your most important reference before doing anything else. A crossed iron symbol means no heat at all — skip the iron and use cold removal only. A hand wash symbol signals a delicate fabric. A dry-clean-only symbol is a clear reason to stop and consider professional treatment rather than DIY solvents.
One thing that goes wrong repeatedly: someone reads the care symbol, decides it probably doesn’t apply to their situation, and uses a hot iron on a synthetic fabric. The result is a melted, shiny patch that no treatment will fix. Take the label seriously.
Tools You’ll Need — A Simple Checklist
Gather these before you start:
- Ice cubes or an ice pack
- A dull butter knife, credit card, or plastic scraper
- White paper towels or a brown paper bag (unprinted sections only)
- An iron or hair dryer
- Mild liquid laundry detergent or an enzyme-based stain remover
- Rubbing alcohol (for colored wax dye residue)
- A clean white cloth for blotting
Having everything within reach before you begin means you won’t have to leave a half-treated stain while you search for supplies.
How to Remove Candle Wax from Fabric — The Complete Method
The most reliable method for removing candle wax from fabric involves three stages: hardening and scraping, melting and transferring with heat, and treating any leftover stain. Done in order, this process works on most fabric types without causing damage.
Step 1 — Harden the Wax Before You Do Anything Else
Leave the wax alone until it fully cools and hardens. This usually takes 15 to 20 minutes at room temperature. If you need to speed it up, place an ice pack or a bag of ice cubes directly on the stain for about 10 minutes.
Touching or rubbing warm wax forces it deeper into the fabric fibers — and fiber-embedded wax is significantly harder to pull out. This is the step most people skip, and it’s the reason many home attempts fail before they even really begin.
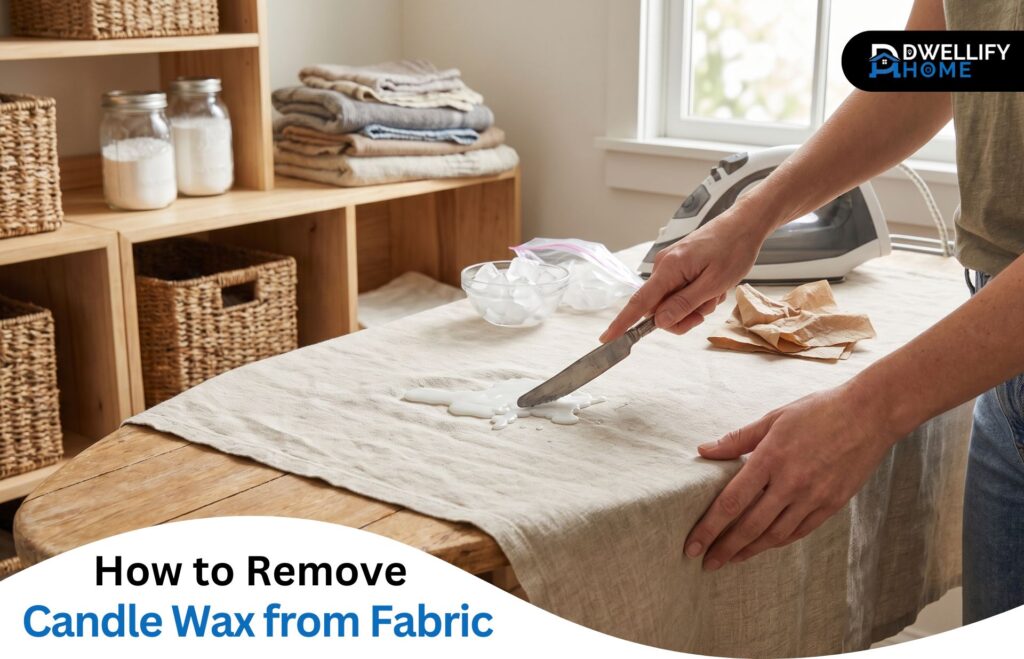
Step 2 — Scrape Off the Excess Wax Carefully
Once hardened, use a dull butter knife, the edge of a credit card, or a plastic scraper to lift the wax away from the fabric surface. Work slowly, from the outer edges of the stain inward, to avoid spreading it.
Don’t use sharp tools. A sharp blade can nick or snag fabric threads, adding a damage problem on top of the original stain. Hold the fabric taut with your other hand to keep it stable as you scrape.
Step 3 — Use Heat to Lift the Remaining Wax
After scraping, there will almost always be a thin layer of wax remaining in the fibers. This is where the iron and paper towel method makes the real difference.
Place a clean white paper towel (or an unprinted section of a brown paper bag) both underneath and on top of the stain. Set your iron to a low-to-medium heat setting with the steam function off. Gently press the iron over the paper for a few seconds at a time — don’t hold it in one spot.
The heat melts the residual wax, and the paper absorbs it. Move to a clean section of paper towel every few passes. You’ll see the wax transferring as a greasy mark on the paper. Repeat until no more wax appears on the towel.
Step 4 — Treat the Oily or Colored Residue Left Behind
Once the wax is gone, you may still see a faint oily spot or a color stain from dyed candle wax. Apply a small amount of liquid laundry detergent or an enzyme-based stain remover directly to the area and let it sit for 10 to 15 minutes.
For dye residue specifically, dampen a clean white cloth with rubbing alcohol and blot gently — never rub. The alcohol dissolves the dye without spreading it further. Always spot test on a hidden section of the fabric first, regardless of how mild the product seems.
Step 5 — Launder Correctly and Inspect Before Drying
Wash the garment at the warmest water temperature the care label allows. Warm water clears residual grease more effectively than cold.
Before putting anything in the dryer, hold the fabric up to the light and confirm the stain is completely gone. Heat from the dryer will permanently bond any remaining wax residue or dye into the fibers. If you can still see a faint mark, repeat the pre-treatment step and wash again before drying.
No Iron? Here’s How to Remove Candle Wax from Fabric Without One
If you don’t have an iron, a hair dryer on a low-to-medium heat setting works just as well. Hold it a few inches from the wax, let it soften, then blot immediately with a clean paper towel. Move to a fresh section of towel as the wax absorbs.
The Hair Dryer Method — Step by Step
Set the hair dryer to medium heat — not high. Hold it 3 to 4 inches from the stained area and move it in a slow, steady sweep. As the wax softens, press a clean paper towel firmly against the spot to absorb it.
Never hold the dryer in one position for too long, especially on synthetic or blended fabrics. Concentrated heat on polyester or nylon can cause sheen damage that looks similar to a scorch mark and won’t come out.
Can You Use Boiling Water Instead?
For sturdy, heat-safe fabrics like thick cotton or linen tablecloths, pouring a steady stream of boiling water through the back of the stained area can push the wax out effectively. This works particularly well on natural fibers that can handle the temperature.
That said, this method is not suitable for synthetics, delicate fabrics, or anything with a structured shape. When in doubt, stick with the iron or hair dryer approach — it gives you more control over heat distribution.
Wax Removal by Fabric Type — What Works and What to Avoid
The same basic method applies to most fabrics, but the safe heat level, solvent choice, and scraping pressure vary significantly depending on the material. Getting this wrong can cause irreversible damage, especially on silk, velvet, or polyester blends.
Cotton and Linen — The Most Forgiving Fabrics
Cotton and linen handle more heat and are the most straightforward fabrics to treat. The standard iron method works well on both, enzyme-based stain removers are safe to use, and warm-water machine washing after pre-treatment finishes the job cleanly.
Polyester, Synthetics, and Blended Fabrics
Use a lower heat setting on the iron and keep it moving — never let it sit still. A hair dryer gives more controlled, gentler heat and is often the safer choice for synthetic blends. Avoid acetone-based solvents on polyester, as they can damage the fiber surface and cause permanent dullness.
Denim — Freeze First, Then Peel
Denim benefits most from a thorough freeze before scraping. Once frozen solid, the wax tends to peel away in larger, cleaner pieces rather than needing aggressive heat treatment. Follow up with a standard detergent pre-treat and a regular machine wash.
Silk, Wool, and Delicate Fabrics — Handle with Extra Care
No direct heat on silk — at all. Use cold scraping only, and blot any residue with a cloth barely dampened with rubbing alcohol. Wool is similar: cold removal, no aggressive scraping, and very gentle treatment.
For antique wool, structured silk garments, or anything labeled dry-clean only, professional cleaning is genuinely the better call. The risk of heat damage or solvent discoloration on these materials is too high to chance without the right equipment.
Velvet and Textured Weaves — Why Wax Embeds Deeper
Velvet requires extra care at every stage. The pile traps wax deep between fibers, and scraping horizontally can permanently flatten or crush it. Freeze the wax thoroughly first, then use a lifting motion — pulling straight up rather than dragging sideways. Treat any residue with a very light blot, and allow it to air dry fully before checking whether a second treatment is needed.
Removing Candle Wax from Specific Fabric Items
How to Remove Candle Wax from a Tablecloth
Tablecloths are usually cotton or linen, which works in your favor. For smaller spills, fold the cloth so the stained section is accessible and place it in the freezer for 20 to 30 minutes before scraping. For larger areas of wax dripped across the cloth, the iron and paper towel method works well laid flat on an ironing board. Machine wash on a warm cycle afterward.
How to Remove Candle Wax from a Fabric Couch or Upholstery
Upholstery can’t go in the washing machine, so the entire process stays on the spot. Freeze with an ice pack, scrape carefully, then use a hair dryer — not an iron — to melt the residue into a clean paper towel. For colored wax dye residue, blot with rubbing alcohol on a white cloth.
Always test any solvent on an unseen area of the couch first, especially with microfiber — some cleaning agents cause watermarks on microfiber that are very difficult to reverse.
How to Remove Candle Wax from a Fabric Dress
A dress often has multiple layers, structured elements, or lining — and each layer may have a different care requirement. Check both the outer fabric and lining care labels before applying any heat or solvent. Where the outer fabric and lining have different heat tolerances, treat only the outer layer using low, carefully controlled heat, keeping paper towels between the layers to prevent any transfer to the lining.
How to Remove Candle Wax from a Fabric Purse or Bag
Fabric purses can’t be laundered, so spot treatment is the only option here. Gently scrape the cooled wax with a credit card or dull edge, then use a hair dryer on low heat to soften any remaining residue and blot it away with a clean cloth. Test colorfastness by applying a tiny amount of rubbing alcohol to an inner seam or hidden section before using it on the visible stain.
Colored Candle Wax Left a Stain — Here’s How to Remove the Dye
Colored candle wax contains dye that can bond with fabric fibers even after the wax itself is fully removed. Rubbing alcohol, applied sparingly with a cotton ball or clean cloth, is one of the most effective home remedies for lifting this residual color. Always blot — never rub.
Rubbing Alcohol for Dye Stains — How to Use It Safely
Pour a small amount of rubbing alcohol onto a clean white cloth — not directly onto the fabric. Press it gently against the stain, hold for a few seconds, then blot. Reapply to a fresh section of cloth and repeat. The dye will gradually transfer away from the fabric.
Work from the outer edge of the stain inward to prevent the dye from spreading to clean areas around it.
When You Need an Enzyme-Based Stain Remover Instead
If the dye stain is deeper or darker — which is common with red, blue, or heavily pigmented candle wax — an enzyme-based stain remover is more effective than alcohol alone. Apply it directly to the damp stained area, allow it to sit for 10 to 15 minutes, and do not rinse it off before washing. The enzymes break down the organic compounds in the dye more thoroughly than surface blotting can.
Will Bleach Help — Or Make It Worse?
On white or very light colourfast fabric, color-safe bleach can clear stubborn dye residue when other treatments haven’t fully worked. However, chlorine bleach on colored fabric will strip or alter the garment’s own color — making the visible problem significantly worse than the original wax stain.
Bleach should never be the first tool you reach for, and it should never be used on any fabric that isn’t white or confirmed bleach-safe.
What to Do When the Wax Has Already Dried, Set, or Been Through the Dryer
Old or set wax can still be removed, but it requires more patience. The same freeze-and-scrape and heat-transfer method applies — but dried wax may need a longer freeze time and multiple ironing passes. Wax that went through the dryer is harder but not impossible to treat; start with a stain remover soak before applying heat.
Removing Candle Wax That’s Been on Fabric for Days
Wax that has been sitting on fabric for several days has had more time to bond with the fibers. Freeze for longer — up to 30 minutes — before attempting to scrape. Expect to need two or three rounds of the ironing method rather than just one.
The oily residue in older stains may also be more difficult to lift. An enzyme-based pre-treatment left on for 20 to 30 minutes before washing tends to give better results than the standard 10-minute application.
What to Do If the Stain Was Accidentally Dried in the Dryer
This is the situation that comes up most often in professional textile care. The wax went through a hot dryer cycle, the residue is now baked in, and the assumption is that the fabric is beyond saving. In many cases, it isn’t — but it does require additional effort.
Soak the stained area in an enzyme-based stain remover for at least 30 minutes before any heat treatment. Then follow the iron method, but expect to repeat it three to five times. If the stain still won’t respond after multiple rounds, professional fabric cleaning is worth pursuing — particularly for items that matter.
Common Mistakes That Make Candle Wax Stains Much Harder to Remove
The three most damaging mistakes when dealing with a wax stain are rubbing warm wax deeper into the fibers, putting the garment in the dryer before the stain is fully gone, and applying too much heat on the wrong fabric. Each one can permanently lock the stain in.
Rubbing Fresh Wax — Why It Spreads the Problem
The instinct to wipe or dab fresh wax immediately is understandable, but it’s counterproductive. Warm, soft wax spreads outward and pushes deeper into fiber weaves when rubbed. Leave it alone, let it solidify, and you’ll have a smaller, more manageable area to treat.
The Dryer Is the Enemy of an Unfinished Wax Stain
Always check the fabric under good lighting before drying. A stain that looks faint in dim indoor light can still carry enough wax residue to set hard under dryer heat. If there’s any doubt, air dry and re-examine.
Using the Wrong Heat Level on the Wrong Fabric
High heat on polyester causes permanent sheen damage. High heat on silk causes scorch marks that won’t reverse. Even medium heat on some structured fabrics can leave a lasting impression from the iron plate. Always start with a lower heat setting than you think you need, and increase gradually.
Skipping the Spot Test Before Using Any Solvent
Rubbing alcohol, commercial stain removers, and even mild dish soap can affect the dye or finish of certain fabrics — particularly upholstery and purses. Test on a hidden area every time, even with products you’ve used before. Different fabrics respond differently, and a quick spot test takes five seconds.
Wax Just Spilled — What to Do in the First 5 Minutes
Do not wipe or rub the spill. Step away and let it cool completely — even if that takes 10 to 15 minutes. Once solid, scrape off the bulk with a dull edge and follow with the iron method. Acting fast matters less than acting correctly.
The single best thing you can do immediately after a wax spill is nothing. If there are others nearby, note the location so it doesn’t get rubbed or stepped on, and come back to it once it has fully cooled and hardened. A solid wax stain is far easier to work with than a warm, spreadable one.
How to Prevent Candle Wax from Dripping onto Fabric in the First Place
A few reliable habits significantly reduce the chances of wax spills in the first place:
- Use candles with low-drip or drip-free wicks for any dinner table setting
- Place candles on stable holders that sit securely above fabric surfaces
- Use a candle tray or plate beneath tapers and pillar candles to catch any drips before they reach the cloth
- Keep burning candles away from open windows and air vents — airflow creates uneven burning that leads to more dripping
- Trim the candle wick to about a quarter inch before lighting — a long wick produces a larger, more unstable flame that drips more
Frequently Asked Questions About Removing Candle Wax from Fabric
Can I remove wax from dry-clean-only fabric at home?
It’s not recommended. Dry-clean-only labels exist because the fabric is sensitive to heat, water, or the solvent-based treatments that are standard in home removal methods. Cold scraping to remove loose surface wax is acceptable, but applying heat or liquid treatments to dry-clean-only fabric risks permanent damage. Take the item to a professional and point out the stain clearly before they start.
Does colored candle wax always leave a permanent stain?
Not always — but the dye in colored wax bonds with fabric fibers fairly quickly. The faster you treat it, the better your chances of full removal. Rubbing alcohol and enzyme-based stain removers handle most color residue effectively. Heavily saturated colors like deep red or dark blue wax on pale fabric may need several treatment rounds before the stain fully clears.
Can I use white vinegar or WD-40 to remove candle wax?
White vinegar is not particularly effective against wax, which is an oil-based substance. Vinegar works better on mineral or water-soluble stains. WD-40 can help loosen wax residue on hard surfaces, but applying an oil-based product to fabric creates a second grease stain that then needs its own treatment. The methods outlined in this guide are more targeted and avoid adding new problems.
Is wax harder to remove from dark fabric than light fabric?
The removal process is the same for both. The difference is that dye residue from colored wax is harder to notice against dark fabric — which means you might not realize a residue problem remains. After removing wax from dark fabric, check it under good lighting to look for any lingering sheen or color mark before it goes in the dryer.
What happens if I put a wax-stained garment in the dryer by mistake?
The dryer’s heat bonds the wax residue and any dye into the fabric fibers, making the stain significantly harder to remove. Soak the area in an enzyme-based stain remover for at least 30 minutes, then attempt the iron method. Multiple treatment rounds are usually needed. For valued items, professional textile cleaning is worth considering at this point.
How do I remove candle wax from fabric without using any heat?
Freeze the wax thoroughly, scrape away as much as possible, then apply rubbing alcohol or an enzyme-based stain remover to the residue and launder in warm water. This cold approach takes more patience and may require additional treatment rounds, but it’s a practical and safe method for fabrics that can’t tolerate any heat.
Final Thoughts on Removing Candle Wax from Fabric
Wax stains have a reputation for being stubborn, but the reality is that most of them respond well to a calm, methodical approach. The key is remembering that you’re dealing with two separate problems — the wax and the residue — and addressing both in the right order. How to remove candle wax from fabric comes down to patience more than any special product: let the wax harden, work through it in stages, and never let the dryer near it until you’re certain the stain is completely gone.
Disclaimer: The content on Dwellify Home is intended for general informational purposes only. Results may vary depending on fabric type, wax composition, and how the stain has been previously handled. Always check your fabric’s care label before applying any cleaning method. For valuable, delicate, or dry-clean-only items, professional textile care is recommended.