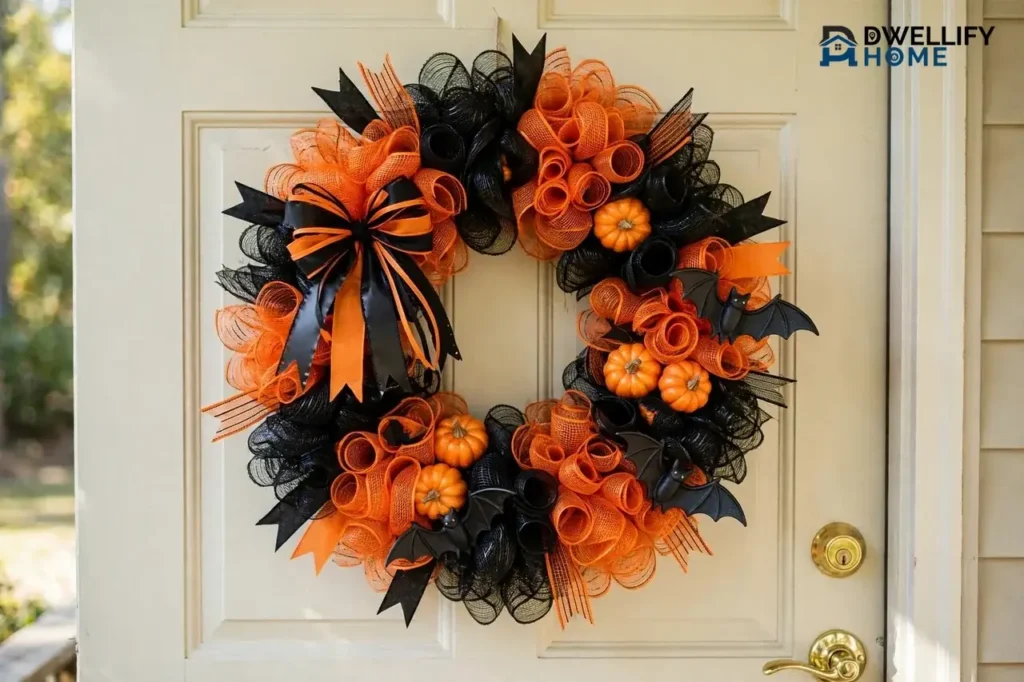
To make a mesh wreath, you attach deco mesh to a wire wreath frame with pipe cleaners (also called chenille stems), using one of three techniques: the poof method, where one continuous roll is gathered into loops between ties; the ruffle method, where short cut pieces are scrunched into wavy fans; or the cruffle method, which rolls both cut ends of a piece inward, then gathers the center. A good first project is a 14- to 16-inch wire frame with one 21-inch by 10-yard roll of deco mesh for poofs, or 10-inch-wide mesh cut into pieces for ruffles and cruffles.
The technique matters more than the theme. Learn one method well and the same base becomes a spring, fall, or Christmas wreath just by changing colors and ribbon. This guide teaches all three methods, how to cut mesh without a frayed mess, how much mesh to buy, and how to fix flat or lopsided results.
What Is a Deco Mesh Wreath?
A deco mesh wreath is a wreath built on a wire frame and covered with deco mesh, a wide, loosely woven synthetic netting sold on rolls. The mesh is most often polypropylene — a soft plastic netting that holds a full, shaped form and tolerates outdoor use better than fabric ribbon. Because the weave is open and springy, gathered mesh traps air and looks much fuller than the same weight of ribbon or burlap.
Two frame styles cover almost every project:
- Plain wire wreath frame: two to four concentric wire rings with cross bars. You add your own pipe cleaners wherever you want an attachment point, which gives you full control over spacing.
- Work wreath form: a wire frame with pipe-cleaner ties (twist ties) already attached, often 18 ties on a standard round form. Work forms are usually labeled by the size of the finished wreath, not the bare frame — a sizing quirk Mardi Gras Outlet explains in its wreath-form tutorial, and worth checking before you buy.
Supplies You Need for a Mesh Wreath
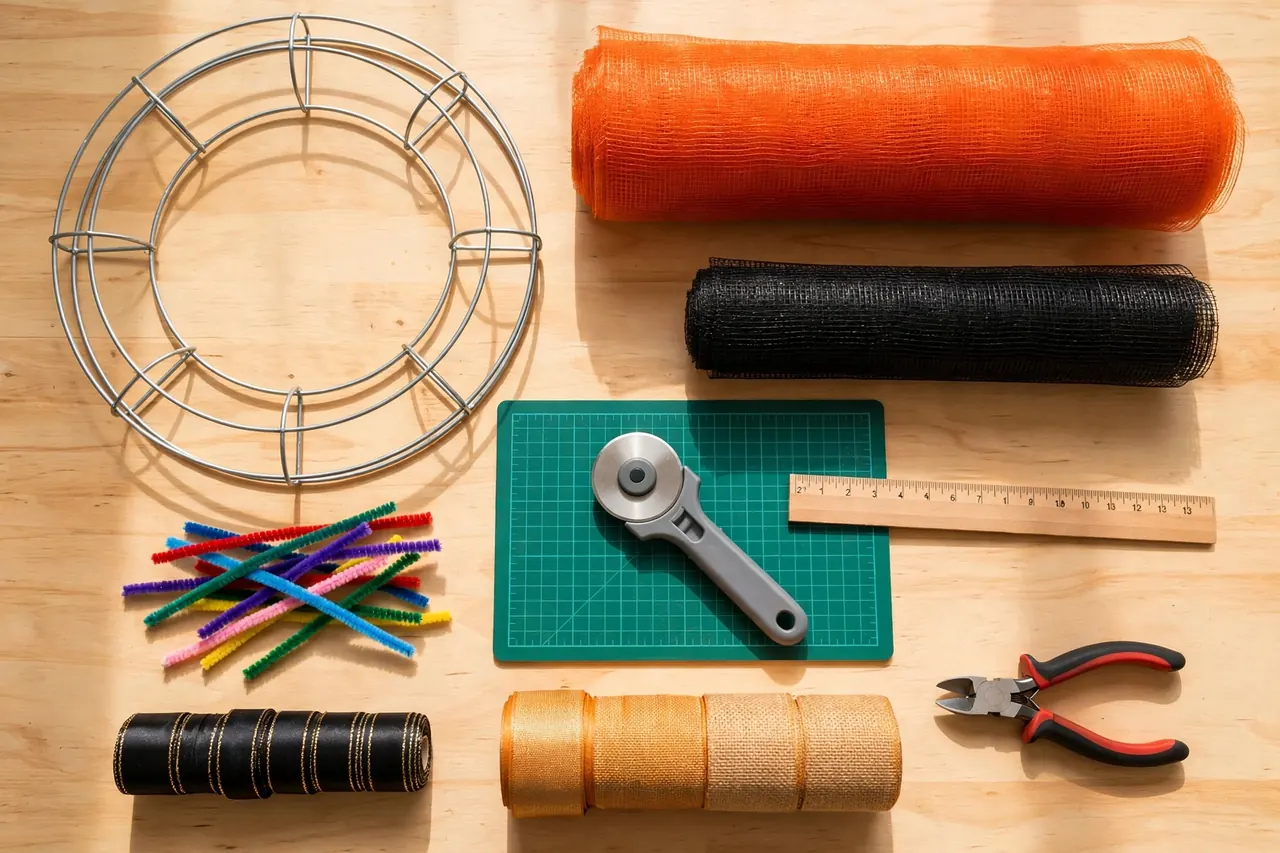
You do not need a craft room full of tools. Every method in this guide uses the same short list; the only real decision is which width of mesh to buy for your technique.
- Wire wreath frame or work wreath form in your chosen size (14 or 16 inches is a forgiving first size)
- Deco mesh: one roll, 21 inches wide by 10 yards, for the poof method; or 10-inch-wide rolls, usually 10 yards each, for ruffle and cruffle methods
- Pipe cleaners / chenille stems in a color close to your mesh — light stems show through dark mesh (skip these if your work form has built-in ties)
- Wired ribbon in 1.5-inch and 2.5-inch widths for tails and a bow
- Rotary cutter and cutting mat, or sharp scissors — a rotary cutter gives cleaner edges on mesh
- Ruler or tape measure for consistent poof and piece lengths
- Wire cutters for trimming pipe cleaner ends
- Optional: a wreath sign, floral picks, or ornaments; a clip or clothespin to hold gathered mesh; a door hanger
How Much Mesh Do You Need?
The honest answer is that it depends on the method, because the methods consume mesh in completely different ways. Poofs use one continuous roll, measured between ties. Ruffles and cruffles use cut pieces, so you count ties, pieces per tie, and piece length — then do simple math before you cut anything.
Mesh yardage planner for cut-piece methods
| Pieces per tie | Piece length | 18 ties need | Total mesh length |
|---|---|---|---|
| 2 pieces | 10 inches | 36 pieces | 360 inches = 10 yards |
| 3 pieces | 10 inches | 54 pieces | 540 inches = 15 yards |
| 2 pieces | 20 inches | 36 pieces | 720 inches = 20 yards |
The working example Sports Wreath Shop uses is the two-pieces-per-tie plan above: a frame with 18 ties, two 10-inch pieces per tie, uses 10 yards of mesh in theory. In practice, buy more than the math says — test pieces and a mistake or two are normal.
For the poof method, plan on one full 21-inch by 10-yard roll for a standard frame, and expect to use most of it on a full, two-ring wreath. For a second base color, buy a second roll rather than stretching one roll thin — thin poofs are the main cause of a sparse-looking wreath.
Step 1: Set Up the Frame and Ties
Every method starts the same way, and ten minutes here saves an hour of fixing later.
- Open all the ties. On a work form, stand every pipe-cleaner tie straight up so the openings are ready. On a plain frame, twist pipe cleaners around the frame at even intervals on both rings first.
- Count your ties. Write the number down — your mesh math, ribbon count, and color pattern all depend on it.
- Choose your starting tie and mark it with a scrap of ribbon. On a round frame it is easy to lose track of where you began and double-fill one section.
- Plan your color pattern before the first cut. Decide whether colors alternate tie by tie, cluster in sections, or run as a single color base with a second color only in ribbon. Decide now, not halfway around.
Method 1: The Poof Method (Best First Technique)
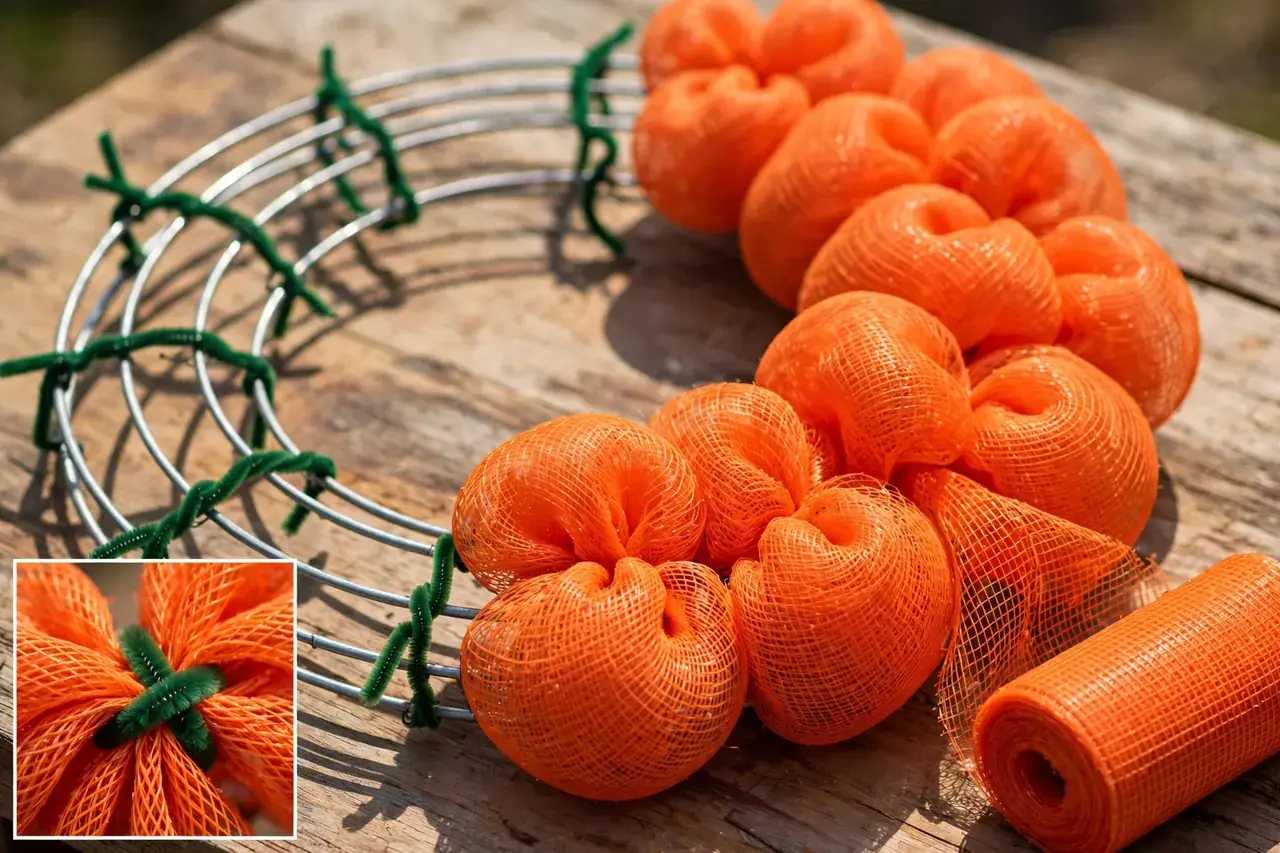
The poof method builds the wreath from one uncut roll of wide mesh. You anchor the end of the roll, measure a length of mesh, gather it into the next tie, and repeat. Each gathered section balloons into a rounded loop — the poof. It is the fastest method, uses the fewest cuts (so the fewest frayed edges), and makes the full base that most signs and big bows are designed to sit on.
- Anchor the roll end. Gather the end of the 21-inch mesh into a bunch and twist it firmly into your starting tie on the outer ring. Fold the raw end under first so it does not stick out later.
- Measure your first poof. Pull the mesh along the frame and measure 10 to 12 inches of length to the next tie. Measure every poof, at least until your eye learns the length — consistency is everything here.
- Gather and secure. Pinch the mesh together at the measured point, lay the gather into the next tie, and twist the tie closed tightly — several firm twists, not one loose one.
- Work around the outer ring the same way, puffing each loop upward as you go so the poofs stand instead of lying flat.
- Move to the inner ring. At the last outer tie, draw the mesh across to the nearest inner tie without a poof, secure it, then continue around the inner ring with slightly smaller poofs — about 10 inches.
- Finish the tail. Cut the mesh from the roll, tuck the end into the back of the wreath, and secure it into a tie so no raw edge faces forward.
Method 2: The Ruffle Method (Soft, Wavy Layers)
Ruffles are individual cut pieces of mesh, scrunched from end to end so the center pinches tight and both edges fan open like a bow tie. The look is softer and more layered than poofs, and because each piece is separate, ruffles are the easiest way to mix two or three colors evenly.
- Cut your pieces. From 10-inch-wide mesh, cut pieces about 10 inches long. Cut all of them before you start attaching, and keep colors in separate piles.
- Lay one piece flat with the natural curl facing the way the mesh wants to roll — fighting the curl makes pieces spring out of your hand.
- Scrunch down the center. Starting at one cut edge, walk your fingers along the middle of the piece, gathering the mesh into tight folds until you reach the other edge. You end up holding a pinched waist with two open, wavy fans on either side.
- Clip or hold the center while you pick up the next piece, if you are stacking two pieces in one tie. Many makers hold the first ruffle loosely in the tie, add the second, then twist once for both.
- Attach at each tie, working around the outer ring first, then the inner. Stand each ruffle upright as you place it, so the fans face forward instead of lying flat against the frame.
The ruffle method’s one weakness is its cut edges: every piece has two, and they are the parts most likely to fray or stick out. That weakness is exactly what the next method was invented to fix.
Method 3: The Cruffle Method (Ruffle Volume, Tidy Edges)
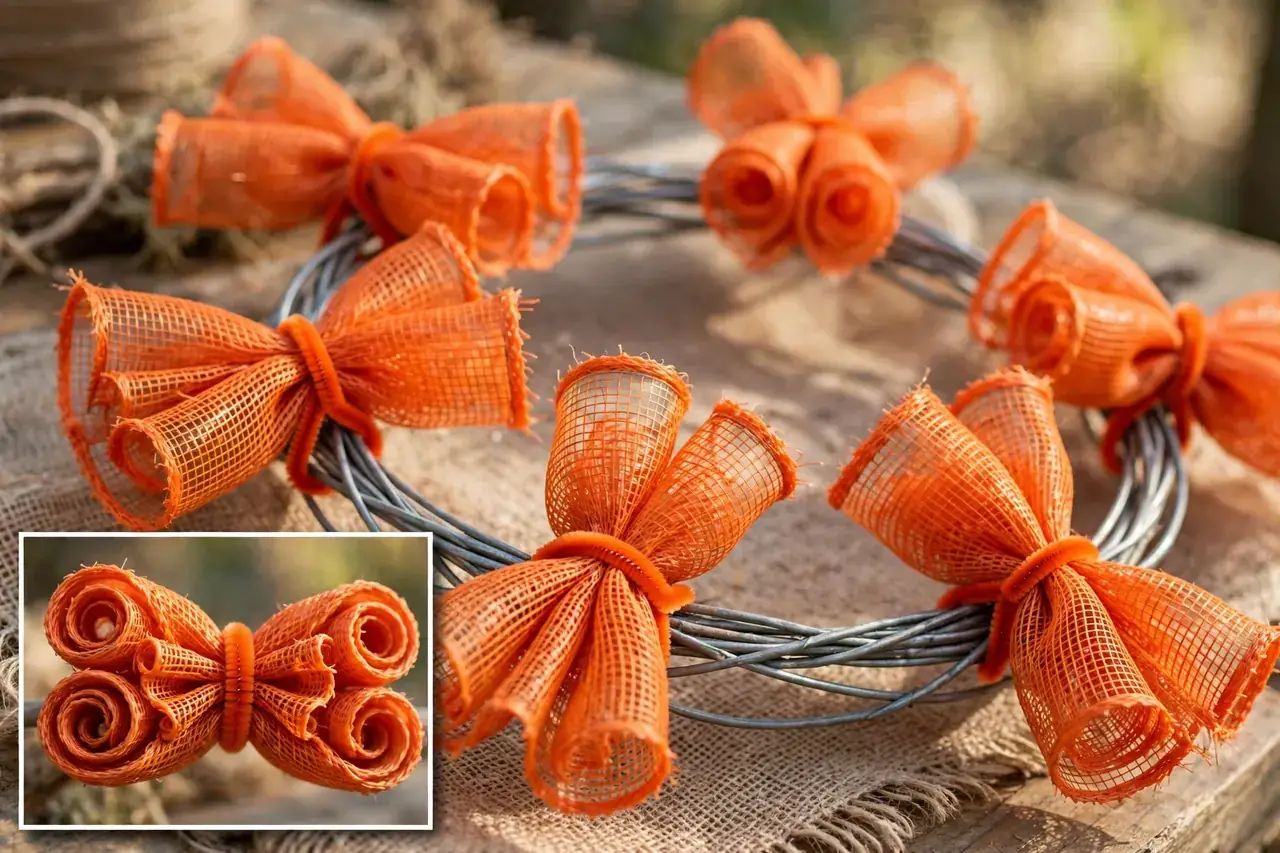
A cruffle is a cross between a curl and a ruffle. You roll both cut ends of a mesh piece inward so the raw edges disappear inside the rolls, then gather the open middle into a ruffle. The result has a ruffle’s wavy fullness with a curl’s neat, finished ends.
- Cut one test piece first. Cruffles use longer pieces than plain ruffles — start with 10-inch-wide mesh around 20 to 30 inches long, and adjust after you see how your mesh behaves. Stiff mesh rolls tighter; soft mesh needs more length.
- Roll the first end inward. Lay the piece flat and roll one cut end toward the center several turns, until the raw edge is completely hidden inside the roll. Hold it with a clip or your thumb.
- Roll the opposite end the same way, keeping both rolls snug.
- Gather the open center into a soft ruffle by scrunching the unrolled middle together, without pulling the rolled ends loose.
- Pinch the middle and attach it into a frame tie, twisting firmly. Angle the two rolled ends outward like wings.
- Repeat around the frame, keeping pieces a consistent size — measure them instead of eyeballing, or one long cruffle will dominate its section.
Because each cruffle takes longer than a plain ruffle, this method suits wreaths where the finish matters — a front-door wreath you will see daily. The same gathered base also carries any theme, from everyday colors to the themed assembly in our guide on how to make a Halloween wreath.
How to Cut Deco Mesh Without Fraying
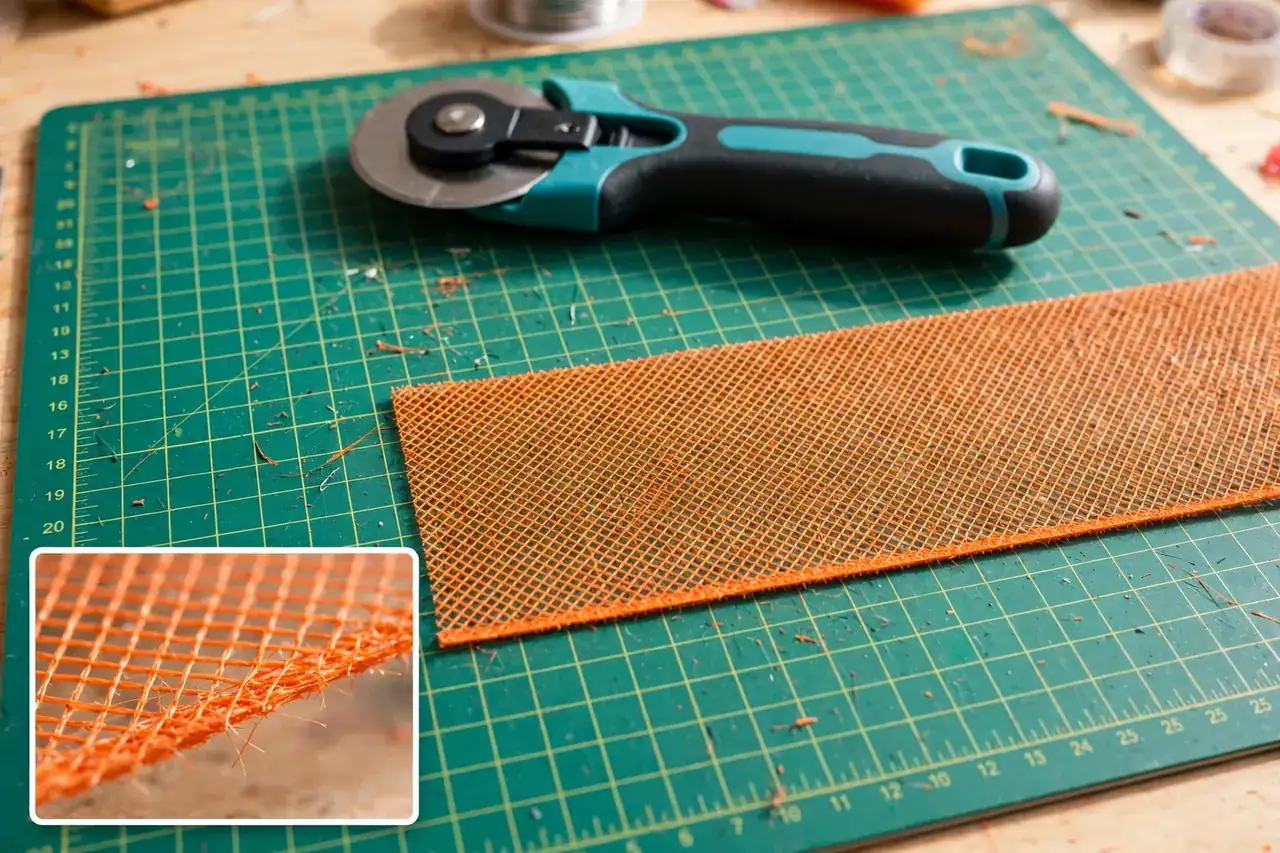
Deco mesh frays. That is not a defect in your roll; the woven synthetic strands simply have nothing holding them once cut, and most mesh will shed a little no matter what you do. The goal is to keep fraying small and hidden, not to eliminate it.
- Use a rotary cutter and mat if you have them. A rolling blade slices the weave cleanly in one pass, while scissors saw at it and loosen more strands. If you use scissors, choose sharp ones and cut in long strokes.
- Cut on the roll’s natural grid. The weave runs in straight lines; cutting along a line of the weave, instead of across it at an angle, leaves fewer loose ends.
- Handle cut edges as little as possible. Every pull at a loose strand unravels it further. If a strand sticks out, trim it flush rather than pulling it.
- Hide the edges by design. This is the real secret: fold the end under in the poof method, roll it inside in the cruffle method, and tuck tails to the back of the frame. A technique that conceals edges beats any product sprayed on them.
- Work over a hard floor or a sheet and shake the finished wreath outdoors before hanging it. Loose clippings get everywhere.
A caution about a shortcut you will see online: some makers pass a flame along cut edges to melt them. Mesh is synthetic plastic; it can melt unpredictably or catch, and the fumes are unpleasant. For a beginner project, the roll-and-tuck methods above solve the same problem with no flame at all.
Adding Ribbon Tails and a Bow
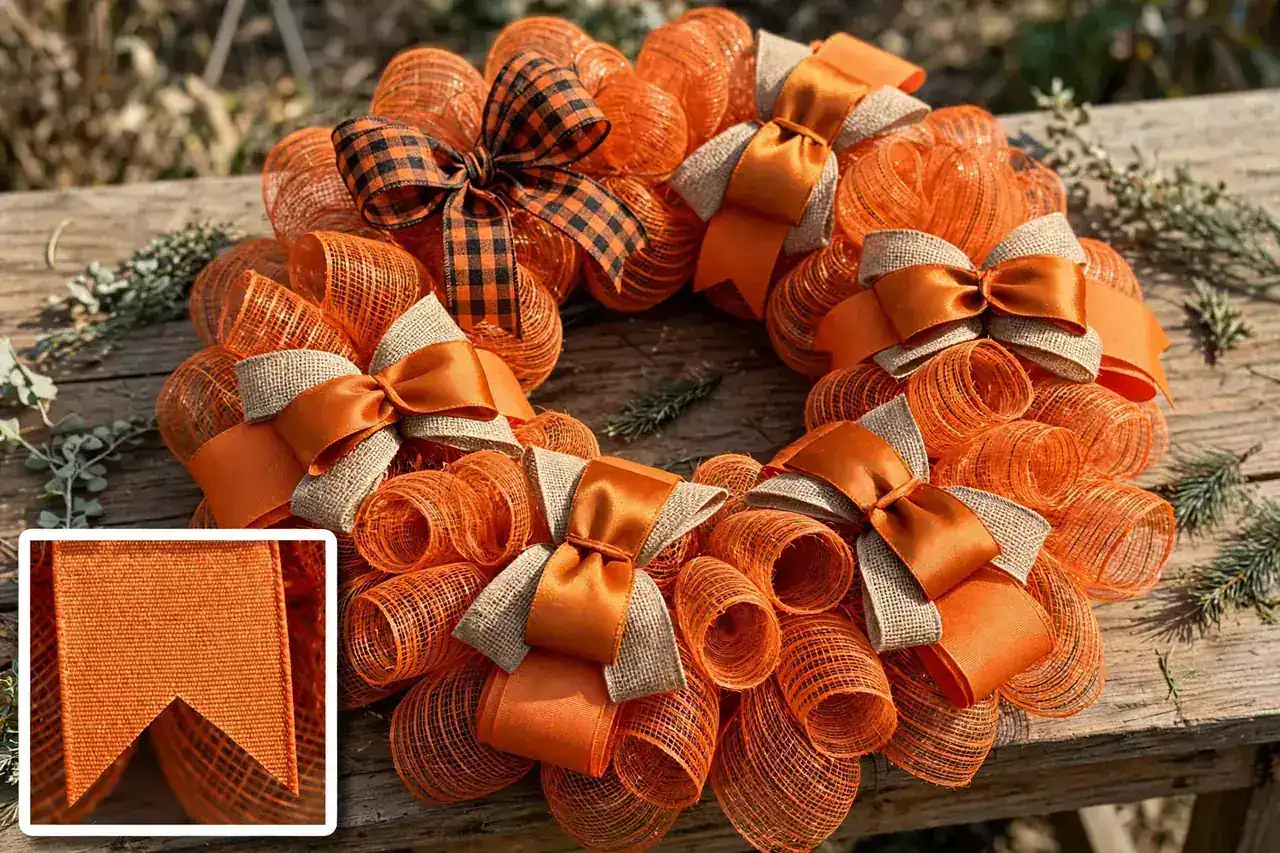
Ribbon is what turns a mesh base into a designed wreath. Wired ribbon holds its shape, so tails stay where you put them and bow loops do not collapse. Tails also do quiet repair work: one placed at a thin spot covers the gap better than forcing in more mesh.
- Cut your tails. Cut 1.5-inch and 2.5-inch wired ribbon into tails of about 12 to 14 inches. Cut enough for one bundle per tie, or one bundle in every other tie for a lighter look.
- Dovetail the ends. Fold the last inch of each tail in half lengthwise and cut upward at an angle from the fold to the corner. Opened flat, the end shows a neat V notch.
- Build a bundle. Stack two or three tails in an X, with the widest ribbon at the bottom, and pinch them together at the center.
- Attach the bundle into a tie. Lay the pinched center in an open tie — or open a tie that already holds mesh, slide the bundle in beside it, and re-twist.
- Add one bow as the focal point. A single bow placed off-center, at about the 7 o’clock or 11 o’clock position, looks more designed than one parked at the top. Wire it to the frame itself, not just to mesh, so its weight never sags.
- Attach signs and picks to the frame the same way. Anything with real weight needs its wire wrapped around frame wire; mesh alone will not hold it.
Step back after every few bundles and check the color balance from a distance. Ribbon that looks evenly spread at arm’s length can cluster when you see the whole circle, and a bundle is much easier to move now than after the bow is wired on.
Fluffing, Fixing Gaps and Hanging Your Wreath
The last ten minutes decide whether the wreath looks handmade in the good way. Hang it on a hook at eye level before you start — a wreath always looks fuller lying flat, and gravity shows you the thin spots honestly.
- Open every poof and ruffle with your fingers, pulling the loops gently outward and upward. Mesh compressed in ties relaxes into shape once teased open.
- Fill true gaps with one extra ruffle or a ribbon bundle, attached at the nearest tie — not by dragging neighboring mesh sideways, which just moves the gap.
- Check the back. Trim pipe cleaner ends that poke out, bend sharp wire tips flat against the frame, and make sure nothing scratchy will rub your door.
- Hang it from the frame with a wreath hanger or a loop of floral wire, never by a mesh loop, which stretches and tilts under the weight.
On a covered porch, a poly mesh wreath handles weather well; on a fully exposed door, expect sun to fade bright colors over a season or two, and store the wreath indoors in a box large enough that the mesh is not crushed. Dressing the whole entrance, not just the door? Our outside Halloween decorating ideas show how a wreath works as one zone of a bigger display.
Troubleshooting: Flat, Messy or Lopsided Wreaths
Almost every disappointing first wreath fails in one of five predictable ways, and all five can be fixed without starting over.
Common mesh wreath problems and fixes
| Problem | Usual cause | Fix |
|---|---|---|
| Wreath looks flat | Poofs measured too long, or mesh pulled tight instead of gathered | Shorten poofs to 10–12 inches and fluff each loop open by hand |
| Frame shows through | Too few pieces per tie, or only the outer ring was filled | Add a ruffle or ribbon bundle at the bare ties; always fill the inner ring too |
| Frayed, messy edges everywhere | Dull scissors, over-handled cut ends, edges left facing forward | Trim stray strands flush, tuck edges to the back, or switch to the cruffle method |
| One side looks heavier | Color pattern drifted, or poof sizes grew as you worked | Measure every piece; move one or two ribbon bundles to the light side |
| Pieces slip or fall out | Ties twisted only once, or stems not wrapped around frame wire | Re-twist ties firmly several turns and trim the ends |
If your wreath has two problems at once, fix fullness first and color balance second — a full wreath with slightly uneven color still reads as cheerful; a thin one never does.
Related Guides
- How to Make a Halloween Wreath — put these mesh techniques to work in a themed black-and-orange design.
- DIY Scary Halloween Decorations — the eerie lighting and silhouette effects that pair with a mesh wreath on the door.
- Easy Halloween Crafts — more simple projects in the same sit-down crafting style.
- How to Dry Flowers at Home — dried stems and seed heads make natural, lightweight additions tucked into a mesh wreath.
Frequently Asked Questions
What is the easiest way to use deco mesh in a wreath?
The poof method is the easiest starting point. It uses one continuous 21-inch roll, so there is almost no cutting and very few raw edges. Anchor the end in a tie, measure 10 to 12 inches, gather, twist, and repeat around both rings.
Is 10-inch or 21-inch deco mesh better?
Neither is always better; they suit different techniques. Ten-inch mesh is the convenient width for cut-piece methods like ruffles and cruffles. Twenty-one-inch mesh is the popular choice for poofs, where its width makes big, full loops that cover a frame quickly.
How many rolls of mesh do you need for a wreath?
It depends on the frame size and method. For cut pieces, do the math first: 18 ties with two 10-inch pieces per tie uses 360 inches, exactly 10 yards, so buy a spare roll. For poofs, one 21-inch by 10-yard roll covers a standard frame.
How do you prevent deco mesh from fraying?
You cannot stop it completely, but you can keep it minor and invisible. Cut with a rotary cutter or sharp scissors along the weave, handle cut edges as little as possible, and never pull loose strands — trim them flush. Then hide edges by design: folded under in poofs, rolled inside cruffles.
What is a cruffle in deco mesh wreath making?
A cruffle is a mesh piece with both cut ends rolled inward and the open center gathered into a ruffle. The rolls hide the raw, fray-prone edges while the gathered middle keeps a ruffle’s wavy volume. Makers often choose cruffles for wreaths they sell or gift.
Can you combine poofs and ruffles in one wreath?
Yes, and many full wreaths are built exactly that way. Make a poof base first for round, even coverage, then add ruffles or cruffles at selected ties for extra texture, a second color, or to fill a thin spot. Ribbon tails go in last, over the combined base.
You now know the three core techniques every mesh wreath is built from. Start with the poof method, keep your measurements consistent, and by your second wreath the cruffle’s tidy finish will feel easy too. Change only the colors and ribbon, and the same skills carry you through every season.