A damp patch on the basement wall doesn’t announce itself as a major problem. It usually shows up as a faint stain, a musty smell, or a thin layer of white powder on the concrete. And then, slowly, it gets worse.
Water in a basement rarely fixes itself. The longer it sits, the more damage it quietly does — to your foundation, your air quality, and eventually your wallet. The good news is that once you understand how water is actually getting in and which method fits your specific situation, solving it becomes much more straightforward.
This guide covers every basement waterproofing method honestly — what each one does, when it works, what it costs, and what most other articles skip entirely.
The Short Answer
Waterproofing a basement means applying methods — from interior sealants to exterior drainage systems — that prevent water intrusion through foundation walls and floors, protecting the home from moisture damage, mold growth, and structural deterioration.
Dwellify Home
At Dwellify Home, we help homeowners make practical, well-informed decisions about their homes — from foundational maintenance to everyday living spaces. Our content is written to cut through the noise, giving you clear, honest guidance you can actually use — without hype, without guesswork.
Why a Wet Basement Is a Bigger Problem Than It Looks
What Moisture Does to Your Foundation Over Time
Concrete looks solid, but it’s porous. Water moves through it constantly — slowly, steadily, and without much visible warning. Over years, that moisture weakens the material, accelerates freeze-thaw cracking in colder climates, and feeds the white powdery deposits known as efflorescence, which are a clear sign that water is actively moving through your wall.
More seriously, water-saturated soil pressing against your foundation generates hydrostatic pressure. That pressure doesn’t just create damp walls — it physically cracks them over time. Foundation wall cracks from sustained hydrostatic pressure are not cosmetic issues. Left alone, they widen and worsen every season.
Mold, Air Quality, and the Health Risk Most Homeowners Underestimate
Here’s something a lot of homeowners don’t think about: your basement is not sealed off from the rest of your home. Air naturally moves upward through a house — what’s called the stack effect — which means whatever is in your basement air eventually makes its way into your living space.
A damp, moldy basement pushes mold spores, musty odors, and elevated humidity into every room above it. For anyone with allergies, asthma, or respiratory sensitivities, this isn’t a future concern — it’s an active one.
How a Damp Basement Affects Your Home’s Value
When a home inspector walks into a basement and finds water stains, efflorescence, or active moisture, it gets flagged in the report. Buyers notice it. Many walk away. Those who don’t will negotiate hard — often asking for a larger price reduction than a proper waterproofing job would have cost in the first place.
A dry, properly waterproofed basement is something buyers expect. A wet one is something they discount aggressively, and rightly so.
Quick Comparison Table — Basement Waterproofing Methods at a Glance
| Method | Best For | DIY-Friendly | Avg. Cost | Longevity |
| Interior Masonry Coating | Minor vapor/seepage on sound concrete | Yes | $30–$300 | 5–10 years |
| Interior Drainage System | Ongoing water intrusion, no exterior access | No | $3,000–$8,000 | 20–30 years |
| Sump Pump Installation | Water collected by drainage system | Partial | $600–$2,000 | 10–15 years |
| Exterior Waterproofing | Chronic flooding, high water table, wall damage | No | $8,000–$25,000+ | 25+ years |
| Crack Injection (Epoxy/Hydraulic) | Localized cracks, active leaks | Yes | $50–$150 | 10–20 years |
Key Benefits of Waterproofing a Basement
- Prevents mold and mildew growth that affects both the basement and the air quality in rooms above it
- Protects the structural integrity of foundation walls against long-term hydrostatic pressure damage
- Reduces energy costs by stabilizing basement humidity — your HVAC works less to compensate
- Increases usable living space by making the basement safe, dry, and finishable
- Supports home resale value — a documented waterproofed basement is a concrete selling point
- Stops small problems from compounding into expensive structural repairs over time
How Water Gets Into Your Basement
Hydrostatic Pressure — The Root Cause Most Homeowners Never Hear About
Hydrostatic pressure builds when the soil surrounding your foundation becomes saturated — from heavy rain, snowmelt, or a naturally high water table. That saturated soil has nowhere to direct the pressure except inward, against your foundation walls and floor.
It doesn’t need a large crack to get through. Concrete is porous enough that hydrostatic pressure will force moisture through the material itself, not just through visible gaps. This is why simply painting the inside of the wall doesn’t solve the problem for many homeowners.
Poor Yard Grading and Water Pooling Around the Foundation
The ground around your home should slope away from the foundation — at least six inches of drop over the first ten feet. When it doesn’t, rainwater collects right against your basement walls instead of draining away from them.
This is one of the most commonly overlooked causes of basement moisture, and one of the least expensive to fix.
Clogged Gutters and Short Downspouts
A clogged gutter overflows and dumps water along the side of your home, directly into the soil beside the foundation. A downspout that terminates two feet from the house does almost the same damage at a slower pace.
Downspout extensions should carry water at least six feet away from the foundation. This single fix has resolved chronic moisture problems for more homeowners than any amount of wall sealant — because it addresses the source rather than the symptom.
Cracks in Foundation Walls and Floors
Vertical cracks in poured concrete walls typically form during the curing process and don’t necessarily threaten structural integrity, but they are open pathways for water. Horizontal cracks are more serious — they indicate lateral soil pressure on the wall and need professional assessment promptly.
The joint where the floor meets the wall — called the cove — is a particularly common entry point that gets missed in most DIY waterproofing attempts.
Leaking Window Wells and Basement Windows
Window wells fill with water when drainage at their base is blocked or absent. Once water pools there, it finds its way through the window frame, around the seal, or through the block wall below.
A properly installed window well drain — connected to a gravel bed or tied into an interior drainage system — prevents this almost entirely.
Condensation from Indoor Humidity — When It’s Not Actually a Leak
Not all moisture comes from outside. During warm months, humid air enters the basement through windows, doors, or gaps, then condenses on the cooler concrete surfaces. The result looks exactly like a seepage problem but has a completely different cause and a completely different fix.
Applying waterproof coatings over a condensation problem doesn’t help. You need humidity control and ventilation instead.
Diagnose the Problem Before You Pick a Solution
Skipping diagnosis is the single most common and expensive mistake in basement waterproofing. The method that works for condensation will fail on hydrostatic seepage — and the method right for seepage is a waste of money if your issue is condensation.
The Aluminum Foil Test — How to Tell If It’s Seepage or Condensation
Tape a 12-inch square of aluminum foil tightly to a damp wall area, sealing all four edges with duct tape. Leave it for 24 hours, then check both sides.
If the moisture is on the outer face of the foil — the room side — it’s condensation from humid air in the basement. If the moisture is behind the foil, between the foil and the wall, water is seeping through from the outside. The fix for each is fundamentally different, and this test reliably tells you which you’re dealing with.
Signs on Your Walls and Floor That Point to a Serious Issue
- Horizontal cracks or visible bowing in block or poured walls — potential structural failure, get a professional involved before anything else
- Efflorescence (white powdery deposits) — confirms active water movement through the wall material itself
- Dark staining at the wall-floor joint — the cove is leaking and needs targeted attention
- Rust stains appearing below windows — water is entering around the frame, not through the wall
- Recurring damp patches appearing only during or after heavy rain — likely hydrostatic pressure building outside
When Interior Methods Won’t Be Enough
Interior waterproofing manages water after it enters or approaches the wall surface. It doesn’t stop the source. For minor seepage through otherwise sound concrete, interior methods work reliably well.
But when the source is heavily saturated soil, poor grading, a high seasonal water table, or significant wall damage, interior-only solutions address the symptom and leave the cause in place. In those cases, the problem typically returns — often worse than before.
The 4 Main Basement Waterproofing Methods — Explained Honestly
Method 1 — Interior Sealants and Waterproof Coatings
Products like DRYLOK Extreme and BEHR Premium Basement Waterproofer bond to the interior face of concrete walls, creating a moisture-resistant barrier that resists vapor transmission and minor seepage through porous material.
They work well when the issue is low-level moisture moving through sound, undamaged concrete. They do not fix structural cracks, stop active leaks, or overcome significant hydrostatic pressure. Applying them over a problem that’s beyond their design scope leads to the coating peeling off the wall — not because the product is poor, but because it’s being asked to do something it was never built for.
Method 2 — Interior Drainage Systems and Perimeter Channels
A perimeter drainage channel is installed beneath the basement floor, running along the interior edges of the foundation. It doesn’t stop water from entering through the wall — it intercepts water before it reaches the floor and channels it toward a sump pit.
This is a significant installation that requires cutting the concrete slab, but it’s highly effective for ongoing water intrusion where exterior access isn’t practical. It manages the water rather than stopping it at the source, which is why it’s almost always paired with a sump pump.
Method 3 — Sump Pump Installation
A sump pump sits in a pit at the lowest point of the basement and automatically expels water collected by the drainage system. It’s not a standalone fix — it needs a drainage network feeding water to the pit.
What most homeowners underestimate: battery backup. A sump pump running on grid power alone will fail during the exact storm that produces the flooding. A battery backup system is not an optional upgrade — it’s a core part of any functional waterproofing setup.
Method 4 — Exterior Waterproofing and Foundation Membranes
Exterior waterproofing addresses water before it ever reaches the foundation wall. The process involves excavating around the perimeter of the home down to the footing, applying a waterproof membrane or liquid-applied coating to the cleaned exterior wall surface, installing drainage board against the membrane, and adding a gravel bed with a perforated drain pipe at the footing level.
It’s the most thorough, longest-lasting solution available. It’s also the most disruptive and the most expensive. For homes with chronic water problems, high water tables, or failing original exterior coatings, it often represents the only method that produces genuinely lasting results.
How to Waterproof Basement Walls from the Inside — Step by Step
Step 1 — Clear the Space and Remove All Standing Water
Before anything touches the walls, every surface needs to be completely dry. Use a wet/dry vacuum for standing water, then run fans and a dehumidifier for 24 to 48 hours minimum.
Any moisture hiding behind stored items or under floor coverings will interfere with surface prep and product adhesion. Move everything out before starting.
Step 2 — Clean the Walls and Deal with Efflorescence
Scrub the walls thoroughly with a stiff wire brush to remove loose material, dirt, and debris. Efflorescence — the white powdery deposits — must come off completely before any coating goes on.
It acts as a barrier between the wall surface and the waterproofing product, and if it remains, the coating won’t bond properly and will eventually peel. DRYLOK Etch is effective for efflorescence removal and is safer to handle than muriatic acid alternatives.
Step 3 — Repair Cracks with Hydraulic Cement or Epoxy Injection
For cracks that are damp but not actively flowing, use a polyurethane or epoxy injection kit. These materials penetrate through the full depth of the crack and expand as they cure, creating a waterproof seal that’s structural rather than just surface-level.
For active leaks with water visibly coming through, hydraulic cement is the right tool. It sets in three to five minutes and can stop a running leak mid-flow. Work quickly and mix only small amounts at a time — it doesn’t wait for you.
Step 4 — Seal Window Joints, Door Frames, and Wall Coves
The cove — the joint where the wall meets the floor — is a primary entry point in the majority of wet basements. Fill it with hydraulic cement or a purpose-made cove sealant before applying any wall coating. Repeat the process around window frames and any pipe or utility penetrations.
These joints are precisely where most DIY waterproofing jobs fall short. The wall gets coated, but the floor joint stays open, and water continues to enter exactly where it always did.
Step 5 — Apply Waterproof Masonry Coating in Two Full Coats
Use a masonry brush or thick-nap roller to work the first coat into the wall surface, pressing the product into any remaining pores in the concrete. Let it dry fully per the manufacturer’s directions.
Apply the second coat in the opposite direction to the first. Two coats aren’t optional — a single coat leaves micro-gaps in coverage that moisture will eventually locate and exploit.
How to Waterproof a Basement from the Outside
When Exterior Waterproofing Is the Only Lasting Fix
When a basement has chronic flooding, a seasonally high water table, significant structural wall cracks, or when interior solutions have already been tried and failed, exterior waterproofing is the appropriate response.
It’s also the smartest choice for new construction — installed before the foundation is backfilled, it costs a fraction of what remediation costs later.
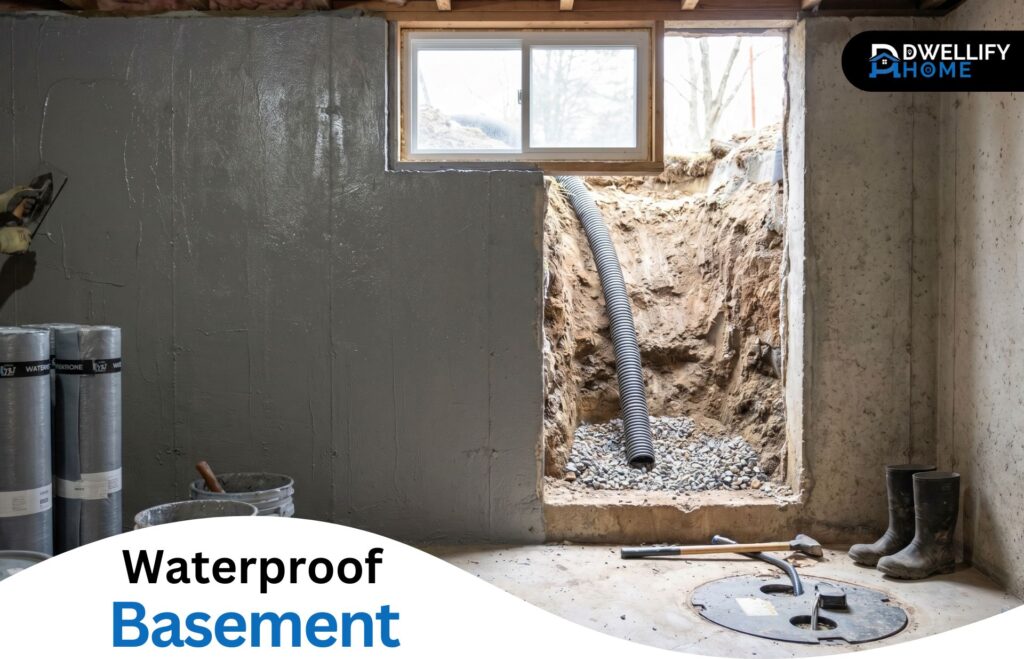
What the Exterior Waterproofing Process Actually Involves
The process begins with excavation — digging down to the footing along the exterior walls of the foundation. The exposed concrete is cleaned, any existing failing coatings are removed, and cracks are repaired before waterproofing begins.
A waterproof membrane — either sheet-applied or liquid-applied — then goes on the clean foundation surface. This is a substantial project involving excavation equipment, disruption to landscaping, and professional installation. Plan accordingly.
Foundation Membranes, Dimple Board, and Drainage Board — What Each One Does
The waterproof membrane stops water from contacting the concrete directly. The dimple board — a plastic sheet with raised dimple patterns — installed over the membrane creates an air gap between the soil and the membrane. This allows water to drain downward along the wall rather than pressing against it under hydrostatic pressure.
Together, these two layers do what interior coatings alone cannot: they stop water at the point of contact with soil, before it reaches the wall at all.
Exterior French Drains and Managing Groundwater at the Source
At the base of the excavation, a perforated drain pipe embedded in clean gravel collects groundwater before it can build up against the footing. This pipe routes water away from the foundation — either to daylight at a lower elevation or to an interior sump pit.
This combination — membrane, drainage board, and footing drain — is the most complete waterproofing system available. When installed correctly, it reliably manages even high-water-table situations over the long term.
Choosing the Right Waterproofing Products
What Waterproof Basement Paint Can — and Cannot — Do
Waterproof basement paint bonds to concrete and creates a moisture-resistant barrier suitable for minor vapor transmission through sound, undamaged walls. Applied correctly to properly prepared surfaces, it keeps low-level humidity from passing through and provides a cleanable, finished surface.
It is not a fix for active leaks, meaningful cracks, or walls with ongoing hydrostatic pressure behind them. In those situations, the coating will fail — peeling, bubbling, or cracking — not because the product is defective, but because the underlying pressure exceeds what any surface coating is designed to resist.
DRYLOK Extreme vs. BEHR Premium Waterproofer — A Straight Comparison
Both are reliable products for interior masonry waterproofing applications. DRYLOK Extreme is rated to resist up to 15 PSI of hydrostatic pressure and carries a 15-year manufacturer’s warranty. BEHR Premium uses NanoGuard technology that penetrates into porous concrete and masonry block surfaces and performs well across a range of substrate conditions.
The practical difference for most DIY applications is modest. DRYLOK has a longer established track record and broader retail availability. BEHR tends to apply more smoothly. Either one will perform as expected on properly cleaned and prepared surfaces — the prep work matters more than the brand choice.
Hydraulic Cement vs. Epoxy Injection — Which One for Which Crack
Use hydraulic cement when water is actively flowing or seeping through a crack at the time of repair. It sets in minutes and stops running leaks in wet conditions where other materials won’t cure.
Use epoxy or polyurethane injection for cracks that are dry or damp but not actively flowing. These materials penetrate through the full depth of the wall and cure into a structural bond — more durable and comprehensive than hydraulic cement for static crack conditions.
Don’t use epoxy on a wet, actively leaking crack. The presence of water prevents proper curing, and the repair will fail.
Interior Drainage Channels vs. Traditional French Drains
Traditional exterior French drains sit in soil and are susceptible to clogging over time as fine particles infiltrate the gravel bed and the pipe. Interior perimeter drainage channels, installed beneath the concrete slab inside the basement, don’t share this vulnerability — they sit in a controlled environment away from soil intrusion.
For existing homes where exterior excavation is impractical or cost-prohibitive, interior drainage is the more reliable long-term solution for managing ongoing water intrusion.
Does Your Foundation Type Change the Approach?
Poured Concrete Walls — The Most Straightforward to Seal
Poured concrete is dense and relatively uniform in composition. Cracks tend to be vertical and concentrated at specific locations such as window corners or tie-rod holes. Interior masonry coatings bond well to clean poured concrete, and epoxy injection repairs hold reliably in this material.
This is the foundation type where a careful, well-prepared DIY approach has the strongest chance of producing lasting results.
Concrete Block Walls — Why They Absorb More Water and Need a Different Method
Concrete block — or CMU — walls are hollow. Each individual block is a potential water reservoir. When hydrostatic pressure builds outside, water fills the cores of the blocks and seeps through the mortar joints between them.
Interior coatings can be applied to block walls, but they must fully penetrate the mortar joints. Any coverage gap at a joint allows water to travel behind the sealed surface undetected. For block walls with recurring moisture problems, an interior drainage channel system is often more dependable than surface coatings alone.
Stone and Brick Foundations in Older Homes — Handle with Extra Care
Old stone and brick foundations were built without modern waterproofing principles. The lime-based mortar holding them together is often soft, partially eroded, and breathable by design. Applying rigid modern coatings or epoxy products to these walls can trap moisture inside the wall mass and accelerate deterioration of the very material you’re trying to protect.
If your home has a historic stone or brick foundation, consult a specialist with experience in historic masonry before applying any product. The approach for a century-old stone foundation is genuinely different from what works on modern poured concrete.
How Much Does It Cost to Waterproof a Basement?
DIY Waterproofing — Realistic Material Costs by Method
- Waterproof masonry coating or paint: $30–$80 per gallon, covering roughly 75 to 100 square feet per coat
- Hydraulic cement: $10–$25 per bag
- Epoxy or polyurethane crack injection kit: $50–$150 depending on crack length and kit size
- Basic sump pump: $150–$400; with battery backup system: $400–$800
- Interior perimeter drainage channel materials (DIY-sourced): $500–$1,500 for a typical full basement
Professional Waterproofing — What Affects the Final Price
The national average for professional basement waterproofing runs between $3,000 and $10,000. Full exterior excavation with membrane installation ranges from $8,000 to $25,000 or more, depending on home size, foundation depth, soil conditions, and site access.
Clay soil significantly increases cost — it holds water longer and requires more robust drainage design. Utility relocations, landscaping restoration, and limited access around the foundation perimeter also push prices higher.
Cost by Method: From a $30 Sealant to Full Exterior Excavation
| Method | Typical Cost Range |
| Interior masonry coating (DIY) | $30–$300 |
| Crack injection repair (DIY kit) | $50–$150 |
| Sump pump installation (professional) | $600–$2,000 |
| Interior drainage system (professional) | $3,000–$8,000 |
| Exterior waterproofing with excavation | $8,000–$25,000+ |
How to Get a Fair Quote and Spot a Contractor Overselling You
Get at least three quotes before committing to any professional work. Any contractor who recommends full exterior excavation without first assessing the exterior grading, gutter performance, and whether simpler interior solutions have been attempted is likely pushing toward the most profitable option rather than the most appropriate one.
A trustworthy contractor diagnoses the source of your specific water problem before recommending a solution. If they skip the diagnosis and go directly to the highest-cost method, that’s worth questioning — directly and specifically.
DIY or Hire a Professional — How to Make the Right Call
What a Competent DIYer Can Realistically Handle
- Cleaning and applying waterproof masonry coating to interior walls
- Filling small cracks (under 1/4 inch wide) with hydraulic cement or polyurethane caulk
- Improving yard grading and extending downspouts away from the foundation
- Installing a replacement sump pump in an existing pit
- Sealing window frames, door frames, and the wall-floor cove joint
These tasks are within reach for a homeowner comfortable with basic tools and willing to do thorough surface preparation.
Situations That Should Always Go to a Professional
- Horizontal wall cracks or visible wall bowing in any direction
- Active water intrusion that continues between rain events, not just during them
- Interior drainage system installation, which requires cutting the concrete slab
- Full exterior excavation and membrane application
- Any signs of foundation settlement, sinking, or structural movement
These aren’t difficulty levels — they’re situations where the wrong approach can make the problem significantly more expensive to fix than it would have been with professional help from the start.
What a Good Waterproofing Warranty Should Cover
A professional waterproofing warranty should cover the system against water intrusion — not just the materials used. Warranties that cover only product failure, not system performance, offer limited real-world protection.
The best professional warranties are also transferable to the next homeowner. This is a genuine selling point when listing the home. Before signing any contract, ask specifically: does this warranty cover water entering the basement, or only the components installed? The answer reveals how confident the contractor actually is in their own work.
The Mistake That Costs Homeowners Thousands — Finishing a Basement Before Waterproofing It
This comes up more than almost any other scenario. A homeowner decides to convert their basement into livable space. They frame the walls, install insulation, hang drywall, lay flooring — maybe add a bathroom. The space looks great. Then the following spring, water gets in behind the finished wall.
By the time the moisture becomes visible on the surface, mold has already been growing inside the wall cavity for weeks. Everything has to come out — framing, insulation, drywall — before waterproofing can even begin. The finished work is lost, and the waterproofing now costs exactly what it would have originally, plus the cost of demolition and complete refinishing.
Always waterproof before you finish. No exceptions. Even if the basement has been dry for years, that doesn’t mean conditions haven’t changed — shifting water tables, new construction nearby, changes in drainage on neighboring lots, and aging foundation coatings can all alter what was once a dry space into a wet one without much warning.
How to Keep Your Basement Dry After Waterproofing
A Seasonal Maintenance Checklist Every Homeowner Should Follow
Spring: Walk the foundation perimeter after the ground thaws and check for new cracks or soil settlement. Inspect gutters and confirm all downspout extensions are directing water away from the foundation. Check the basement interior after the first heavy rain.
Summer: Monitor indoor humidity. If relative humidity in the basement exceeds 60 percent, run a dehumidifier continuously. Check that window well covers are in place and that drains aren’t blocked by debris.
Fall: Clean gutters before peak leaf season. Test the sump pump before the wet season begins. Confirm that the ground grade around the foundation hasn’t shifted or settled during dry summer months.
Winter: Watch for snowmelt events — a warm spell after heavy snow is one of the most common triggers for basement water intrusion. Confirm the sump pump runs correctly during thaw events and that the discharge line isn’t frozen.
How to Test Your Sump Pump Before It Fails During a Storm
Pour a bucket of water slowly into the sump pit until the float rises and the pump activates. It should clear the water and shut off cleanly. If it runs continuously, struggles to keep up, or doesn’t activate at all, service or replace it before the next significant rain event.
Test the battery backup separately. Unplug the primary pump and repeat the fill test. If the backup doesn’t engage, the battery needs replacement. Most backup batteries should be replaced every three to five years regardless of apparent condition.
Controlling Basement Humidity — What Level Is Actually Safe
A basement dehumidifier should hold relative humidity consistently between 30 and 50 percent. Above 60 percent, mold begins to establish itself on organic materials — wood framing, cardboard, fabric, and paper products.
For a basement of roughly 1,000 square feet in a humid climate, the dehumidifier should be rated to handle at least 50 pints per day. Undersized units run continuously without meaningfully reducing humidity levels. Match the unit’s rated capacity to your actual square footage and regional climate.
Frequently Asked Questions About Waterproofing a Basement
Is basement waterproofing worth the cost?
Yes, in the large majority of cases. The cost of proactive waterproofing is consistently lower than the cost of the damage it prevents. Foundation repairs, mold remediation, and structural work caused by prolonged water intrusion routinely cost two to five times more than preventive waterproofing. It also protects the home’s resale value and expands usable living space.
How long does basement waterproofing last?
Interior masonry coatings typically last 5 to 10 years before reapplication becomes necessary. Interior drainage systems and sump pumps, when properly maintained, function reliably for 20 to 30 years. Exterior waterproofing membranes installed over properly prepared foundations can last 25 years or more. Longevity depends directly on the quality of installation and ongoing seasonal maintenance.
Can you waterproof a basement that already has active water coming in?
Yes, but the right approach depends on severity and source. Hydraulic cement stops active leaks at crack points immediately. For ongoing intrusion through walls or the floor joint, a professional-installed interior drainage system can manage active water on a permanent basis. Exterior waterproofing remains the most thorough option for serious or recurring situations that interior solutions haven’t resolved.
Does waterproofing a basement increase home value?
More precisely, it prevents the loss of value that water damage causes. A documented, dry, properly waterproofed basement is a clear selling point — buyers and home inspectors both respond positively to it. In markets where older homes with wet basement histories are common, a waterproofed basement is a meaningful and often decisive differentiator.
Is waterproof basement paint a permanent fix — or just a temporary one?
It is not a permanent solution. Waterproof masonry paint is appropriate for minor vapor transmission through sound, undamaged concrete and requires reapplication every 5 to 10 years. Applied over a surface with active hydrostatic pressure behind it, it will fail faster. Think of it as a maintenance layer — useful and legitimate for the right conditions, but not a substitute for addressing the underlying water source.
What is the most effective basement waterproofing method overall?
Exterior waterproofing — excavation, membrane installation, and footing drainage — is the most comprehensive and longest-lasting system because it stops water before it reaches the foundation. For the majority of homeowners dealing with moderate moisture problems, an interior drainage system combined with a properly sized sump pump and battery backup delivers reliable, lasting results at a significantly lower cost and disruption level.
Conclusion
Getting a basement genuinely dry comes down to doing things in the right order. Diagnose first — understand where the water is coming from and why. Then match the solution to the actual problem, not to the most aggressive recommendation you receive or the lowest-cost product on the shelf.
For most homeowners, interior waterproofing combined with smart exterior drainage management handles the problem completely. For more serious situations involving high water tables, chronic flooding, or deteriorating exterior coatings, exterior waterproofing is the right long-term investment.
Whatever method you choose, maintain it. Test the sump pump. Clean the gutters. Monitor the grading after wet seasons. A properly waterproofed basement stays dry because the systems protecting it are kept in working order — not because a single application fixes things forever.
Protect your home’s foundation consistently, and it will hold up for decades. That’s what good waterproofing is really about.
Disclaimer
The content on Dwellify Home is provided for general informational purposes only. While we aim for accuracy and practical relevance, every home, foundation, and moisture situation is different. Results will vary based on individual circumstances, local conditions, and the specific methods or products used. For serious structural concerns or significant water intrusion, we recommend consulting a qualified waterproofing or foundation professional.