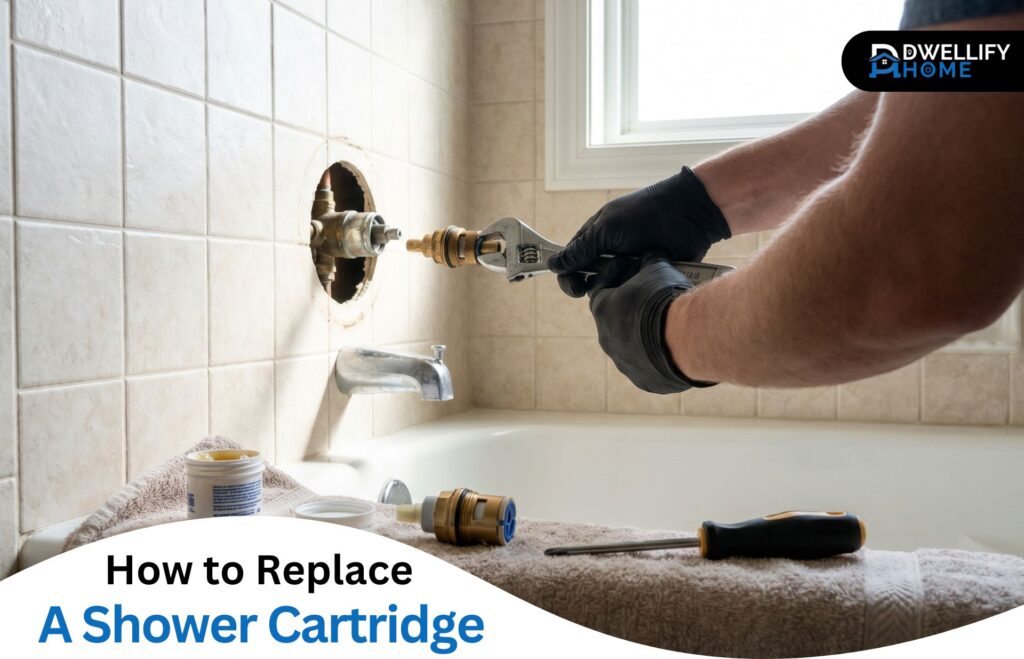
Replacing a shower cartridge is one of those repairs that looks complicated from the outside but turns out to be very manageable once you understand what you’re actually working with. A dripping showerhead, a handle that spins freely without stopping flow, water that runs lukewarm no matter what you do — these are all classic cartridge problems, and in most cases, you can fix them yourself in a couple of hours without calling anyone.
This guide walks you through how to replace a shower cartridge from start to finish — including the parts most tutorials skip, like what to do when the cartridge won’t budge, how to avoid installing it backward, and when the job genuinely needs a licensed plumber.
The Short Answer
Replacing a shower cartridge means removing the worn internal component inside your faucet valve and installing a matching replacement. It fixes dripping, temperature problems, and handle issues — usually in under two hours without professional help.
Dwellify Home
At Dwellify Home, we help homeowners make practical, informed decisions about their living spaces — from everyday repairs to thoughtful design choices. Our goal is to give you clear, honest guidance so you can move forward with confidence, whether you’re picking up a wrench or choosing a finish.
What Is a Shower Cartridge — and What Does It Actually Do?
A shower cartridge is the internal component inside your faucet that controls water flow and temperature. When you turn the handle, you’re moving the cartridge. It regulates how much hot and cold water mixes together and whether water flows at all.
It sits inside the valve body — the fixed piece soldered or threaded into your wall — and it does most of the mechanical work every time someone showers.
Shower Cartridge vs. Shower Valve — They’re Not the Same Thing
This is one of the most common points of confusion, and it leads people to buy the wrong part or describe the wrong problem to a plumber.
The valve body is the permanent brass housing installed inside the wall. You don’t replace it unless something is seriously wrong — like a crack or corrosion damage. The cartridge is the removable insert that fits inside the valve body. That’s what wears out, and that’s what you’re replacing.
When someone says “shower valve cartridge replacement,” they almost always mean the cartridge — not the full valve. Keep that distinction in mind before purchasing anything.
Quick Comparison: Clean vs. Replace Your Shower Cartridge
| Situation | Clean It | Replace It |
| Cartridge under 5 years old | ✓ | — |
| Stiffness from mineral buildup | ✓ | — |
| O-rings worn or cracked | — | ✓ |
| Cartridge over 8–10 years old | — | ✓ |
| Dripping continues after cleaning | — | ✓ |
| Handle spins freely or feels broken | — | ✓ |
Key Things to Know Before You Start
- Always match the replacement cartridge to your exact faucet brand — universal cartridges are unreliable
- Shut off water before removing any part of the handle assembly
- Use silicone plumber’s grease on O-rings — petroleum-based grease damages rubber seals
- Note the cartridge orientation before pulling it out — installing it backward reverses hot and cold
- A cartridge puller tool costs around $10–$20 and makes removal significantly safer
Signs Your Shower Cartridge Needs to Be Replaced
Most cartridges don’t fail suddenly. They give you signals over time, and recognizing them early can save water and prevent bigger damage.
- Constant dripping when the handle is off — the cartridge can no longer fully seal the water flow
- Inconsistent or reversed hot/cold water — the cartridge’s temperature control has worn or shifted
- Low water pressure from the showerhead — internal cartridge wear can restrict flow
- A stiff or spinning handle — the stem inside the cartridge has worn or broken
- Squealing or grinding when turning the handle — worn internal seals or mineral deposits on moving parts
- Leaking from behind the handle or around the trim plate — O-ring failure inside the cartridge
Any one of these is worth investigating. Two or more showing up at the same time and a replacement is almost certainly the right move.
Should You Clean It or Replace It?
Not every cartridge problem requires a full replacement. Sometimes a good cleaning buys you another year or two, and it’s worth knowing when that’s realistic.
When Cleaning the Cartridge Is Enough
Hard water areas are tough on cartridges. Mineral deposits — mostly calcium and magnesium — build up on the cartridge body and inside the valve, causing stiffness, inconsistent flow, and partial blockage. If your cartridge is relatively new (under five years) and the symptoms are stiffness or mild pressure loss, a vinegar soak can help.
Remove the cartridge, let it soak in white vinegar for a few hours to dissolve scale, rinse it thoroughly, inspect the O-rings for cracking or flattening, and apply fresh silicone plumber’s grease before reinstallation. If the O-rings look worn, replace just those — they’re inexpensive and available at any hardware store.
When a Full Replacement Is the Right Call
If the cartridge is more than eight to ten years old, if the O-rings are cracked or deformed, if there’s visible wear on the stem or body, or if cleaning doesn’t resolve the problem — replace it. Cartridges are not expensive, and a failed or improperly functioning cartridge wastes water every day.
Types of Shower Cartridges — Know What You Have Before You Buy
Single-Handle Cartridges
The most common setup in modern homes. One handle controls both flow and temperature. These cartridges rotate or slide depending on the brand and design. Moen, Delta, and Kohler all use distinct single-handle cartridge designs — they are not interchangeable.
Two-Handle and Three-Handle Cartridges
Older homes often have separate hot and cold handles, each with its own cartridge. These are simpler in design but require you to identify and potentially replace both if the problem is temperature-related.
Thermostatic Cartridges
Found in higher-end shower systems. These maintain a preset water temperature regardless of pressure changes elsewhere in the house. They’re more complex internally, and brand-matching is non-negotiable.
Pressure-Balancing Cartridges (Anti-Scald) — Why They Matter
Pressure-balancing cartridges are required by code in most of the US for showers installed after 1992. They prevent sudden temperature spikes — like when someone flushes a toilet and the cold pressure drops — by automatically adjusting the mix ratio. If you have one of these, do not substitute a non-pressure-balancing cartridge when replacing it. It’s a safety feature, not just a preference.
How to Find the Right Replacement Cartridge
How to Identify Your Faucet Brand and Model
Check the front of the handle, the trim plate (escutcheon), or the original documentation if you have it. Most major brands stamp or engrave their name somewhere visible. Moen, Delta, Kohler, American Standard, Pfister — they all use proprietary cartridges.
If you can’t identify the brand from the trim, take photos of the handle and escutcheon and bring them to a plumbing supply store. The staff there have usually seen every configuration and can narrow it down quickly.
Model numbers, when available, are almost always on the cartridge body itself or inside the valve behind the handle trim. Checking there is worth the extra few minutes before you go shopping.
Why You Should Bring the Old Cartridge to the Store
Universal replacement cartridges exist, but they’re a gamble. The tolerances inside each brand’s valve body are specific enough that a slightly wrong fit can cause leaks, stiffness, or premature failure.
The most reliable approach: remove the old cartridge first, bring it to a plumbing supply store or large hardware store, and match it physically. Cartridge-matching charts are available at most stores, and the packaging will confirm compatibility. This step takes ten extra minutes and saves a second trip.
Tools and Materials You’ll Need
- Flathead and Phillips screwdrivers
- Allen wrench / hex key set (metric and standard)
- Adjustable wrench
- Needle-nose pliers
- Cartridge puller tool (brand-specific or universal)
- Silicone plumber’s grease — not petroleum-based grease
- Penetrating oil (like PB Blaster) for older or stuck cartridges
- Replacement cartridge (brand-matched)
- Towels and a small bucket
- Drain stopper or cover (so small parts don’t fall in)
- Flashlight
A quick note on the cartridge puller: this is a specialized tool designed to grip the cartridge stem and pull it straight out without damaging the valve body. For Moen cartridges especially, it’s the right way to do this job. They’re available at hardware stores and online for around $10–$20. Some cartridge replacement kits include one.
How to Replace a Shower Cartridge — Step by Step
Step 1 — Shut Off the Water Supply
Before touching anything, shut off the water. Some shower valves have local service stops accessible from behind the trim plate — small flat-slot shutoffs on the hot and cold supply lines. If yours has them, use those. If not, shut off at the main house water supply.
After shutting off, turn the shower handle to the on position to release any remaining pressure and drain the lines. Then plug or cover the drain opening — small parts like retaining clips have a way of finding open drains.
Step 2 — Remove the Shower Handle
Look for a decorative cap on the front or top of the handle. Pop it off with a flathead screwdriver — gently. Behind it you’ll usually find a Phillips screw or an Allen set screw holding the handle to the cartridge stem.
Remove the screw and pull the handle straight off. If it’s stuck — and older handles often are — don’t pry hard against the tile. Use a handle puller tool or work gently side to side while pulling. Forcing it can crack the valve body escutcheon or the handle itself.
Step 3 — Remove the Trim Plate and Escutcheon
The trim plate (escutcheon) covers the hole in the wall and protects the valve cavity. It’s usually held by two screws. Remove those, then check if it’s also sealed with caulk. If so, run a utility knife carefully around the edge to cut the seal before pulling the plate away from the wall.
With the plate off, look inside the wall cavity briefly. Check for water staining, soft drywall, or mold. If you see signs of ongoing moisture damage behind the wall, that’s separate from the cartridge issue and worth addressing before reassembling.
Step 4 — Remove the Cartridge Retaining Clip or Nut
Most cartridges are secured by one of two methods: a small horseshoe-shaped retaining clip that sits across the top of the cartridge, or a threaded retaining nut that tightens around the cartridge collar.
For clip-style valves (common on Moen): grip the clip with needle-nose pliers and pull it straight up and out. Don’t bend it — you may need to reuse it if it’s not included with the new cartridge.
For nut-style valves (common on Delta and some Kohler): use an adjustable wrench or the appropriate deep socket to loosen and remove the nut. Don’t overtighten when reinstalling — snug is enough.
Step 5 — Pull Out the Old Cartridge
With the retaining hardware removed, grip the cartridge stem firmly with pliers or a cartridge puller and pull straight out. The direction matters — it should come straight out, not at an angle.
Note the cartridge’s orientation before it comes out. Some have a tab, a flat side, or a marking that tells you which way is “up” for hot-cold alignment. Take a photo before pulling if you’re not sure.
If the cartridge won’t move, don’t force it. Apply penetrating oil around the base, let it sit for 15–20 minutes, then try again with the puller tool. Forcing a stuck cartridge can crack the valve body — and that turns a $25 repair into a much larger one.
Step 6 — Inspect and Clean the Valve Body
Before installing anything new, look inside the valve body with a flashlight. Rinse any debris or mineral buildup out carefully — you can flush it gently with water from a cup or by briefly opening the supply if the valve has local stops.
Check the inside surfaces for cracks, heavy corrosion, or damage. If the valve body is structurally compromised, the cartridge replacement alone won’t solve the problem — see the “when to call a plumber” section below.
Step 7 — Prepare the New Cartridge
Lay the new cartridge next to the old one and compare them. They should match in length, diameter, stem design, and connection points.
Apply a thin coat of silicone plumber’s grease to all the O-rings on the new cartridge. This helps them seat properly and extends their life. Do not use petroleum-based grease like Vaseline — it degrades rubber seals over time and will cause leaks.
Check the orientation markings. Many cartridges have a “hot” marking or an alignment tab that must point in a specific direction. Getting this right now saves the hassle of reversing hot and cold water after reassembly.
Step 8 — Install the New Cartridge
Align the cartridge with the valve body opening, matching any alignment tabs to the corresponding notches in the valve. Push it in firmly and evenly — it should seat fully without excessive force.
Reinstall the retaining clip or nut. For clip-style valves, press the clip down until it locks into the groove on the valve body. For nut-style valves, tighten by hand first, then snug with a wrench — not overly tight.
Step 9 — Reassemble the Trim, Handle, and Escutcheon
Slide the escutcheon back over the valve, reinstall the screws, and apply fresh silicone caulk around the trim plate where it meets the tile. A key detail many people get wrong: caulk the top and sides only, leave the bottom edge open. This allows any water that gets behind the trim to drain out instead of collecting and causing mold damage.
Reinstall the handle, tighten the set screw or Phillips screw, and press the decorative cap back into place.
Step 10 — Restore the Water Supply and Test Everything
Turn the water supply back on slowly. Don’t crank it open all at once — a gradual open lets you catch any immediate leaks before pressure builds fully.
Test the handle through its full range. Check that hot is hot and cold is cold. Watch the showerhead and the area around the handle for any dripping. Let the water run for a few minutes, then turn it off and watch for a drip — a properly installed cartridge should stop flow completely within a few seconds of shutoff.
How to Replace a Three-Handle Shower Cartridge
Older showers — especially those installed before the 1990s — often have three handles: one for hot, one for cold, and one diverter that redirects flow between the tub spout and showerhead.
Each handle has its own cartridge or stem assembly. The removal and installation process for each is the same as described above, but you’re working on three separate units. If you’re having a temperature problem, start with both the hot and cold cartridges. If the issue is that water won’t redirect properly between the tub and shower, the diverter cartridge is your target.
Three-handle setups often use older stem-style cartridges rather than the modern pull-out designs. Take photos and bring the old stems to the store for matching — these are less standardized than single-handle cartridges.
How to Remove a Stuck Shower Cartridge Without a Cartridge Puller
Using Penetrating Oil the Right Way
Apply penetrating oil around the base of the cartridge where it enters the valve body. Let it sit for at least 15 minutes — longer for cartridges that have been in place for many years. Apply a second coat if needed. Work the cartridge gently side to side with pliers before attempting to pull, to break the mineral bond.
How to Remove a Moen Shower Cartridge Without the Tool
Moen cartridges are notoriously difficult to remove without the dedicated puller because the brass body expands slightly over time from heat cycling. In a pinch: use two pairs of pliers — one to grip each side of the cartridge near its base — and pull straight up with even pressure on both sides. Avoid gripping the stem itself as it can shear off.
The Moen 1225 and 1222 cartridges have two ears at the top that the puller grabs. You can grip these ears directly with needle-nose pliers and apply steady upward pressure. Patience and even force are more effective than sudden yanks.
How to Remove a Delta Shower Cartridge Without the Tool
Delta cartridges (used in their two-handle and some single-handle designs) are usually easier to remove than Moen cartridges. After removing the retaining nut, grip the cartridge body firmly with slip-joint pliers wrapped in a cloth to avoid scoring the brass, and pull with a straight rocking motion. Delta cartridges tend to respond better to a gentle back-and-forth than a straight pull.
Common Mistakes That Ruin a Good Cartridge Replacement
- Buying the wrong cartridge model — universal cartridges are unreliable; always match the brand and model
- Installing the cartridge backward — hot and cold will be reversed, and this is a very common error
- Skipping silicone grease on O-rings — dry O-rings fail quickly and cause leaks
- Using petroleum-based grease instead of silicone — it deteriorates rubber and makes the next removal harder
- Losing the retaining clip down the drain — cover the drain before starting, always
- Overtightening trim screws — cracks the escutcheon or strips the valve threads
- Forcing a stuck cartridge — cracks the valve body and creates a much larger problem
- Not flushing the valve body before installing — debris from the old cartridge can damage the new one immediately
Troubleshooting — When Something Still Isn’t Right
Shower Is Still Dripping After the New Cartridge Is In
First, confirm the cartridge is fully seated. If it’s even slightly out of position, it won’t seal. Remove and reinstall, making sure it bottoms out completely before securing the retaining clip or nut. If the drip continues, the valve body itself may be damaged.
Hot and Cold Water Feel Reversed
The cartridge was installed 180 degrees off from the correct orientation. Remove it, rotate it, and reinstall. Most cartridges have a clear “hot side up” or alignment tab — check the packaging or manufacturer diagram.
The Handle Is Stiff or Hard to Turn
Usually a dry cartridge. Remove it, add silicone grease to the O-rings and stem, and reinstall. If it’s still stiff after lubrication, the cartridge may be the wrong model or not seated properly.
A New Leak Appeared Around the Handle or Trim Plate
Check that the escutcheon is snug against the wall and properly caulked on the top and sides. If water is getting behind the trim through the caulk gaps, recaulk properly. If water is coming from inside the handle mechanism, the cartridge O-rings may have been damaged during installation.
What to Do If the Cartridge Broke Inside the Valve
This happens — especially with older brass cartridges in hard water areas. If the stem shears off and the body is still inside the valve, do not try to dig it out with a screwdriver. Use a broken cartridge extractor (available at plumbing supply stores) or call a plumber. Digging at a stuck cartridge fragment can score the valve body and make the entire valve unrepairable.
When to DIY and When to Call a Plumber
What This Repair Costs If You Do It Yourself
A replacement cartridge for most major brands runs between $15 and $80 depending on the type and brand. Add $10–$20 for a cartridge puller if you don’t have one, and a few dollars for silicone grease and caulk. Total DIY cost for most homeowners: under $100.
What a Plumber Charges and When It’s Worth It
A plumber typically charges $200–$400 for a shower cartridge replacement, depending on your location and the complexity of the job. That’s a reasonable cost for what you get — a guaranteed fix with a professional standing behind it.
Call a plumber when:
- The valve body is cracked or corroded beyond use
- The cartridge broke inside the valve and extraction attempts failed
- There’s evidence of water damage inside the wall that needs assessment
- You can’t identify the faucet brand and no one at the supply store can match the cartridge
- The supply lines are soldered copper and need to be cut and re-soldered
These aren’t situations where persistence pays off — they’re situations where the wrong move makes things significantly worse.
Frequently Asked Questions
Can I replace a shower cartridge without shutting off the whole house?
Yes, if your shower valve has local service stops — small shutoff valves built into the valve body on the hot and cold supply lines. Not all valves have them, but many installed after the mid-1990s do. If yours doesn’t, you’ll need to shut off the main supply.
How do I know which shower cartridge I need?
Identify your faucet brand from the handle or trim plate markings, then look up the cartridge number for your specific model on the manufacturer’s website. Better yet, remove the old cartridge and bring it to a plumbing supply store for a physical match. That’s the most reliable method.
How long does a shower cartridge last?
In average conditions with decent water quality, a cartridge typically lasts 15–20 years. In areas with hard water or high mineral content, expect 8–12 years. Cartridges in frequently used showers wear faster than those in guest bathrooms.
Is a shower cartridge the same as a shower valve?
No. The shower valve is the fixed brass body installed permanently in the wall. The cartridge is the removable insert that fits inside the valve and controls water flow and temperature. You replace the cartridge — not the valve — in most repair situations.
Can a bad cartridge cause low water pressure?
Yes. Mineral buildup on a worn cartridge can restrict flow noticeably. A damaged cartridge seal can also divert water internally rather than directing it fully to the showerhead. Replacing the cartridge often restores normal pressure in these cases.
What happens if I install the cartridge backward?
Hot and cold will be reversed — turning the handle toward “hot” will produce cold water and vice versa. In pressure-balancing cartridges, installation error can also compromise the anti-scald function. If your temperatures feel wrong after replacement, pulling the cartridge and rotating it 180 degrees is the first thing to check.
Does water quality affect how long a cartridge lasts?
Significantly. Hard water — water with high calcium and magnesium content — accelerates wear on O-rings, deposits mineral scale on internal moving parts, and bonds the cartridge body to the valve over time. If you’re in a hard water area and going through cartridges every few years, a whole-house water softener or a shower-specific inline filter can extend cartridge life considerably.
Conclusion
Replacing a shower cartridge is genuinely one of the more satisfying plumbing repairs a homeowner can take on — it’s accessible, the parts are affordable, and the result is immediate. A shower that dripped for months stops dripping the same afternoon.
Most of what goes wrong with this repair comes down to buying the wrong part or rushing through the installation. Take your time with brand identification, match the cartridge carefully, keep the orientation correct, and use silicone grease. Follow those basics and the job goes smoothly in the large majority of cases.
If you run into a cracked valve body, a cartridge that broke off inside the housing, or water damage behind the wall — those are the moments to call in a licensed plumber. Knowing where the line is makes you a smarter DIYer, not a less capable one.
Disclaimer:
The content published on Dwellify Home is intended for general informational purposes only. While we aim to provide accurate and helpful guidance, individual results may vary based on your specific fixtures, home setup, and local conditions. Always consult a licensed professional when in doubt about the scope or safety of a repair.