After two decades of working with brick — restoring it, refinishing it, and watching homeowners fall in and out of love with it — I’ve learned that few finishes generate as many questions as german smear. It’s the kind of technique people see on a renovation show or a Pinterest board, save the photo, then sit on the idea for months before reaching out.
The look is rooted in old European masonry, particularly the cottages and castles of northern Germany, where lime-rich mortar was applied roughly over irregular brick. Today, homeowners are using the same idea to soften aging red brick, add character to new builds, and update tired fireplaces without resorting to paint.
This guide walks through everything that actually matters — what the technique is, the different finish styles, real costs, common mistakes, and how to decide whether it suits your home.
The Short Answer
German smear is a masonry finish where wet white mortar is spread over brick and partially wiped away before it sets, creating a textured, old-world look. Homeowners choose it to soften dated brick without painting it.
Mission Statement
At Dwellify Home, our goal is to help homeowners make practical, stylish, and informed decisions about their living spaces. From modern home upgrades and garden ideas to property guidance and everyday home solutions, we share clear, honest advice that turns confusion into confident choices.
What Is German Smear?
German smear is a masonry finishing technique where wet mortar is spread over brick or stone and partially wiped away before it sets. The result is a textured, partially-covered surface that mimics centuries-old European masonry. It’s permanent, breathable, and changes the look of brick without painting it.
Where the Technique Comes From
The roots go back to old European villages where masons used what they had on hand — sand, lime, water — to seal and weatherproof rough brickwork. The mortar didn’t fully cover the brick; it filled the joints and feathered out, giving each home a lived-in, slightly imperfect surface.
That same look became popular in the States once homeowners started searching for warmer alternatives to flat painted brick.
German Smear vs. German Schmear — Are They the Same?
Yes — they’re the same technique. “Schmear” comes from the Yiddish word meaning to spread, and the two terms are used interchangeably in the trade. Some contractors prefer “schmear” to honor the European origin, while most homeowners search for “smear.” The materials, application, and final look are identical.
Quick Comparison Table — German Smear vs. Other Brick Finishes
| Finish | Permanence | Texture | Reapplication | Best For |
| German Smear | Permanent | Heavy, hand-applied | None | Old-world character |
| Limewash | Semi-permanent | Light, soft wash | Every 5–7 years | Subtle, breathable look |
| Whitewash | Temporary | Flat, faded | When chipping appears | Budget refresh |
| Painted Brick | Permanent | Smooth, sealed | Repaint as needed | Clean, uniform finish |
Key Benefits at a Glance
- Adds permanent texture and old-world character to plain brick
- Costs as little as $30–$100 in materials for a fireplace
- Won’t peel, fade, or flake like paint
- Lets brick breathe — no trapped moisture
- Hides minor cracks and uneven mortar joints
- Works on both interior and exterior brick (and stone)
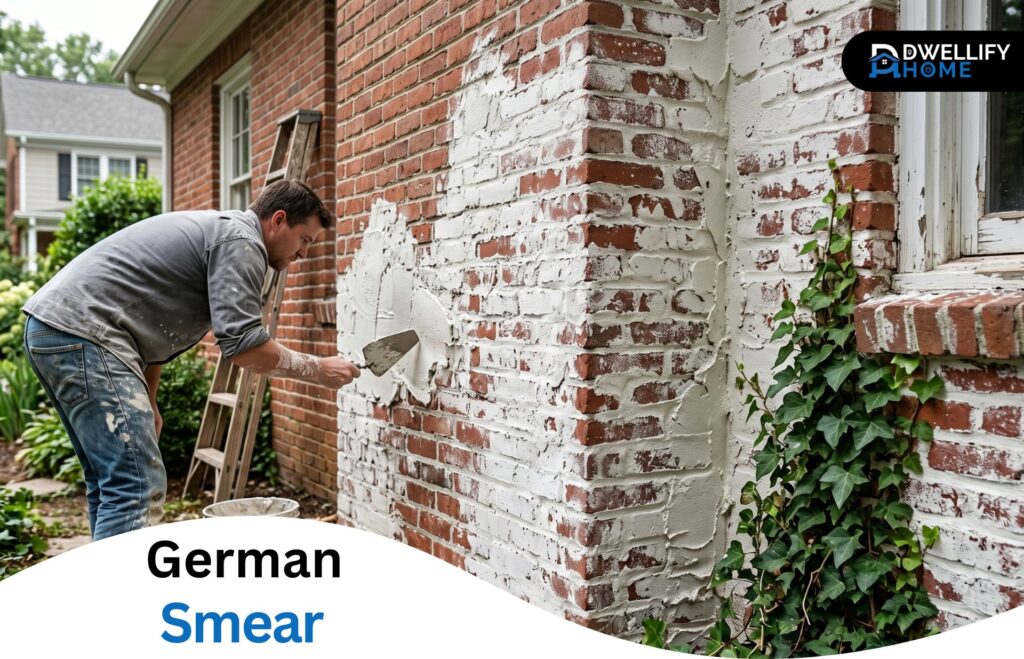
How a German Smear Finish Actually Looks
The Visual Signature of a German Smear Brick Finish
The finish has a soft, irregular character. You’ll see brick peeking through in some spots, wider mortar coverage in others, and joints that look filled and softened rather than crisp. The texture catches light differently throughout the day — that’s part of what makes it feel old and settled rather than uniform.
Done right, no two square feet look exactly alike.
How It Looks on Different Brick Colors and Textures
Red and orange brick are the most forgiving. The warm tones underneath give the white mortar real depth. On darker brick, the contrast becomes dramatic and can read closer to a painted look if you go heavy.
Rough or weathered brick holds the mortar beautifully. Smooth, machine-pressed modern brick can feel a bit flat with this finish, so the application style matters more there.
The Five German Smear Finish Styles
Most homeowners assume there’s only one way to do this. There are actually five recognized styles, and choosing the right one matters more than picking the materials.
Traditional Finish
This is the classic look — mortar fills the joints, then trails partially across the brick faces. You see plenty of brick still showing through, and the finish has a hand-applied, artisan feel. It’s the safest choice if you want character without committing to heavy coverage.
Rustic Finish
A more uneven, lived-in version. The application varies dramatically — some bricks barely covered, others almost fully buried. It reads as authentically aged and works especially well on older homes or cottage-style builds.
Slurry Finish
A more refined, modern take. Around 80–90% of the brick gets covered with smooth, even mortar that creates a cohesive surface. It still shows subtle texture, but the overall feel is cleaner and more contemporary.
Heavy Textured Finish
The boldest of the five. Mortar is applied thickly with deliberate troweled contours, creating sculpted, plaster-like depth. Bricks remain visible but feel embedded in the surface. Good for homes that want a strong architectural statement.
Mortar Wash Finish
A near full-coverage version that feels closer to a stucco or whitewashed surface. The brick tones still bleed through softly, but the overall look is much lighter and more uniform.
German Smear vs. Limewash, Whitewash, and Paint
This is where most people get stuck — and rightfully so. These four options can look similar in photos but behave very differently in practice.
German Smear vs. Limewash
Limewash uses a thin water-and-lime mixture that soaks into the brick. It’s softer, lighter, and needs to be reapplied roughly every 5–7 years. The smear technique uses actual mortar — it’s textured, permanent, and doesn’t fade or wash off.
If you want subtle and reversible, choose limewash. For lasting texture and character, smear is the stronger option.
German Smear vs. Whitewashed Brick
Whitewashing typically means diluted latex paint brushed over brick. It sits on the surface, can chip over time, and gives a flat, faded look. The smear technique adds physical depth — texture you can feel, not just see — and won’t peel.
German Smear vs. Painted Brick
Paint creates a sealed, uniform surface and hides the brick entirely. Once you paint, you’ve committed — and stripping paint from brick is a costly nightmare. The smear technique preserves the brick’s natural texture and doesn’t trap moisture the way paint can.
Quick Comparison at a Glance
- Limewash: light, breathable, needs reapplication every few years
- Whitewash: cheaper, flatter, prone to chipping
- Painted brick: full coverage, sealed surface, very hard to reverse
- German smear: textured, permanent, breathable, hand-applied character
Where German Smear Works Best
On Brick Exteriors and Home Facades
Full exteriors are where the finish truly shines. It softens dated red brick and gives new construction an old-world feel without the cost of natural stone. Make sure the brick is sound first — crumbling mortar joints need to be repointed before you start.
On Interior Brick Walls and Fireplaces
Fireplaces are the most common interior project I see, and for good reason. The technique transforms a heavy red focal point into something warmer and lighter without the permanence of paint. Indoor application is also easier — no weather concerns, smaller surface area, and faster cure times.
On Stone Walls and Mixed Masonry
The technique works on stone too, though the look reads slightly different. On a stone wall, the mortar fills the deeper joints and softens the contrast between stones. For homes with mixed brick-and-stone exteriors, applying the finish to both surfaces creates a unified, cohesive appearance.
Materials and Tools You’ll Need
Keep the supply list simple. You’ll need premixed white mortar (Type N or Type S works for most projects, and white thin-set is a popular DIY choice), a 5-gallon mixing bucket, a drill with a paddle bit, and a grout bag for filling joints.
Add a margin trowel or grout trowel for the smearing step, a stiff brush to knock down clumps, sponges for cleanup, heavy gloves, eye protection, and drop cloths for the surrounding area. A garden hose or spray bottle is needed for wetting the brick beforehand.
That’s the full kit. Anything more is usually overkill.
How to Apply German Smear Step by Step
Step 1 — Prep the Brick Surface
Clean the brick thoroughly. Vacuum loose dust, scrub off soot or grease with dish soap and water, and rinse. Any oil or residue left behind will bleed through the white mortar later. Repoint any failing joints before starting.
Step 2 — Mix the Mortar to the Right Consistency
You want a peanut-butter texture — thick enough to hold its shape on a trowel without dripping. Too watery and it’ll run; too dry and it won’t stick. Most beginners err on the watery side. Mix small batches at first.
Step 3 — Wet the Brick Before You Start
Spray the brick down until it’s damp but not dripping. This single step separates a smooth application from a fight against the mortar drying too fast. Indoors, a wet sponge works fine.
Step 4 — Apply the Mortar in Small Sections
Work in 3- to 5-foot sections. Use the grout bag to pipe mortar directly into the joints, then add more onto the brick faces where you want heavier coverage. Resist the urge to do too much at once.
Step 5 — Smear, Wipe, and Shape the Texture
Hold a trowel at roughly a 45-degree angle and feather the mortar across the brick. Vary the pressure — heavy in some spots, almost nothing in others. Step back every few minutes to check the balance. Irregularity is the goal.
Step 6 — Clean Edges and Fix Mistakes
Wipe stray mortar off windows, trim, and floors within 5–10 minutes before it sets. If a section looks too heavy, a damp sponge can pull mortar back while it’s still workable. Once it sets, corrections become much harder.
Step 7 — Let It Cure Properly
Mortar takes about 24–48 hours to dry to the touch and roughly 28–30 days to fully cure. Keep it shielded from rain and direct sun for the first couple of days, especially outdoors.
How Much Does German Smear Cost?
DIY Cost for a Fireplace or Small Wall
A standard fireplace project usually runs $30–$100 in materials. A bag of white mortar is around $15–$25, and most fireplaces need one to two bags plus basic tools. The real cost is your time — expect 4–6 hours of focused work.
Professional Cost for a Full Exterior
Hiring a contractor for a full home exterior typically runs $3,500–$10,000, depending on square footage and finish style. Smaller jobs like fireplaces start around $500–$1,500. Heavy textured and slurry finishes cost more because they require more mortar and more time.
What Affects the Final Price
Square footage, brick condition, finish style, regional labor rates, and prep work all influence the total. Brick that needs repointing, cleaning, or paint stripping beforehand can add significantly to the bill.
DIY or Hire a Professional?
For a single fireplace or accent wall, DIY is realistic if you’re patient and willing to test in a hidden spot first. The technique is forgiving — mistakes can usually be wiped away while wet.
For a full exterior, I’d push most homeowners toward a professional. The scale, the curing windows, the consistency required across hundreds of square feet — that’s where DIY projects start to look uneven. A skilled crew finishes the same work in days, not weeks, and the finish reads more cohesive.
Pros and Cons of German Smear
The Strongest Advantages
It’s permanent without being paint. It adds character that’s hard to fake. It’s relatively inexpensive in materials. It hides minor brick imperfections, doesn’t peel or fade, and lets the brick still breathe — which matters more than people realize.
The Honest Drawbacks to Consider
It can’t be applied over painted brick. It’s labor-intensive. The result is permanent, so a wrong finish style is hard to undo. And in the wrong neighborhood or on the wrong architectural style, it can look out of place.
Common German Smear Mistakes (and How to Avoid Them)
The biggest reason for a finish gone bad is mortar consistency. Too watery and it runs in streaks; too thick and it won’t spread evenly. Mix small batches and test on a hidden brick first.
Skipping the brick wetting step is another common one — the mortar dries before you can work it. Applying over painted or sealed brick leads to bonding failure within months. Going too heavy on the first pass is the third — once it dries, you’re stuck with it.
Finally, watch the weather. Outdoor application below 40°F or in direct, hot sun can ruin the cure.
Maintaining a German Smear Finish
Routine Cleaning
A garden hose handles outdoor cleaning for most cases. For interior surfaces, a soft brush and a mix of vinegar and water works well for soot or dust. Avoid pressure washers on the finish — too much force can chip the cured mortar.
Long-Term Durability and What to Expect Over the Years
A properly applied finish lasts decades. The mortar bonds chemically with the brick, which is why it doesn’t peel like paint. Expect minor weathering and a softening of the white over time, both of which most homeowners actually like.
Can German Smear Be Removed?
Practically speaking, no. Once the mortar cures, removing it requires aggressive chemical stripping or sandblasting, both of which damage the brick underneath. The honest answer is to treat the technique as a permanent decision and choose a finish style you’ll be happy with long-term.
Does German Smear Add Value to Your Home?
When done well and matched to the right architectural style, yes — it boosts curb appeal and can make a home stand out in listing photos. When done poorly, or applied to a home where it clashes with the surrounding neighborhood, it can hurt resale.
The market generally responds well to well-executed finishes on cottage, farmhouse, and traditional homes.
How to Choose the Right German Smear Look for Your Home
Match the finish style to the home’s architecture. Rustic suits cottage and farmhouse styles. Slurry and mortar wash work better on transitional or modern homes. Traditional fits almost anything.
Consider the brick’s current condition, your climate, and the homes around you. Drive your neighborhood — if every house is painted brick or untouched red, a heavy finish might stand out in the wrong way. Always test a small, hidden section before committing.
Frequently Asked Questions About German Smear
How long does german smear last?
A properly applied finish lasts decades, often the lifetime of the brick itself. The mortar bonds chemically with the masonry, so it won’t peel, flake, or fade like paint. Expect mild weathering over time, but no major reapplication is needed.
Can it be applied over painted brick?
No. Mortar won’t bond properly to painted or sealed surfaces and will start flaking within months. The brick must be bare and clean. Removing existing paint is possible but expensive and time-consuming, often costing as much as the smear application itself.
How long does the mortar take to fully cure?
The surface dries to the touch within 24–48 hours, but full cure takes about 28–30 days. During that period, protect outdoor applications from heavy rain and direct sun. Indoor projects cure more predictably and can be lightly cleaned after about a week.
Can you apply german smear in cold weather?
Avoid application below 40°F or above 90°F. Cold prevents the mortar from curing properly, while excessive heat dries it too fast and weakens the bond. Spring and fall, with mild temperatures and low humidity, give the most reliable results outdoors.
Will it damage the underlying brick?
No. The technique is breathable and doesn’t trap moisture, which means the brick underneath stays protected. Unlike paint, which can seal moisture inside and cause spalling over time, properly applied mortar actually adds a thin protective layer to the surface.
Can it be tinted in colors other than white?
Yes. Mortar pigments can produce gray, cream, beige, and earth-toned finishes. Custom tints are common on modern applications and on stone walls where pure white can feel too stark. Always test the tinted batch on a hidden section before committing.
Conclusion
The right finish, applied carefully on the right home, can transform a tired brick exterior into something that genuinely feels rooted and intentional. The technique isn’t difficult to understand, but it does reward patience, the right consistency, and an honest look at whether your home suits the result.
Take your time deciding, test before committing, and if the project size feels beyond comfortable, bring in someone who’s done it before. Done well, the result holds up for decades — and that’s the real value of choosing this finish.
Disclaimer
The information in this article is provided for general informational purposes only. Individual results, project conditions, and personal preferences may vary, so always assess your own situation, test in a small area before committing, and consult a qualified professional when needed.