You bought a portable AC, opened the box, pulled out the plastic slider panel, and walked over to your window only to realize the thing cranks outward. The panel has nowhere to sit. That moment of “wait, this doesn’t fit anything I own” is one I’ve watched play out in living rooms more times than I can count, and the good news is it has a fix every single time. An air conditioner window kit for outward-opening windows usually comes down to three paths: a fabric zip-seal, a custom rigid panel, or something you build yourself. This guide walks through all three, plus casement, awning, hopper, and tilt-and-turn quirks, sealing, and security.
Snippet-Ready Definition
An air conditioner window kit for outward-opening windows seals a portable AC’s exhaust hose into a casement, awning, or tilt-and-turn window. Because standard slider kits can’t grip these sashes, people use fabric seals, custom rigid inserts, or DIY panels to vent properly and keep hot air out.
Mission Statement
Dwellify Home exists to help homeowners, renters, and property enthusiasts make practical, informed decisions about their living spaces. With this guide, that means cutting through the confusion around portable AC kits so you can cool a room with an outward-opening window confidently, whatever your budget or skill level.
Why outward-opening windows break the standard portable AC kit
The kit in the box is built for a sash window that slides shut and clamps the panel in place. An outward-opening window has no sliding sash to press down on anything, so the panel has nothing to grip and no flat channel to seat into. That single design assumption is why the included kit fails on casement and crank windows.
The geometry problem — why slider kits need a sash that clamps down
A standard slider plate works like a book held in a closing drawer. You set the telescoping panel in the track, then slide the sash down or across until it pins the panel tight and squeezes the foam seal. The whole system depends on that clamping pressure.
A crank window doesn’t move that way. The glass swings out and away from the opening, so there’s no sash coming back to press anything closed. You’re left holding a panel against thin air. No clamp, no seal, no luck. This is the part people miss when they assume any “ac window vent kit” will adapt.
What “outward-opening” actually covers — casement, crank, awning, hopper, tilt-and-turn
These names get used loosely, so here’s the plain version. A casement window is hinged on the side and swings outward, usually operated by a crank handle, which is why “casement window” and “crank window” almost always mean the same thing. An awning window is hinged at the top and tilts outward from the bottom. A hopper is the reverse, hinged at the bottom and tilting inward, common in basements. A tilt-and-turn is a European style that either tilts in at the top or swings fully open like a door.
Knowing which one you have changes both the kit you pick and how you measure for it.
How to identify your window type in 30 seconds
Three quick checks settle it. First, does it crank or push outward, or slide? If it cranks outward, you’re in casement territory. Second, which edge is hinged: side means casement, top means awning, bottom means hopper. Third, is there an interior screen you can pop out? That removable screen is what makes a rigid insert possible, so it’s worth noting now.
Quick comparison
| Option | Rough cost | Best for | Trade-off |
| Fabric zip-seal kit | $20–$45 | Renters, fast setup | Less tidy, can billow |
| Custom rigid insert | $200–$310 | Owners, long-term use | Higher cost, longer wait |
| DIY panel | Under $25 | Hands-on, budget | Takes effort and basic tools |
Key things this guide helps you do
- Understand why the kit in the box won’t fit a casement or crank window
- Choose between a fabric seal, custom insert, or DIY panel for your situation
- Identify your window type and measure it correctly the first time
- Seal the setup so a single-hose unit doesn’t pull hot air back in
- Handle awning, hopper, and tilt-and-turn windows that need a different approach
Your three working options at a glance
You realistically have three ways to seal a portable AC into an outward-opening window. A fabric zip-seal is the cheapest and friendliest for renters. A custom rigid acrylic insert looks the cleanest and lasts the longest but costs the most. A DIY panel splits the difference on price if you can cut a straight line.
| Option | Rough cost | Best for | Trade-off |
| Fabric zip-seal kit | $20–$45 | Renters, fast setup | Less tidy, can billow |
| Custom rigid insert | $200–$310 | Owners, long-term use | Higher cost, longer wait |
| DIY panel | Under $25 | Hands-on, budget | Takes effort and basic tools |
Fabric zip-seal kit — cheapest and renter-friendly
This is a waterproof fabric cover that attaches with adhesive hook-and-loop and zips around your exhaust hose. No drilling, fully removable, and it packs away in a drawer when summer ends. It won’t win any beauty contests, but for a renter who needs cool air this week, it’s the easiest call.
Custom rigid acrylic or polycarbonate insert — cleanest look, highest cost
A clear panel cut to your exact window, with a pre-cut hole for the hose. It replaces your screen, lets light through, and seals tight enough that most people forget it’s there. If you own the place and plan to run the AC every summer, the higher price earns its keep over a few seasons.
DIY panel from corrugated plastic, plexiglass, or foam board — lowest cost
Same idea as the custom insert, made on your kitchen floor. With a sheet of material, a craft knife, and an afternoon, you can build a panel for the cost of a takeout dinner. It rewards patience and a steady hand more than any special skill.
How to choose between them — a simple decision matrix
Rent or own is the biggest fork. Renters lean fabric because there’s nothing permanent and nothing to repair on move-out. Owners who want a clean, durable setup lean rigid. If money’s tight and you don’t mind a Saturday project, DIY beats both on cost. Climate matters too: a windy or rainy spot favors a rigid panel that won’t flap, while a mild summer makes fabric perfectly fine.
How a fabric window seal kit works (and when to pick one)
A fabric seal kit closes off the open part of your window with a tough, weather-resistant cloth that sticks to the frame with adhesive Velcro and zips shut around your AC hose. It’s the right pick when you want a fast, no-drill, removable setup, especially if you rent or you’re cooling a room for just part of the year.
How the Velcro-and-zipper system seals an outward sash
You stick one strip of adhesive hook-and-loop around the window frame and a matching strip along the edge of the open sash. The fabric presses onto both. Because the sash is cranked open, it actually pulls the fabric taut between frame and glass, and the zipper down the middle opens just enough to feed your hose through, then closes snug around it.
The cranked-open window working with you rather than against you is the small detail that makes these kits hold up better than people expect.
Real brands and what they cost — HOOMEE, IKSTAR, Gruntbear, HEROOY
Most fabric seals land in the $20 to $45 range. Brands like HOOMEE, IKSTAR, Gruntbear, and HEROOY make versions in this niche, and they’re widely sold online. The detail that matters is fit: not every kit handles outward-opening sashes, so look for one that explicitly lists casement or top-hung compatibility. HOOMEE’s outward-opening model, for instance, is sold specifically for that use and even includes separate install guidance for outward versus top-hung windows.
Sizing the kit by window perimeter, not the opening
Here’s where people order the wrong size. A fabric kit seals around the whole perimeter of your sash, so you measure the total distance around the window frame, not the size of the glass opening. Kits come in lengths like 300, 400, or 500 centimeters of perimeter. Add up all four sides, then buy the size that comfortably exceeds that number. Too short and you’ll have a gap; too long is easy to trim or tuck.
Step-by-step install for a side-hinged casement
- Clean the frame and sash edge with rubbing alcohol so the adhesive grips. Skip this and the Velcro peels in a week.
- Stick the hook-and-loop strips to the frame and the open sash edge, pressing firmly along the whole run.
- Attach the fabric panel to the strips, working from one corner so it sits flat without wrinkles.
- Find the zipper, open it partway, feed the exhaust hose through, and zip it closed around the hose.
- Run the AC and feel around the edges for warm air leaking back in. Press down any loose spots.
Honest limitations — bugs, wind, and closing up when you leave
Fabric isn’t perfect. On a gusty day it can billow and break the seal at the corners. Small gaps near the zipper are an open invitation to insects if you don’t seat them well. And the big one people forget: you can’t fully close or lock the window while it’s installed, so leaving the house means either trusting a partly open window or pulling the hose and unzipping each time.
How custom acrylic and polycarbonate inserts work (and when they’re worth $200+)
A custom insert is a rigid clear panel cut to your exact window dimensions, with a hole sized for your hose. You remove the interior screen, set the panel in its place, and secure it. At $200 to $310 it’s the priciest route, but for an owner who runs a portable AC every summer, it pays back in durability, a clean look, and a seal that doesn’t quit.
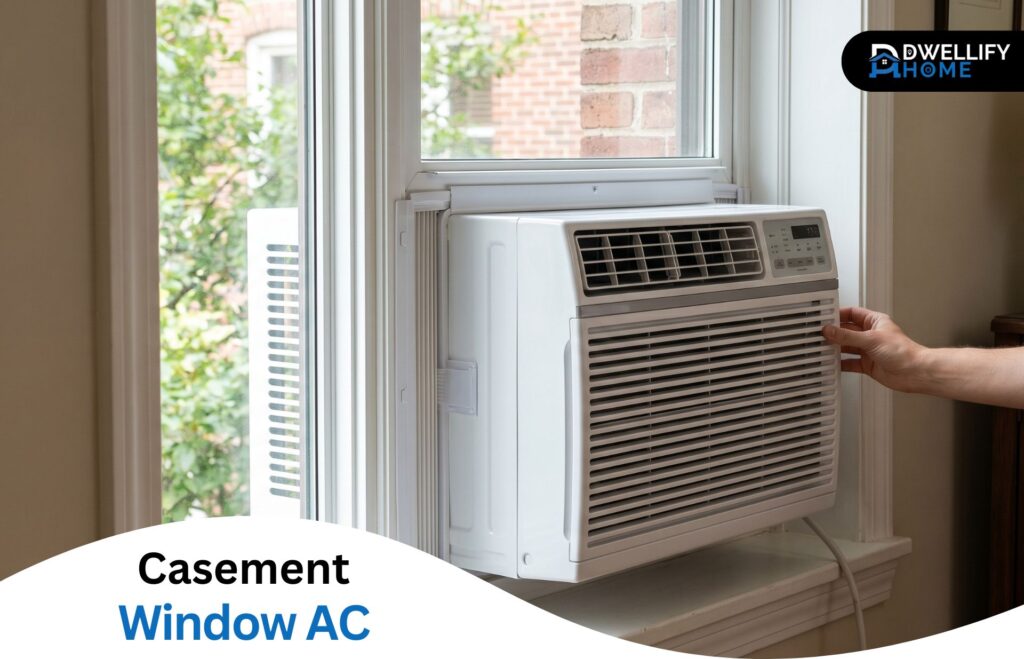
What a custom casement insert is — replacing the screen with a clear panel
The insert lives where your bug screen normally sits. You crank the window open, pop out the screen, and the clear panel drops into that same opening. Your hose connects to the pre-cut port, the window stays cranked to whatever angle the panel needs, and from inside it just looks like clear glass with a hose running through it.
Real makers and price points — Martinson Manufacturing, TAP Plastics, Klo Lab
Martinson Manufacturing builds these to order from quarter-inch CNC-cut clear acrylic, with pricing that starts around $245 and a fit guarantee that covers a free remake if your measurements come up short. TAP Plastics and Klo Lab are other names worth comparing. The reason these cost what they do is that each one is made for a single window, so there’s no mass-production discount.
Hose port sizes that matter — 5″, 5.9″, 6″, and dual-hose cutouts
Before you order anything, find your hose diameter. Portable AC hoses commonly run 5, 5.9, or 6 inches, and the panel’s port has to match or your adapter won’t seal. If you have a dual-hose unit, you need a panel cut for two ports, not one. Some makers offer a hose-in-hose option too. Measuring this wrong is the most common reason a beautiful custom panel ends up leaking.
How to measure your window for a custom panel — and what to do if it isn’t square
Measure the height and width inside the frame, where the panel will actually sit. Old houses are the catch here: frames settle over decades and are rarely perfectly square. Take measurements at the top, middle, and bottom for width, and both sides for height. If the numbers differ, use the smallest one or follow the maker’s specific guidance, because a panel cut to the largest dimension won’t fit at the tight end.
What the install actually involves — glazier points, adhesive tape, no drilling
These go in fast, usually five to ten minutes, with no drilling and no permanent changes. You seat the panel in the screen channel, hold it with glazier push-points or the clear adhesive tape the maker supplies, and connect the hose. Nothing about it damages the window, which is part of why it suits owners who care about the frame.
Building your own outward-opening window panel (the DIY route)
Yes, you can make your own, and plenty of people do it for under $25. The approach is simple: cut a flat panel to fit your window opening, cut a hole for the hose, fit it in place, and seal the edges. It takes an afternoon and a little patience, and the result can rival a store-bought insert if you’re careful.
Materials that actually hold up — corrugated plastic, plexiglass, polycarbonate, plywood
Corrugated plastic (the stuff yard signs are made of) is light, cheap, and easy to cut with a utility knife, which is why it’s the go-to budget pick. Plexiglass and polycarbonate cost more but stay clear and rigid, with polycarbonate being the tougher of the two. Plywood is rock-solid and cheap but blocks all your light, so it’s a fine choice for a basement and a poor one for a living room.
Using the window screen as your template
Don’t measure twice and cut once. Measure zero times and trace instead. Pop out your existing screen, lay it on your panel material, and trace the outline. The screen already fits the opening, so your traced panel will too. This one trick saves more failed cuts than any careful measuring ever will.
Cutting the hose hole slightly undersized for a friction-tight grip
Mark the hole a touch smaller than your hose diameter, then cut to the line. A hole cut slightly tight grips the hose by friction and seals itself, while a hole cut too big leaves a ring of gap that leaks hot air. You can always shave a tight hole bigger; you can’t shrink one that’s too large.
Sealing the edges with foam tape, weatherstrip, or a thin silicone bead
Once the panel’s in, run foam weatherstrip tape around every edge where it meets the frame. That compresses into the gaps and blocks both air and bugs. For a more permanent setup, a thin bead of removable silicone works, and foil tape handles any spot that runs warm near the hose. Take your time here, because the panel is only as good as its edges.
A realistic time and cost estimate
Budget an afternoon and somewhere under $25 in materials if you already own a knife and a straightedge. Most of the time goes into careful cutting and sealing, not the build itself. If you rush the edges, you’ll spend the rest of the summer chasing leaks, so the slow part is the part that matters.
Special cases — awning, hopper, and tilt-and-turn windows
Not every outward-opening window is a tidy side-crank casement. Awning, hopper, and tilt-and-turn windows each open differently, and that changes which kit seals them best. Match the solution to the shape of the opening and you’ll save yourself a lot of frustration.
Top-hinged awning windows and the wedge-gap problem
An awning window tilts out from the bottom, so the opening is a wedge: wider at the bottom, pinched at the top. A rigid panel struggles with that triangular shape, but a fabric kit conforms to it easily. For awning windows, fabric is almost always the smarter pick.
Bottom-hinged hopper windows in basements and bathrooms
Hoppers are small and tilt inward, and they show up in basements and bathrooms where you might be venting a smaller unit. The compact opening usually takes a snug rigid panel or a cut piece of foam board well, since there’s less area to seal and the inward tilt gives you something to brace against.
European tilt-and-turn windows — venting while staying locked in tilt
Tilt-and-turn windows have a trick worth knowing. Set to the tilt position, the window opens a few inches at the top while staying locked and secure at the sides. A clamp-in rigid outlet, the kind sold by brands like Eurom or Aktobis, fits into that tilt gap so you can vent the hose while the window stays in its locked, secure position. It’s the cleanest option for that window style.
Getting the seal right — what actually kills your cooling
If your AC runs all day and the room still feels warm, the unit usually isn’t the problem, the seal is. Hot air sneaking back in through gaps, an uninsulated hose radiating heat, or a hose bent too sharply will all sabotage cooling. Fixing the seal and the hose path often does more than any setting on the machine.
Why a leaky seal hurts more with a single-hose AC
A single-hose unit pulls room air across its coils and blows it outside, which lowers the pressure inside your room. That lower pressure actively sucks hot outside air in through every gap you left, including a sloppy window seal. A dual-hose unit pulls its exhaust air from outside instead, so it doesn’t depressurize the room and is far more forgiving of a leaky seal. If you run single-hose, sealing well isn’t optional.
Insulating the exhaust hose so it stops re-heating the room
That exhaust hose gets genuinely hot, and an uninsulated one radiates that heat straight back into the room you’re trying to cool. Slipping an insulating sleeve over it, sold by brands like TURBRO and VEVOR, cuts that heat gain noticeably. It’s a cheap upgrade that quietly improves a setup people assume is already maxed out.
Keeping the hose short and under a 45° bend
Keep the hose as short and straight as the layout allows. Sharp bends choke the airflow and trap heat, and many manufacturers, GE among them, specifically advise against bending the hose past about 45 degrees or extending it beyond its supplied length. A long, kinked hose makes the unit work harder for less cooling and can trip it into shutdown.
Blocking rain, insects, and dust without trapping condensation
Seal the gaps, but don’t seal so tightly that water has nowhere to go. Angle the hose slightly downward outside so rain runs away from the unit, screen any open spots against bugs, and leave the bottom edge able to drain rather than pooling moisture against the frame. The goal is airtight against hot air, not a sealed box that traps condensation.
Security, weather, and long-term use
A kit means your window sits partly open, which raises fair questions about safety and durability. Most setups can’t be fully locked while installed, outward sashes catch wind, and different materials age differently. A little planning keeps the setup safe and lasting.
Can you still lock the window with a kit installed?
Mostly, no. A fabric or DIY setup holds the window cranked open, so the standard lock won’t engage. The exceptions are a tilt-and-turn left in its locked tilt position, and certain rigid inserts that fill the opening solidly. On a ground-floor or accessible window, that open gap is worth thinking through before you leave the house for the day.
Wind, storms, and what to do in severe weather
An outward-opening sash is a sail in a storm. Strong gusts can stress the hinges and crank mechanism, and a fabric seal can be torn loose. When severe weather is coming, the safe move is to shut the AC off, disconnect the hose, and close the window properly. Five minutes of prep beats a bent crank arm or water across the floor.
Leaving it up year-round vs removing each season
A rigid acrylic insert handles year-round installation without much fuss, which is part of its appeal. Fabric kits and DIY panels do better taken down and stored at the end of the season. Adhesive Velcro loses grip over many months, and fabric left in the sun slowly degrades, so removing it each fall keeps the seal tight for next summer.
When no window will work — alternative venting paths
Sometimes no window in the room can take a kit, and that’s not the end of the road. You can vent through a sliding door, through a wall, or through an existing vent. Each has trade-offs, but a portable AC can almost always find a way to exhaust its heat.
Through a sliding patio door with a door-seal kit
A sliding door is just a very tall window as far as venting goes. Tall fabric door-seal kits use the same zip-and-Velcro idea, running floor to ceiling and sealing around the hose where it exits. For a room with a patio door and no usable window, this is often the simplest fix available.
Through a wall or an existing dryer vent
Venting through a wall is permanent but discreet, essentially a small dedicated port for the hose. Some manufacturers also allow routing the hose through an existing dryer vent under certain conditions. Both are more involved than a window kit, so they suit a long-term setup rather than a quick seasonal one.
Why manufacturers warn against venting up through a ceiling
It’s tempting to send the hose up into a drop ceiling and be done with it, but manufacturers like GE warn against it. Hot, moist exhaust rising into an enclosed ceiling or roof cavity has nowhere to escape, so it condenses, breeds moisture problems, and can flow right back down. Vent out and ideally slightly down, never up into a trapped space.
Frequently asked questions
Is a crank window the same as a casement window?
In everyday use, yes. A casement window is hinged on the side and swings outward, and the crank handle is simply how most casements operate. So when someone says “crank window,” they almost always mean a casement. The terms are interchangeable for the purpose of choosing a window kit.
Can I use a regular portable AC window kit on a casement window?
No, not as it comes. The standard slider kit needs a sash that slides shut to clamp the panel, and a casement swings outward with no sash to do that. You’ll need a fabric seal, a custom rigid insert, or a DIY panel instead. The included kit just has nothing to grip on a casement.
What size hose does a portable air conditioner use?
Most portable AC exhaust hoses are 5, 5.9, or 6 inches in diameter, with 5.9 inches being very common. The exact size depends on your model, so check the unit or its manual before buying any panel or adapter. Matching the hose size to the port is what makes the seal work.
Will a window seal kit damage my window frame?
Generally no. Fabric kits use removable adhesive Velcro, and rigid inserts sit in the screen channel with push-points or tape, neither of which requires drilling. The one thing to watch is leaving adhesive strips on for many months in direct sun, which can make them harder to peel cleanly later.
What if I measure the window wrong?
For a DIY panel, a wrong cut just means another sheet of cheap material. For a custom insert, it’s costlier, which is why several makers offer a fit guarantee that remakes the panel free if your measurements fall short. Always measure inside the frame at several points and use the tightest number.
Can I run a portable AC through a window screen?
Not directly. A screen can’t hold the panel or seal around the hose, and forcing a hose through it leaves big gaps that leak hot air back in. The better move is to remove the screen entirely and use that opening for a rigid insert or DIY panel, which is exactly what most setups do.
Do I need a dual-hose unit for an outward-opening window?
You don’t need one, but it helps. A dual-hose unit doesn’t depressurize the room, so it tolerates a slightly leaky seal far better than a single-hose unit. If you already own single-hose, just seal carefully. If you’re still shopping and the seal worries you, dual-hose is the more forgiving choice.
Are there casement window AC kits at Lowe’s or Home Depot?
You’ll find standard portable AC window kits and fabric seal kits at Home Depot and Lowe’s, but true custom casement panels usually come from specialty makers online. In-store kits mostly target sliding windows, so check the packaging for outward-opening or casement compatibility before assuming it fits.
Choosing the right air conditioner window kit for your outward-opening window
The choice really does come down to your situation. Renters and anyone who wants a fast, no-fuss setup should reach for a fabric zip-seal. Owners who run their unit every summer and want a clean, lasting look will get their money’s worth from a custom rigid insert. And if you’ve got an afternoon and want to spend almost nothing, a well-built DIY panel holds its own against both.
Whatever shape your window is, a casement, an awning, a hopper, or a tilt-and-turn, there’s a working air conditioner window kit for your outward-opening window. Seal it well, mind the hose, and you’ll be cooling that room comfortably in no time.
Disclaimer
This content is for general informational purposes only. Individual windows, products, and situations vary, so always check your unit’s manual and product specifications before buying or installing. Results and preferences will differ from one home to the next.