Most people don’t think about the kit until the air conditioner is already half-hanging out the window and the box is empty on the floor. That’s usually when the questions start. A window AC installation kit is the bundle of parts that holds your unit in place and seals the gap around it so the cold stays in and the heat, noise, and bugs stay out.
Here’s the part that trips everyone up: that phrase actually points to two completely different products depending on what kind of air conditioner you have. Get clear on which one you need first, and the rest of this gets simple. We’ll cover what’s in each kit, which parts matter, how to match a kit to your window, how to install it, and how to fix the problems that come up afterward.
Snippet-Ready Definition
A window AC installation kit is the set of parts that mounts an air conditioner in a window and seals the gap around it. It includes side panels, rails, brackets, and foam to hold the unit securely and keep heat, noise, and bugs out.
Our Mission
Dwellify Home helps homeowners, renters, and property enthusiasts make practical, informed decisions about their living spaces — turning everyday projects like fitting a window AC into something you can handle with clarity and confidence.
First, Which Kit Do You Actually Need?
A “window AC installation kit” means one of two things. If your air conditioner is a heavy box that sits in the window, you need a mounting-and-sealing kit: side panels, rails, brackets, and foam. If your air conditioner is a tall unit that sits on the floor with a hose, you need a venting kit that routes that hose out the window. Different units, different kits.
Figuring out which camp you’re in takes two seconds. Look at the unit, not the box.
Window-Mounted AC Kit (the unit sits in the window)
This is the classic setup. The whole air conditioner wedges into an open window, with the heavy back end hanging outside. The kit’s only job is to hold that unit securely and close off the open space on either side of it. You’re working with accordion side panels, a top mounting rail, L-brackets that lock the sash down, foam seal, and sometimes a support bracket for the outside.
Portable AC Window Venting Kit (the unit sits on the floor)
A portable AC rolls around on the floor and pushes its hot exhaust air out through a hose. The venting kit is what lets that hose exit the window without leaving a big open gap. It’s a set of adjustable slider plates, the exhaust hose, an adapter that connects to the unit, and a window coupler where the hose meets the outside, usually with a bit of mesh to keep bugs out.
If you’ve got the floor unit, skip ahead to the venting section. The next few parts are about the in-window type.
Which kit do you need? (quick guide)
| Your air conditioner | Kit you need | Core parts |
| Box unit that sits in the window | Window-mounted AC kit | Side panels, top rail, L-brackets, foam seal, optional support bracket |
| Floor unit with an exhaust hose | Portable AC window venting kit | Adjustable slide plates, exhaust hose, hose adapter, window coupler |
What a window-mounted kit does:
- Holds the unit securely so it can’t tip or slide out
- Fills the open window space on either side of the unit
- Seals against warm air, rattle, and bugs
- Locks the window so it can’t be raised from outside
- Supports the unit’s weight (with an added external bracket)
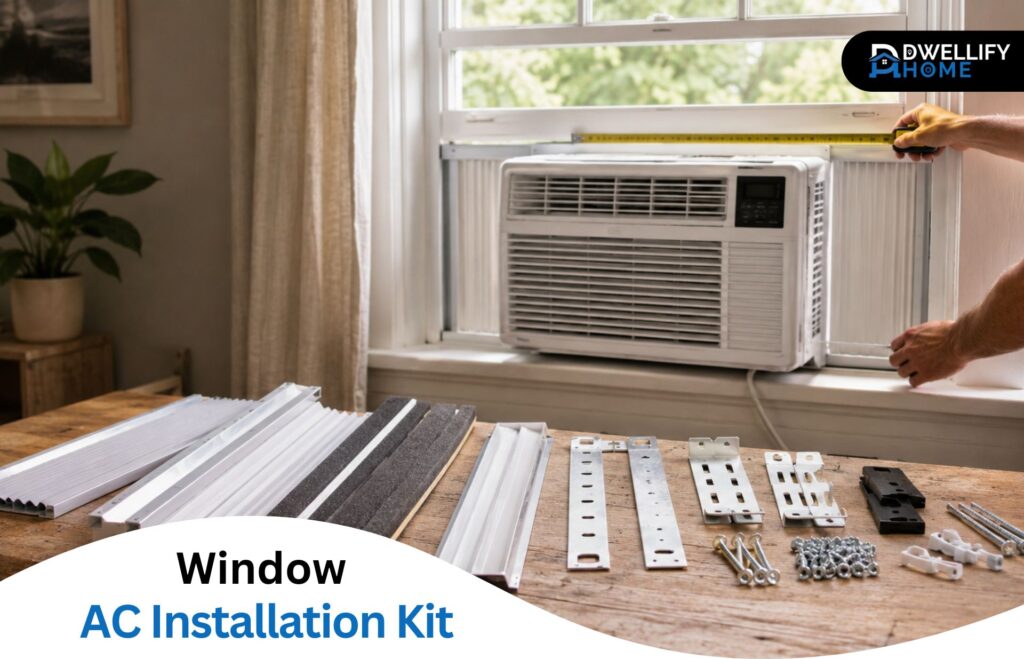
What’s Included in a Window AC Installation Kit
Open a window AC box and the kit parts are usually tucked along the sides or taped to the unit. Most kits include the same core pieces: two side panels, a top rail or channel they slide into, foam sealing strips, and a small bag of screws and L-brackets. What you almost never get in the box is a real support bracket for the outside, which I’ll get to.
The pieces are simple, but knowing what each one is actually for tells you where installs go wrong.
Side Panels and Accordion Curtains
These are the fan-fold plastic panels that stretch out from each side of the unit to fill the open window space. They pull out like an accordion and screw to the window frame. Their job is to block the gap, not to hold any weight.
The honest truth is that factory accordion panels are the weakest part of most kits. They’re thin, they flex, and on a wide window they sag and leak air. If you’re sealing a big opening or want it to actually insulate, rigid cut-to-fit foam panels are a real upgrade over the flimsy plastic ones. They cost a little more and you trim them to size, but they hold their shape and keep heat out far better.
Mounting Rails and L-Brackets
The top rail is the channel the upper window sash drops into when you close it down onto the unit. That’s what stops the AC from tipping out. The L-brackets are the small metal angles that screw into the top of the lower sash and the window frame so nobody can slide the window open from outside.
People skip the L-brackets constantly because the unit feels solid without them. Don’t. They’re a two-minute job and they’re the difference between a window that’s secured and one that anybody can push up and climb through.
Foam Seal and Weather Stripping
The foam does three quiet jobs at once: it blocks warm air from leaking in around the unit, it stops the rattle and buzz when the compressor runs, and it closes the gaps bugs use to get inside. Most kits include a length of adhesive-backed foam strip plus a thicker piece that goes in the gap where the two sashes overlap above the unit.
That overlap gap is the one everyone forgets. The unit’s in, the panels are out, but there’s still a finger-width opening where the top and bottom window sashes meet. A strip of foam pressed in there is what finishes the seal. Frost King and similar brands sell pre-cut polyurethane foam exactly for this, and it’s a couple of dollars well spent.
Support Brackets (and When They’re Sold Separately)
This is the part that catches people out: the external support bracket is almost always a separate purchase. It’s the metal arm that mounts under the unit on the outside and carries the weight so you’re not relying on the window sash alone.
You need one if your unit is heavy, if you’re above the ground floor, or if your sill is shallow or in rough shape. Brackets come in no-drill versions that clamp to the sill and drill-in versions that bolt to the wall, and they’re rated for a maximum weight, so check that your unit comes in under it. Expect to spend somewhere in the range of thirty to a hundred dollars depending on capacity. For a renter, a no-drill window AC bracket is the safe call since it leaves no holes behind.
What’s in a Portable AC Window Venting Kit
For floor units, the venting kit is what makes the whole thing work, because a portable AC that can’t push its hot air outside just heats the room it’s cooling. The kit centers on a window slide plate: two or more interlocking panels that adjust to your window’s width, often spanning roughly a foot up to five feet depending on the set.
The rest is the exhaust path. There’s the collapsible hose, usually five to six inches across, an adapter that clamps onto the back of the unit, and a coupler that seats the hose into the slide plate at the window. Foam strips and a couple of locking screws finish the seal. These parts ship with most portable ACs, but they wear out, crack, or go missing, and you can buy replacement portable AC window vent kit parts on their own. An adjustable window slide kit plate is the piece people replace most, since the originals rarely fit oddly sized windows well.
How to Choose the Right Kit for Your Window Type
The single biggest factor in choosing a kit isn’t the AC brand or the price. It’s the shape of your window and how it opens. A kit built for a window that slides up and down won’t seal a window that cranks outward, no matter how good it is. Match the kit to the window first, then everything else falls into place.
Double-Hung Windows (the standard fit)
A double-hung window is the common kind that slides up and down, and it’s exactly what almost every kit is designed for. The lower sash lifts, the unit goes on the sill, the sash comes down into the top rail, and the side panels fill the rest. If this is your window, the included kit will work as-is.
One caveat with vinyl windows: the frames are hollow and the screw points flex, so the standard L-clips don’t always bite well. A pair of small wedges or a paint-stick shim under the unit gives you a firmer, more level seat than forcing screws into thin vinyl.
Sliding and Horizontal Windows
A window that slides side to side instead of up and down needs the panels turned the other way. Some manufacturers sell a vertical slider window kit for exactly this, where the panel runs tall instead of wide and the unit sits in one half of the opening. An ac window kit for sliding window setups works the same way as a standard one, just rotated, and you seal the leftover height above the unit rather than the width beside it. Plenty of units handle a window for side sliding window openings fine as long as the unit’s height fits within the panel’s reach.
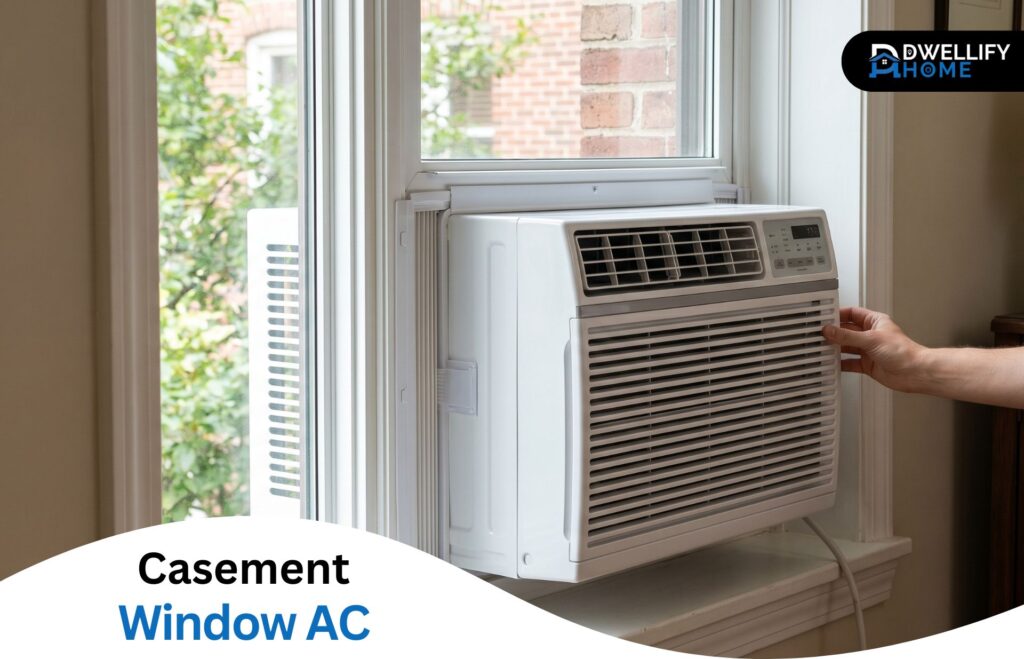
Casement and Crank-Out Windows
Casement windows swing outward on a crank and have no flat track for a unit or a slide plate to sit in, so a standard kit simply won’t seal them. You’ve got two real options. A zipper-cloth seal kit fits a fabric panel into the opening with a sealed slot for a portable AC hose, which is the easy route for a casement window ac kit on a floor unit. For a cleaner, more permanent look, a custom rigid acrylic or polycarbonate insert is cut to your exact opening. In-window AC units generally aren’t a good match for casements at all; a portable unit with one of these seals is the realistic path.
Awning, Hopper, and Older Windows
These are the hardest cases. Awning windows hinge at the top and open outward at an angle; hopper windows hinge at the bottom and tilt inward. Either way there’s no vertical track, and an air conditioner window kit for an outward opening window usually has to be improvised. Factory kits don’t fit, and that’s not your fault.
The proven fix is a panel cut to your opening from plexiglass, plywood, or rigid foam board, with a hole bored for the exhaust hose on a portable unit. You fit it against the inner window stop and the closed sash holds it snug. It’s a do-it-yourself job, but it’s a legitimate one that handymen have relied on for years on old houses where nothing off the shelf will seat properly.
Key Factors to Weigh Before You Buy
Once you know your window, comparing kits comes down to a short checklist. Run through these before you spend anything:
- Window type and how it opens — the deciding factor for whether any kit fits at all.
- AC weight versus bracket capacity — your unit’s weight must come in under the bracket’s rated limit, with room to spare.
- BTU and unit width versus panel reach — a bigger unit takes up more of the opening, leaving less for the panels to cover.
- Material quality — rigid foam panels seal and insulate better than thin accordion plastic.
- Security and locking — look for kits with L-brackets or plan to add a sash lock.
- Reusability — if you take the unit out each fall, you want panels that don’t get destroyed coming off.
- Renter-friendliness — no-drill brackets and removable seals protect your deposit.
If you’re shopping for the best window ac installation kit for your situation, the answer is whichever one matches that list, not whichever has the flashiest packaging. A thirty-dollar kit that fits your window beats a premium one that doesn’t.
Matching Kit Size to Your AC Unit
Size works on two axes: how much window the unit fills, and how much weight the bracket holds. A larger BTU unit is physically bigger and heavier, so it covers more of the opening and demands a stronger bracket. As a rough sizing guide, a small room of 150 to 350 square feet usually wants a 5,000 to 8,000 BTU unit, a mid-size room of 350 to 550 square feet calls for 8,000 to 12,000 BTU, and larger spaces step up from there.
The practical takeaway: measure your window’s open width and height, check your unit’s dimensions and weight against the kit’s panel reach and the bracket’s rating, and confirm the numbers before buying. A unit that’s too wide leaves panels that can’t close the gap.
How to Install a Window AC Unit With the Kit
A standard double-hung install takes most people under an hour, calls for just a screwdriver and a level, and rates as a beginner job. The one rule that matters more than any other: never lift a heavy unit alone. Have a second person steady it at the window until it’s secured. A dropped air conditioner is a ruined unit at best and an injury or a hit to someone below at worst.
Tools and Materials You’ll Need
You don’t need much. A screwdriver, a small level, the kit that came with the unit, and a roll of foam if the included strip looks thin. Keep a couple of shims or wedges on hand for leveling, especially on vinyl windows, and have your support bracket ready if your unit needs one.
Step-by-Step Installation
- Position and level the unit. Set it on the sill centered in the opening, with the body tilted very slightly toward the outside, just a fraction. That backward tilt lets condensation drain outdoors instead of pooling inside.
- Bring the sash down. Lower the upper window sash into the top rail so it locks the unit against tipping.
- Add the support bracket if needed. For heavy or upper-floor units, mount the bracket underneath outside before you trust the window with the weight.
- Extend and screw the side panels. Pull the accordion panels out to the frame on both sides and fasten them.
- Seal the gaps. Run foam along the side panels and press a strip into the gap where the two sashes overlap above the unit.
- Lock it and test. Fit the L-brackets so the window can’t be raised, then plug the unit straight into a wall outlet, never an extension cord, and run it.
That dedicated-outlet point isn’t fussiness. Air conditioners draw hard on startup, and a thin extension cord is a real fire risk. Plug into the wall.
Safety, Security, and the Rules You Might Be Missing
Two things get overlooked here, and both matter. First, weight and brackets. Every support bracket has a rated capacity, and a unit hanging out a third-floor window is held up by that rating alone. Don’t guess. Match the numbers, and use the L-brackets so the window can’t be slid open from outside; a window AC with no sash lock is an easy entry point.
Second, the rules. Some cities require an external support bracket on every window AC regardless of weight, with New York City being the well-known example. Beyond code, an HOA may restrict units that face the street, and a landlord may bar drilling entirely or even window units altogether. Check your lease and local rules before you mount anything. And if you go the custom-acrylic-insert route on a portable unit, remember a light panel can be pushed in from outside, so it’s not a security feature on a ground-floor window.
Common Problems and How to Fix Them
Most window AC complaints trace back to a handful of install slips, and nearly all are quick fixes.
- Water dripping inside. The unit is tilted too far back toward the room, or not enough toward the outside. Adjust so it leans very slightly outward and the condensation drains where it should.
- Rattling or buzzing. A loose sash or missing foam lets the unit vibrate. Tighten the sash down and pack foam into the gaps.
- Warm air leaking back in. Usually the overlap gap above the sashes is open. A foam strip there closes it.
- Unit creeping forward. No L-brackets holding it. Add them.
- Bugs getting in. On a portable setup, the hose coupler is missing its mesh. Add a screen at the window opening.
Sealing, Drainage, and Year-Round Use
After install, walk around the unit on a hot day and feel for warm air sneaking in. Those spots are where your seal failed, and a little extra foam fixes most of them. Check that water is draining outside, not collecting on the sill.
When summer ends you’ve got a choice. Pulling the unit out and storing it is best for the window and the AC, but if you leave it in, an insulated cover or a set of winter panels over the unit stops cold drafts and keeps your heating bill from leaking out the same gaps that let the heat in. For an apartment window where removal is a hassle, a snug winter cover is the sensible middle ground.
Frequently Asked Questions
Do you need an installation kit for a window air conditioner?
Yes. Window air conditioners come with a basic kit because the unit can’t be safely or tightly fitted without one. The side panels and seal close the open window space, and the rails and brackets hold the unit in place. The only thing often missing from the box is an external support bracket.
Is a window AC installation kit reusable or removable?
Mostly yes. The brackets, rails, and rigid panels come out and go back in season after season. The adhesive foam strips are the exception; they usually tear or lose their stick on removal, so plan to replace the foam each time you reinstall. Keep the screws and brackets bagged together.
Do window AC units need to be screwed in or bracketed?
For light units in a sound double-hung window, the closed sash and L-brackets are often enough. Heavier units, upper-floor installs, and many local codes require an external support bracket. When in doubt, bracket it. The cost is small next to the risk of a unit falling.
What’s the difference between a window AC kit and a portable AC window kit?
A window AC kit mounts and seals a unit that sits inside the window opening. A portable AC window kit vents the exhaust hose of a floor-standing unit out through the window using adjustable slide plates and a coupler. The first holds an appliance; the second routes hot air.
Can I install a window AC unit myself?
Most people can install a standard unit in a double-hung window in under an hour with a screwdriver and a helper. The helper matters most for steadying the unit during the lift. Heavier units, high floors, or unusual windows are where it’s worth calling someone with experience.
Choosing the Right Window AC Installation Kit, Simply Put
The whole decision comes down to two questions. Is your air conditioner an in-window box or a floor unit with a hose, and what shape is your window? Answer those and you know exactly which window AC installation kit you need, because the kit follows the unit and the window, not the other way around. Match those, seal the gaps properly, secure it so it can’t fall or be forced open, and you’ll have a unit that cools well and gives you no trouble all season.
Disclaimer: This content is for general informational purposes only. Individual windows, units, local codes, and situations vary, so check your product instructions and local requirements before installing.