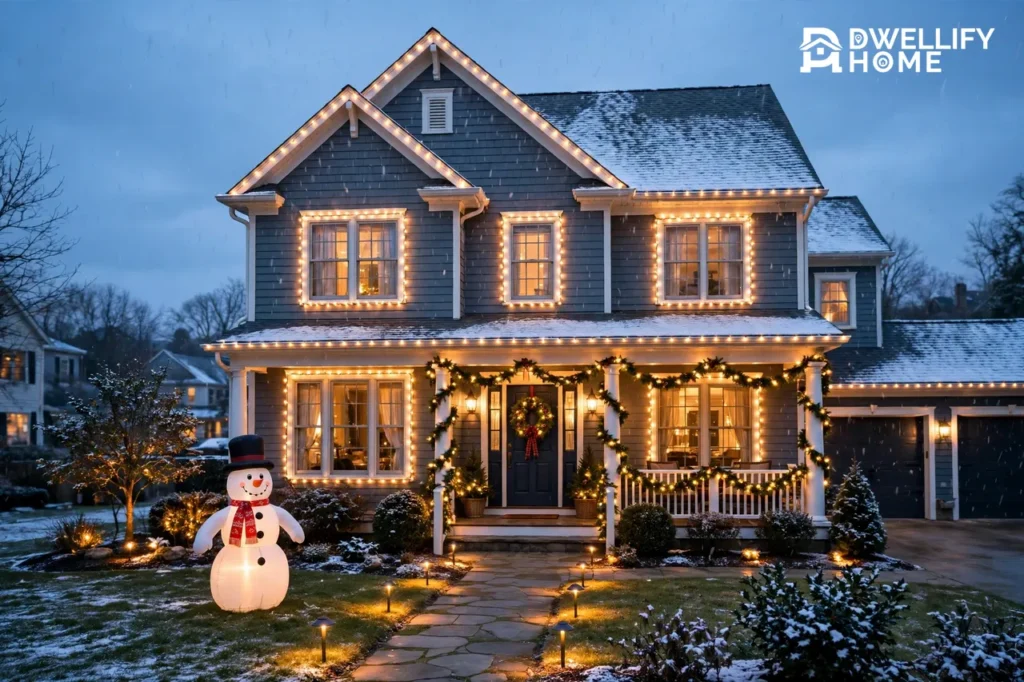
Outdoor Christmas decorations work best when one style and one focal point carry the whole yard — and ENERGY STAR-certified LED strings use about 70% less energy than incandescent ones, so a full display costs less to run than a single old tree did. Start at the front door, build outward to the roofline and the lawn, and anchor and plug in everything the safe way. That is the whole secret, and this guide walks it step by step.
One item on most shopping lists quietly voids its own warranty — the wind clause on inflatables — and the anchoring section below shows how to beat it. Read the plan first, buy second, and you will hang lights once, not three times.
The Short Answer: What Makes a Great Outdoor Christmas Display?
A great outdoor Christmas display has three layers: lights that frame the house, one showpiece that stops the eye, and a lit porch that welcomes people to the door. The best outdoor Christmas decorations ideas all follow that same shape, whether the yard is a small stoop or a full acre. Pick one style — classic warm white, winter wonderland, or modern single-color — and let every piece serve it.
| Layer | What it does | Examples |
|---|---|---|
| Frame | Outlines the house so it reads from the street | Roofline C9 lights, window frames, pathway lights |
| Showpiece | Stops the eye and gives the yard its character | Inflatable, lit figure, projector, yard art |
| Welcome | Makes the door inviting up close | Wreath, garland, lanterns, planters |
Most displays fail on the frame, not the showpiece. A crooked roofline or a dark path makes even the best inflatable look lost. Fix the frame first and the showpiece sells itself. The sections below take the layers in that order.
Where to Start: Pick One Style Before You Buy Anything
Pick one style before you buy anything, because a mixed display reads as clutter, not character. Classic means warm white lights, evergreen garland, and red and gold accents. Winter wonderland means cool white lights, silver and frosted finishes, and snowman or reindeer figures. Modern means clean silhouettes, one color of light, and very little ornament. Choose the style that matches your house, then buy only pieces that fit it.
Walk to the street and look at your house the way a neighbor sees it. The front door, the roofline, and the biggest window are the three spots every eye lands on, so those three spots get the best pieces. If you want a head start on the look, our exterior Christmas decor ideas gather the styles side by side so you can pick one and commit to it.
Set the budget next, not last. A small yard glows on about $100 of lights and one showpiece, a medium yard on $250 to $400, and a large yard on $500 or more — and the budget table further down prices each tier with real products. One style and one budget, decided before the first box, is what keeps a display from turning into a pile of sale items. That decision is the cheapest part of the whole project.
Outdoor Christmas Lights: The Foundation of the Display
Outdoor Christmas lights are the foundation of the display because they do the work nothing else can: they outline the house, light the path, and make every other decoration visible after dark. LED strings are the only sensible choice now — they use far less power, stay cool to the touch, and last many seasons. Buy outdoor-rated strings only, and check the box for the rating before you pay.
Roofline Lights: The Single Most Effective Strand
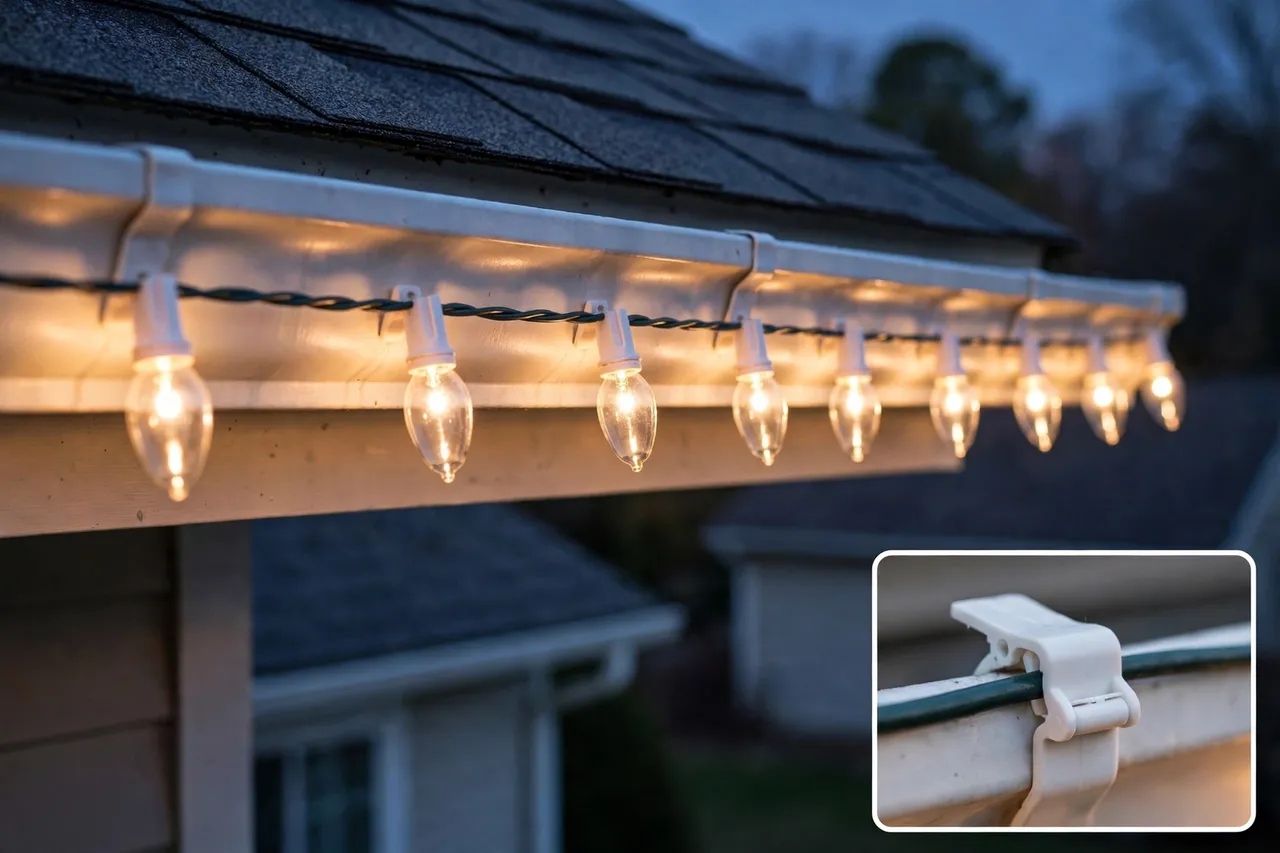
The roofline is the single most effective place to put outdoor Christmas lights, because one neat line of bulbs along the eaves outlines the whole house and reads from the end of the street. C9 bulbs are the classic roofline choice: big, bright, and visible from far away. A 100-count Home Accents Holiday C9 LED string gives 65 feet 4 inches of lit length and lists at $59.98 at Home Depot, checked Nov 12, 2026. Hang them with plastic gutter or shingle clips, never nails or staples, which cut the wire and damage the house. For the full roofline treatment, see our rooftop Christmas decorations guide.
Measure the roofline with a piece of string first, then buy lights a little longer than you need. A strand that falls short by a few feet is far more annoying than a spare loop tucked behind a downpipe. Measure first, buy second — the string never lies and the guess always costs a second trip.
Mini, Net, and Icicle Lights: Trees, Bushes, and Eaves
Mini lights wrap trees and bushes, net lights drape over shrubs in one quick throw, and icicle lights hang from the eaves in drops of different lengths. A 100-count Home Accents Holiday mini LED string lists at $9.98 at Home Depot, reported Oct 19, 2026, and covers about 29 feet. Use the rule of thumb of about 100 lights per foot of tree height for a full look, and put net lights on before the first hard frost, while the branches are still flexible. For street-facing drama, streetlight Christmas decorations and a lit lamp post carry the glow to the curb — our Christmas lamp post decoration guide shows how.
Pathway Lights: The Welcome Guests Actually Walk Through
A dark path kills the whole display, even if the porch looks lovely, so light the walk to the door. Stake lights every three or four feet along the walkway edges, or set lanterns with LED candles in a row. Keep every cord flat along the edge where nobody trips on it, and tape connections up off the ground so they never sit in a puddle. The path is the part guests touch with their feet, so it deserves the same care as the roofline.
Inflatables, Figures, and Projectors: The Showpieces
Inflatables, figures, and projectors are the showpieces of the yard — the one big thing that makes drivers slow down. Pick one showpiece, not five, because a yard with one clear star looks designed and a yard with five looks like a sale bin. The showpiece sits where the frame already points the eye: the center of the lawn, or the biggest open patch of grass.
Inflatables: Big Impact, One Weak Spot
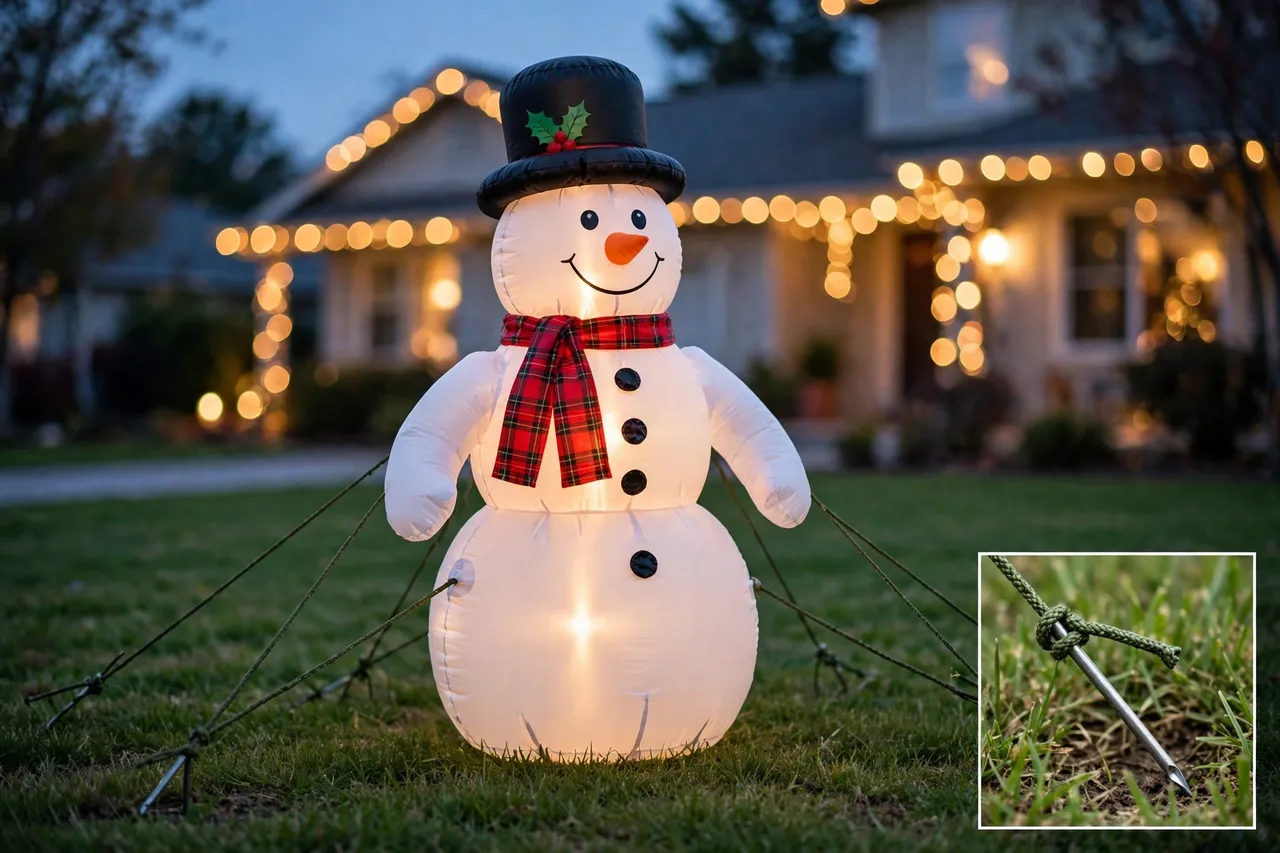
An inflatable is a light fabric shell held up by a small fan, so a breeze pushes on it like a sail. The fan runs the whole time the figure stands, and the figure deflates the moment the fan stops. Gemmy 6-foot Airblown inflatables list at $26.97 to $61.10 on Gemmy’s yard-decor shop, checked Nov 12, 2026, and most 6-foot models include the stakes and tethers in the box. Our inflatable outdoor decorations guide covers the full range, from snowmen to Santas.
Anchoring is the part that actually matters, and it is where most inflatables fail. Drive steel or spiral stakes at a 45-degree angle pointing away from the base, attach a tether at every anchor point, and spread them wide. On pavers or concrete, use sandbags instead of stakes — our weights for outdoor Christmas decorations guide covers the options. Stakes plus tethers, every time — the plastic pegs in the box hold on calm days and quit on the first real gust. In a windy spot, keep the figure under 8 feet tall, and deflate it before a storm: wind tears are not covered under most warranties.
Figures and Yard Art: Character That Never Needs Power
Figures and yard art give the yard its character without a fan or a cord. Wooden reindeer, metal stars, and lit deer stand through wind and rain with nothing more than a stake in the ground. A wooden Christmas yard art piece or outdoor metal Christmas decorations suit a classic yard, while wood Christmas decorations outside add a handmade feel. For themed yards, outdoor Grinch Christmas decorations, Whoville outdoor Christmas decorations, and Disney outdoor Christmas decorations each make one clear statement. Outdoor animal Christmas decorations, outdoor elf decorations, Father Christmas outdoor decorations, and outdoor cat Christmas decorations cover the characters kids ask for by name, and Christian outdoor Christmas decorations carry the nativity theme. A Santa and sleigh yard decoration anchors the classic scene in the center of the lawn. One themed figure, placed where the roofline already points, beats five figures fighting for attention.
Projectors: The Whole House in Ten Minutes
A projector throws light across the whole front of the house from one stake in the lawn, and it is the fastest way to decorate a big house. The Govee Outdoor Projector Light H7073 lists at $99.99 (list $149.99) on Govee’s own store, checked Nov 4, 2026, with laser patterns, an LED aurora effect, and an IP65 rating. The budget pick is the Star Shower Ultra 9 at $29.99, also checked Nov 4, 2026. Set the projector back far enough that the pattern covers the wall without stretching, aim it above the windows, and keep the stake out of the walkway. A projector is the right call when the ladder is the part you would rather skip — but it looks best over a house that already has a lit roofline, not instead of one.
Porch, Door, and Driveway: The Welcome Up Close
The porch, the door, and the driveway are the welcome up close — the parts guests actually touch, so they deserve the warmest light and the tidiest work. Start at the door and work outward: wreath and garland first, then lanterns and planters, then the pathway, then the yard piece. That order keeps the display coherent from the doorstep to the street.
Hang a pre-lit wreath on an over-door hook at eye level, and wire garland to the railing at three points so wind cannot peel it off. Our Christmas decorations on the front door guide covers wreaths, garlands, and bows, and Christmas decor on the porch pulls the whole entrance together. A Christmas porch leaner fills a bare wall, Christmas lantern decorations with LED candles glow without a flame, and Christmas decorations for outdoor planters turn summer pots into winter pieces. Christmas present outdoor decorations stacked by the door read as gifts, not clutter, when they match the style. Three pieces, one style, at the door — that is the whole porch formula.
Do not forget the driveway. Decorating the driveway for Christmas with lit stakes or a pair of figures at the entrance frames the arrival, and a balcony Christmas decorations setup does the same job for a flat or a small home with no yard at all. A small stoop needs only three pieces — wreath, lantern, and one lit planter — and that is a complete display, not a half-finished one.
How to Plan Your Layout by Yard Size and Budget
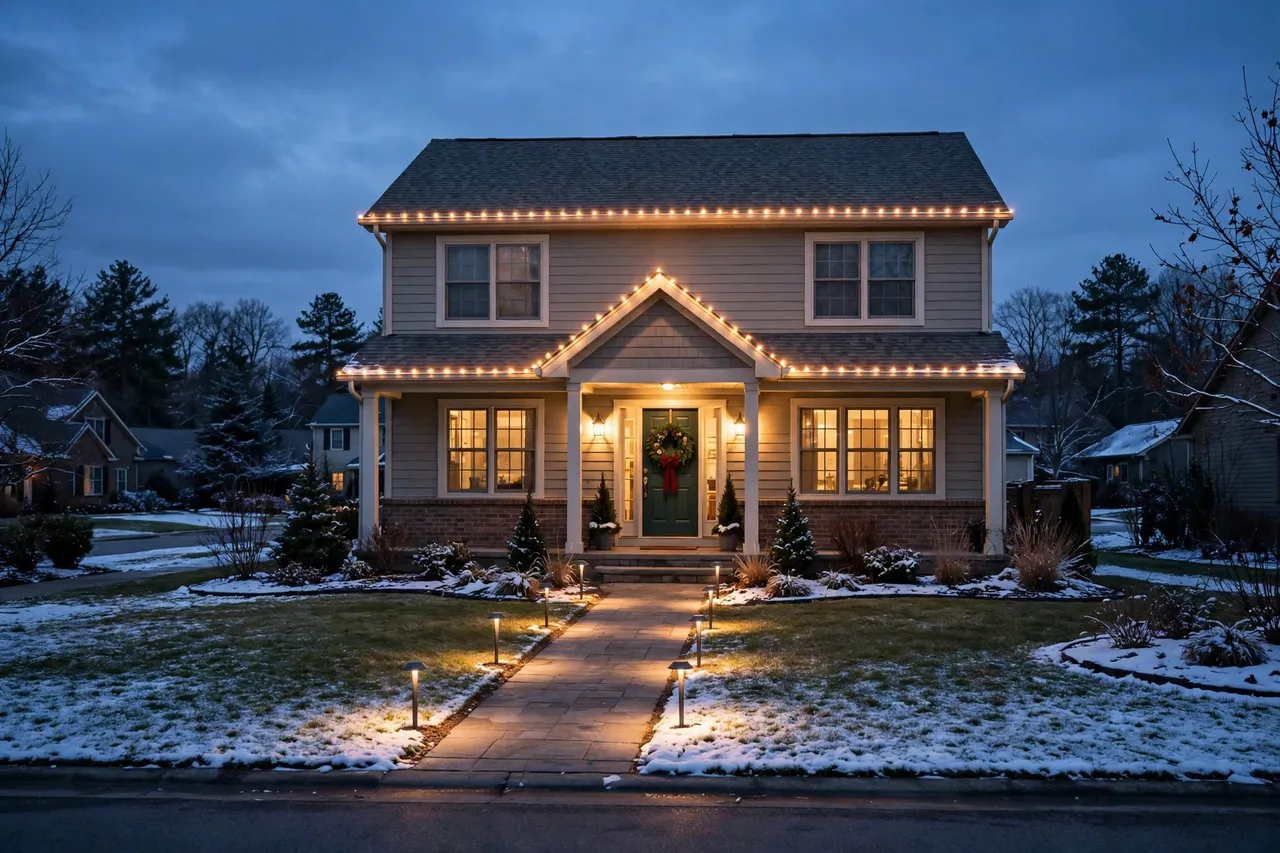
Plan your layout by yard size and budget before you buy, because the same display that glows on a small stoop disappears on a big lawn — and the same display that fills a big lawn bankrupts a small budget. Measure the roofline, count the outlets, and walk the yard once at dusk to see where the dark spots are. Then buy to the plan, not to the sale rack.
| Yard | Frame | Showpiece | Welcome | Typical cost |
|---|---|---|---|---|
| Small stoop or balcony | 1 mini string, 29 ft | None — the door is the star | Wreath, lantern, planter | About $60–$100 |
| Medium yard | 1 C9 roofline string, 65 ft | 1 inflatable or projector | Wreath, garland, 2 lanterns | About $200–$350 |
| Large yard | 2–3 C9 strings, 130–195 ft | 1 inflatable + 1 projector | Full porch + pathway lights | About $500–$800 |
Worked example: a medium yard at the prices above runs one C9 string at $59.98, one 6-foot Gemmy inflatable at about $27 to $61, and a pre-lit wreath and two lanterns at roughly $60 to $90 — about $200 to $250 before cords and a timer. Add one outdoor timer and one outdoor-rated extension cord to every tier, because both pay for themselves in the first season. If you want the plan drawn out, our outdoor Christmas displays guide shows full layouts, and an outdoor Christmas countdown keeps the build on schedule. Buy to the plan, not to the sale rack — the plan is what makes $200 look like $500. The next section is the one that saves the most money, because it lists the mistakes that send people back to the store twice.
What Most People Get Wrong About Outdoor Christmas Decorations
Most people get outdoor Christmas decorations wrong in the same three ways: they buy before they plan, they mix warm and cool white lights in the same display, and they plug everything into one outlet. The first mistake wastes money, the second makes the house look unfinished, and the third trips the breaker on the coldest night of the year. All three are free to avoid.
The most common mistake is believing more decorations make a better display. They do not. More decorations make a busier yard, not a better one — one style, one showpiece, and a lit path beat a crowded lawn every time. The second mistake is using indoor lights and indoor cords outside, where rain turns a small fault into a shock or a fire. The third is hanging lights with nails or staples, which cut the wire and void the warranty in one move. Fix those three and the display is already better than most of the street.
One more belief deserves correcting: a projector alone is not a display. It throws light on a dark house, and a dark house with moving dots still reads as unfinished. Pair the projector with a lit roofline and a lit porch, and the same projector suddenly looks like a professional job. That pairing is the difference between a yard people photograph and a yard people drive past.
Weather-Proofing and Safety: Cords, GFCI, and Ladders
Weather-proofing and safety come down to three rules: outdoor-rated everything, GFCI protection on every circuit, and connections kept dry and off the ground. An estimated 860 home fires a year begin with holiday decorations, according to the National Fire Protection Association figures published by the Electrical Safety Foundation International — and most of them start with a cord or a connection, not with the lights themselves.
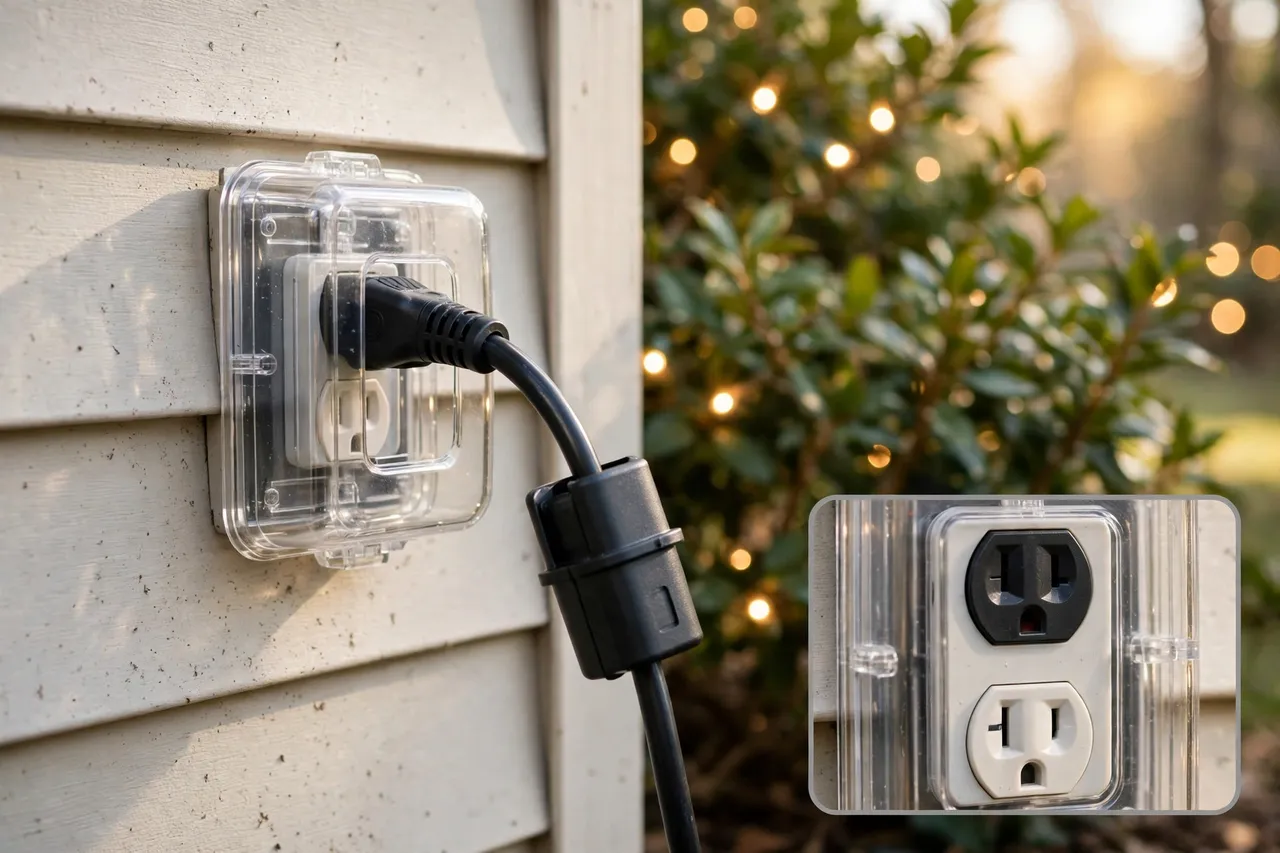
Plug every outdoor light and decoration into a GFCI-protected outlet, and test the GFCI with its test button before the season starts. Use only extension cords marked for outdoor use, and never connect more than three strings of incandescent lights end to end — the limit is on the tag molded into the first plug, and it wins over any guess. Lift every connection off the ground, clip it to the house or a stake, and keep it away from puddles, downspouts, and the drip line of the roof. Home Guardians’ outdoor light safety guide walks through the same checks — rain, snow, tripping GFCIs, and ladders — in plain detail. GFCI protection, outdoor-rated cords, and dry connections: skip any one of the three and the other two cannot save the display.
For the ladder work, set the base one foot out from the wall for every four feet of height, extend the ladder three feet past the roof edge, keep three points of contact, and never work from the top three rungs. Use a fiberglass or wooden ladder near power lines, never a metal one, and never set a ladder on ice or mud. Hang lights with proper clips and never drill holes you do not need — over-door hooks, suction hooks on glass, and removable adhesive hooks hold a wreath and a garland without a single screw. If the roofline is the part you dread, hire it out: a pro install costs less than a fall. That ladder advice is the part of this guide that matters most, and the storage section next is the part that saves the most money next year.
How Much Do Outdoor Christmas Decorations Cost to Run?
Outdoor Christmas decorations cost far less to run than most people fear, because LED lights are the cheapest part of the display to operate. A decorative light string that has earned the ENERGY STAR uses approximately 70% less energy than an incandescent string, according to ENERGY STAR, and the U.S. Department of Energy puts LED savings at 75% or more. A 100-bulb LED mini string draws only a few watts — less than a nightlight — so a whole yard of LED strings costs pennies a night.
Inflatables cost more than lights but still little: a typical 5-to-8-foot inflatable with a 120-volt blower costs about $3.80 for a 40-night season on PG&E rates when it runs on a timer from 5 to 10 p.m., and about $17.40 if it stays inflated around the clock. A timer is the cheapest upgrade in the whole display — it cuts an inflatable’s season cost by about three quarters. Set the timer for dusk to bedtime, turn everything off when you leave the house or go to sleep, and the power bill barely notices December.
When to Put Them Up — and When to Take Them Down
Put outdoor Christmas decorations up on a dry, mild day in early to mid November, and switch them on when the season starts. Hanging them in November beats hanging them in December, when cords turn stiff, clips turn brittle, and the ladder work gets miserable. Most people install between Thanksgiving and the first weekend of December, and hanging them a few weeks early on a pleasant day is the smart move — the lights can sit unplugged on the roofline until you are ready to switch them on.
Take them down in early to mid January, on a mild, dry day, before the coldest stretch of winter. Leaving seasonal lights up through spring adds wear from sun, ice, and wind, and the longer they stay up, the more likely you are to find damaged sections next November. Up in November, down in January — the calendar is the cheapest weather-proofing there is. Check your HOA rules first: some neighborhoods set a takedown date, and a fine wipes out the savings from a cheap string.
Storage After the Season: So It All Works Next Year
Storage after the season decides whether next November starts with working lights or with a shopping trip. Take everything down on a dry day, coil each string loosely around a card reel or your elbow, and label every reel with where it hung — roofline, tree, porch. Store lights in a dry, cool place in breathable bags or bins, never in a damp garage corner, and keep garlands in breathable bags so they do not trap moisture.
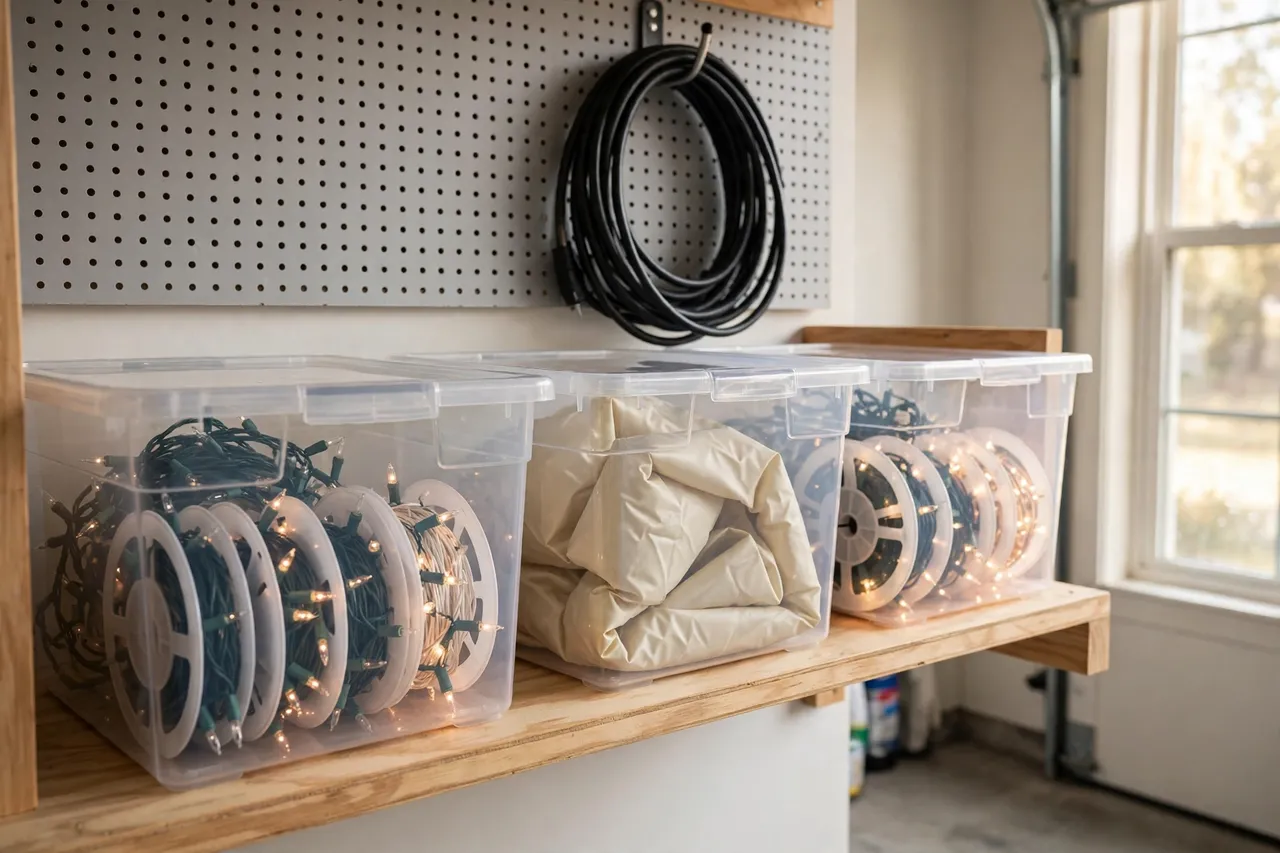
Test every string on the ground before it goes into the box, and throw out anything frayed, cracked, or pinched — a damaged string in storage becomes a hazard next year. Deflate inflatables fully, dry the fabric, fold them loosely, and store them where mice and sharp tools cannot reach them. Label the box with the spot it belongs to and the year it was last tested — future you will thank present you in November. A display that is stored right costs nothing next year except the new pieces you actually want.
7 Mistakes That Ruin an Outdoor Display
Seven mistakes ruin more outdoor displays than bad weather does, and every one of them is avoidable. Read this list before you buy, because fixing a mistake in November costs minutes and fixing it in December costs a ladder trip in the cold.
- Mixing warm white and cool white lights in the same display — pick one color temperature and commit to it.
- Using indoor cords or indoor lights outside — rain and indoor ratings do not mix.
- Plugging everything into one outlet — spread the load across circuits and follow the three-string limit on the tag.
- Hanging lights with nails or staples — use clips made for the cable, and leave a small slack loop at every fixing point.
- Skipping the stakes and tethers on an inflatable — the plastic pegs in the box are a starting point, not an anchor.
- Leaving connections on the ground — lift them, cover them, and keep them out of puddles and shovel paths.
- Leaving the display up all year — seasonal lights are not built for year-round sun, ice, and wind.
If you only avoid one item on that list, make it the first: one color temperature holds a display together, and two make it look like two different houses. Vintage outdoor Christmas decorations suit a warm-white classic display, while a modern single-color display pairs with clean silhouettes and very little ornament. And if you would rather build than buy, our do-it-yourself outdoor Christmas decorations guide covers the handmade route, including outdoor Christmas decorations for the wall and Christmas fence decorations that frame the yard without a single plug.
Related Guides
Every guide below covers one piece of this display in depth. Read the one that matches the spot you are still unsure about.
- Christmas decor exterior ideas — styles and looks for the whole front of the house.
- Christmas decor on the porch — the full entrance, pulled together.
- Christmas decorations on the front door — wreaths, garlands, and bows.
- Inflatable outdoor decorations — the full range, snowmen to Santas.
- Outdoor Grinch Christmas decorations — the Grinch, Max, and Whoville spirit.
- Father Christmas outdoor decorations — the classic Santa figure.
- Christmas lamp post decoration — light that carries to the curb.
- Outdoor metal Christmas decorations — stars, reindeer, and figures that last.
- Wood Christmas decorations outside — handmade warmth for the yard.
- Outdoor Christmas countdown — keep the build on schedule.
- Outdoor Christmas displays — full layouts by yard size.
- Rooftop Christmas decorations — the roofline, done properly.
- Christian outdoor Christmas decorations — the nativity theme.
- Outdoor elf decorations — elves for the lawn and the porch.
- Wooden Christmas yard art — reindeer, signs, and cutouts.
- Weights for outdoor Christmas decorations — sandbags, stakes, and anchors.
- Outdoor animal Christmas decorations — reindeer, penguins, and more.
- Decorating the driveway for Christmas — frame the arrival.
- Christmas decorations for outdoor planters — winter pots by the door.
- Whoville outdoor Christmas decorations — the full Whoville look.
- Streetlight Christmas decorations — glow that reaches the street.
- Outdoor Christmas decorations for the wall — bare walls, dressed.
- Outdoor cat Christmas decorations — cats for the yard.
- Do-it-yourself outdoor Christmas decorations — build it yourself.
- Christmas porch leaner — fill a bare porch wall.
- Christmas lantern decorations — glow without a flame.
- Christmas present outdoor decorations — gift boxes by the door.
- Christmas fence decorations — frame the yard.
- Balcony Christmas decorations — a full display with no yard.
- Vintage outdoor Christmas decorations — the classic look.
- Disney outdoor Christmas decorations — Mickey, Minnie, and friends.
Disclaimer: Outdoor Christmas decorating involves ladders, roof work, and outdoor electricity. If you are not comfortable with any of that, hire a licensed electrician or a professional installer. Never work on a roof or a ladder in wet, icy, or windy weather, never use indoor-rated lights or cords outside, and always plug outdoor decorations into GFCI-protected outlets. If a cord is damaged or a GFCI keeps tripping, unplug everything and replace the damaged piece — do not bypass the protection.
Frequently Asked Questions
How early should I put up outdoor Christmas lights?
Most people install outdoor Christmas lights between Thanksgiving and the first weekend of December. Some start earlier for extended holiday enjoyment, while others wait until closer to Christmas to avoid weather damage. Hanging them on a dry, mild day in November is the easiest option.
How do you stop a Christmas inflatable from blowing away?
Stakes and tethers together: drive 20–25 cm steel or spiral stakes at 45 degrees pointing away from the base, attach tethers at every anchor point, and spread them wide. On hard surfaces use 5–10 kg sandbags instead of stakes.
Can I leave Christmas lights up all year?
It is not recommended. Prolonged exposure to sunlight, rain, and temperature swings shortens lifespan. Remove them by January or February for best longevity, and store them dry so they work next season.
How do I hang lights without drilling holes?
Use universal shingle or gutter clips for the roofline, over-door hooks for the wreath, suction hooks on glass, and removable adhesive hooks on smooth surfaces. Battery lights and fairy lights need no fixings at all, and a garland wired to a railing stays put without a single screw.
How many strings of Christmas lights can I connect together?
Follow the manufacturer’s instructions on the package. The Electrical Safety Authority advises connecting no more than three light strings together and not overloading any one outlet or extension cord. On a long roofline, plan a few shorter runs back to your power source.
Start at the front door this weekend: one style, one focal point, and a tape measure. Hang the frame first, set the showpiece second, and light the porch last — then step to the street at dusk and look at what you built. The yard that wows the street is not the yard with the most boxes. It is the yard with a plan.
💡 Practical Home Tip: Put the timer on before the first night, not after the first bill. Set it for dusk to bedtime on day one, and the display will look after itself all season — no late-night trips to the outlet, no lights burning till dawn, and no surprise on the power bill.